Evolution (Linux)


Barrier-free

This page contains alternative texts for images/graphics.


Setup

When you start Evolution for the first time, or if you haven't set up an account yet, a wizard will automatically start to help you include your email accounts.


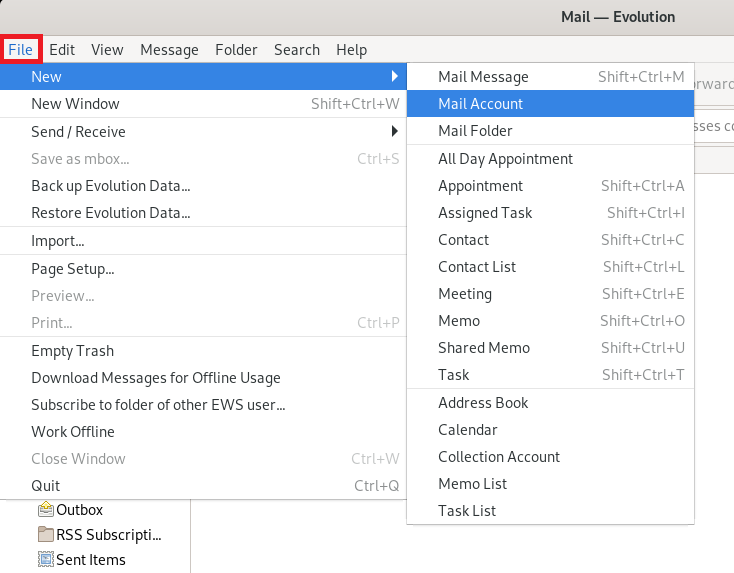
If you have already included email accounts in Evolution, you can start the setup dialog as follows:

File → New → Mail Account


Window, far right Email - Evolution. Menu bar, selected File. Below that the menu, selected first item New. On the right the submenu, selected second item Mail Account.


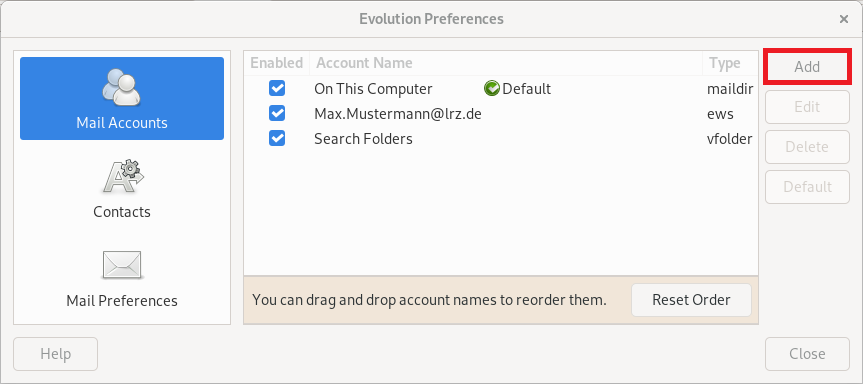
... or via the Preferences of Evolution:

Edit → Preferences


Window Evolution Preferences. Left column centered 3 items, each with icon and below naming, selected first item Mail Accounts. On the right the main field. Table with 3 columns and 3 entries. Entry 1. Enabled column, checked box. Wide column Account Name, On This Computer, icon check mark on circle, Default. Type column, maildir. Entry 2. Enabled column, checked box. Width column Account Name, Max.Mustermann AT lrz.de. Type column, ews. Entry 3. Enabled column, checked box. Width column Account Name, Search Folder. Type column, vfolder. Bottom selected, You can drag and drop account names to reorder them, Button Reset Order. To the right of that, one below the other, 4 buttons, highlighted Add, dimmed 3 times Edit, Delete, Default. At the bottom left, Help button, right Close button.


Window Welcome. Left column. Selected Welcome, Restore from Backup, Identity, Retrieving Email, Sending Email, Account summary, Done. Main field on the right. Upper part empty. Welcome to the Evolution. The next few screens will allow Evolution to connect to your accounts, and to import files from other applications. Below part empty. Alternatively, you can (beginn clickable) create a collection account (end clickable) open bracket email, contacts and calendering closed bracket instead. Empty checkbox, Do not show this wizard again. At the very bottom right, Cancel, Next buttons.


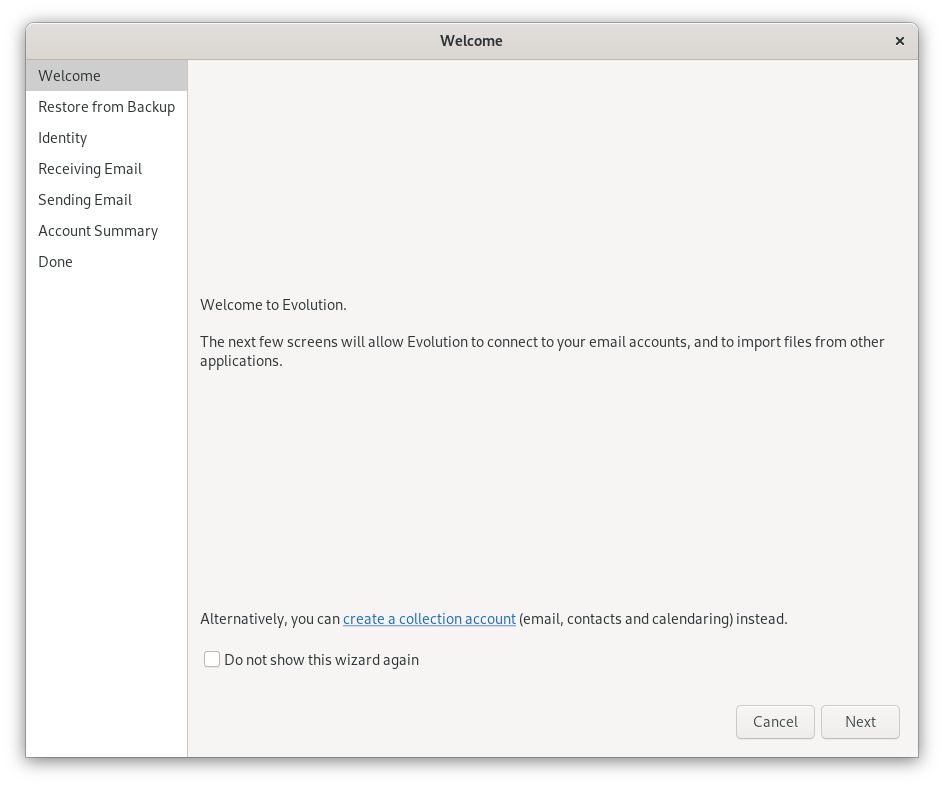
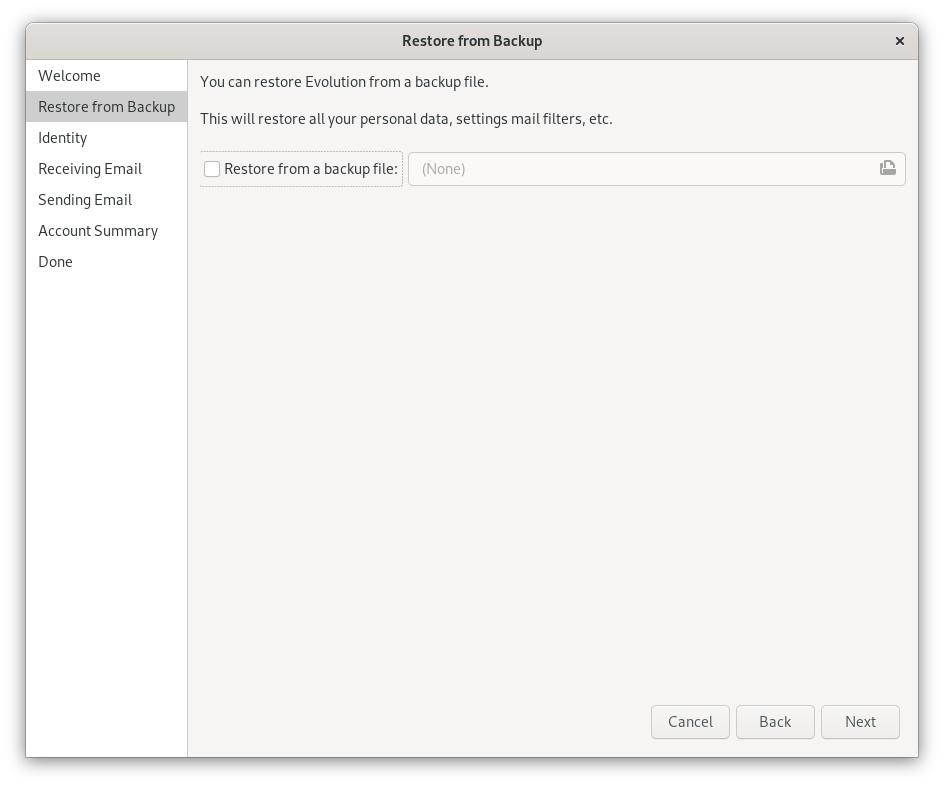
In the next step, you have the possibility to restore Evolution from a backup file. Click Next.

Please note, this option is only available if you are launching Evolution for the first time. 

Window Restore from Backup. Left column. Welcome, selected Restore from Backup, Identity, Retrieving Email, Sending Email, Account summary, Done. Main field on the right. You can restore Evolution from a backup file. This will restore all your personal data, settings mail filters, etc. Empty checkbox, Restore from a backup file, colon. Empty Input field. At the very bottom right, Cancel, Back and Next buttons.


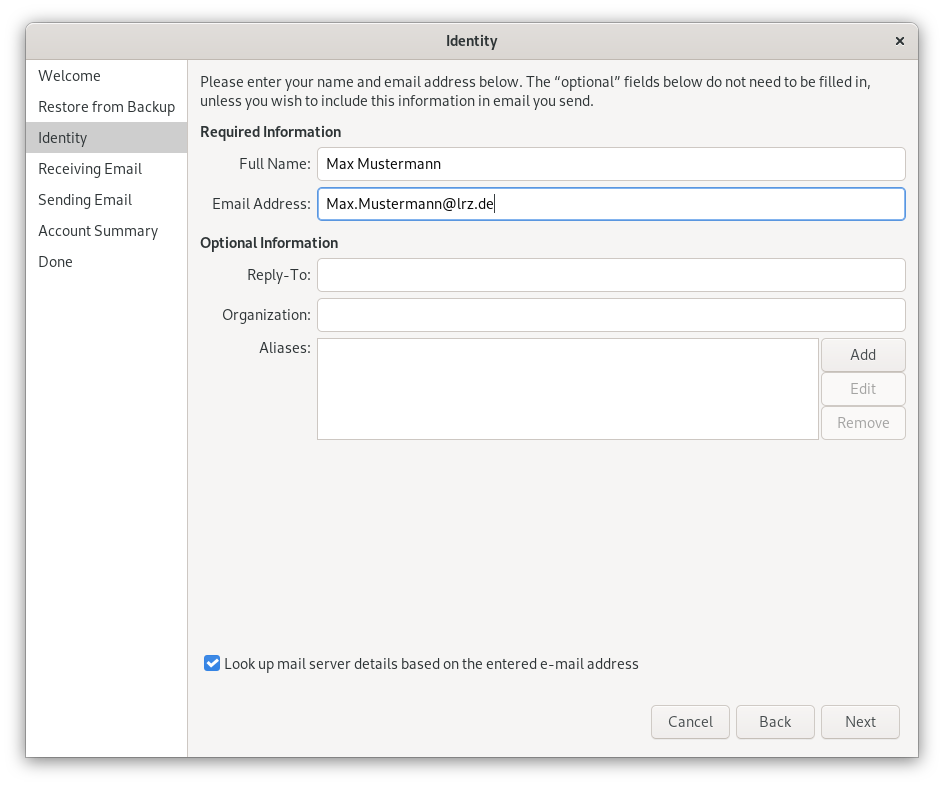
Enter your Full Name and Email Address here and confirm with "Next".

Window Identity. Left column with 7 points, selected point 3, Identity. On the right, the main field. Please enter your name and email address below. The 'optional' fields do not need to be filled in, unless you wish to include this information in email you send. Required Information. Full name, input field Max Mustermann. Email Address, input field Max.Mustermann At lrz.de. Optional Information (labeled 'Optional' above). Reply-To, empty input field. Organization, empty input field. Aliases, larger empty input field, to the right of it one below the other 3 buttons, Add, 2 times dimmed Edit, Remove. Pretty far down, box with check mark, Look up mail server details based on the entered e-mail address. At the bottom right, 3 buttons Cancel, Back, Next.


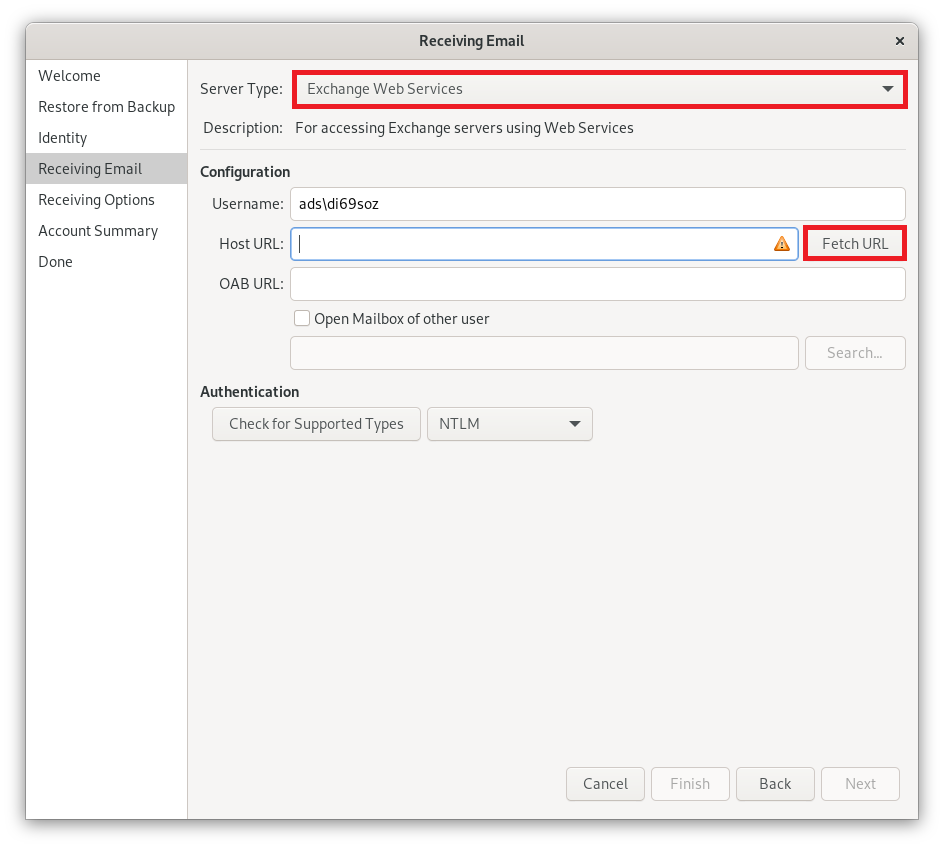
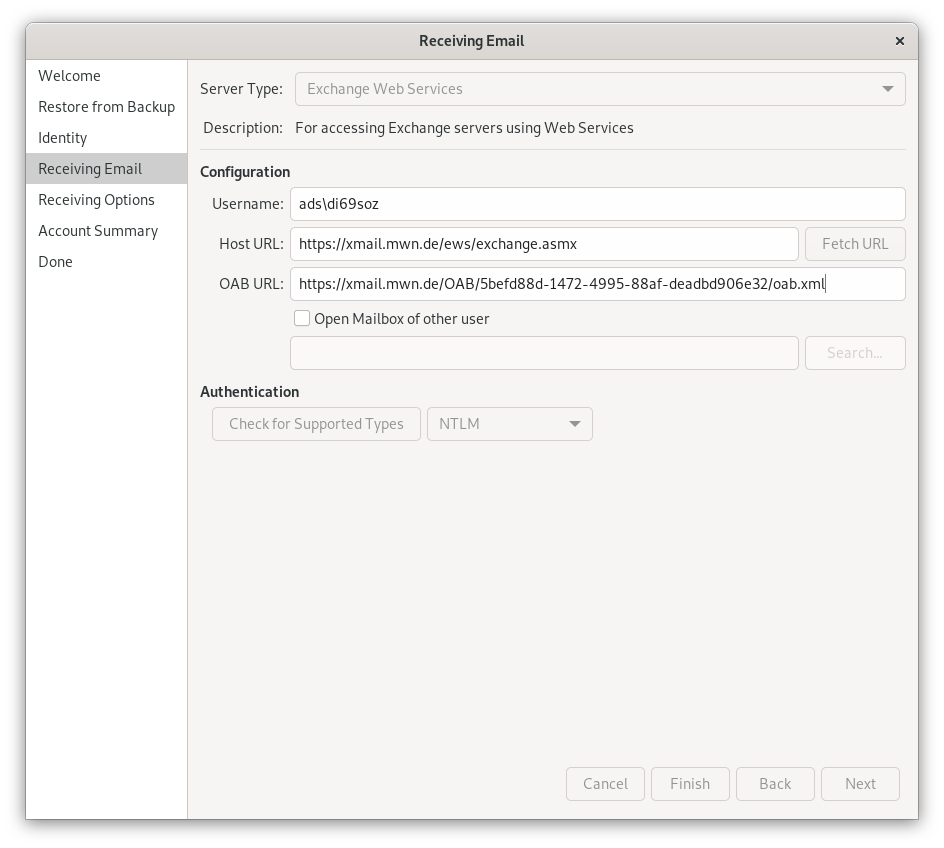
Select here at "Server Type" Exchange Web Services. And for User name, enter your account preceded by " ads\ ".

Click Fetch URL and confirm the following Host URL: 

Window Retrieving Email. Left column with 7 items, selected item 4, Retrieving Emails. On the right, the main field. Server Type, selected checkbox Exchange Web Services. Description, For accessing Exchange servers using Web Services. Configuration. Username, input field ads backslash di69soz. Host URL, Empty input field, right button Fetch URL. OAB address, empty input field, below empty box, Open Mailbox of other user, below empty input field, right dimmed button Search... Authentication. Check for Supported Types, checkbox NTLM. At the very bottom right, 4 buttons Cancel, dimmed Finish, Back, dimmed Next.


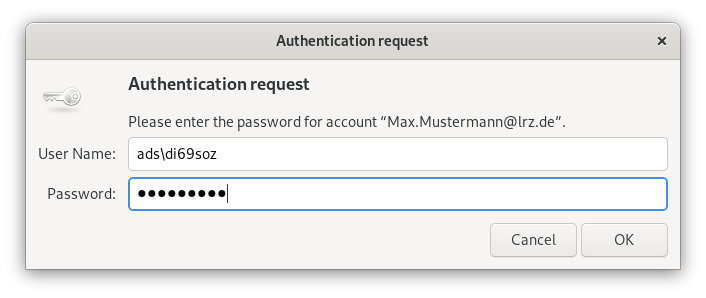
You will now be asked for your password. Enter this and click OK.


Window Authentication request. Icon Key, Authentication request. Please enter the password for the account 'Max.Mustermann At lrz.de'. User Name, input field with text ads backslash di69soz. Password, input field thickness dots. At the very bottom right, Cancel, OK buttons.


After authentication, the Host URL and the Url to the offline address book (OAB URL) is automatically configured.

Window Retrieving Email. Left column with 7 items, selected item 4, Retrieving Emails. On the right, the main field. Server Type, selected checkbox Exchange Web Services. Description, For accessing Exchange servers using Web Services. Configuration. Username, input field ads backslash di69soz. Host URL, input field https colon slash xmail.mwn.de slash ews slash exchange.asmx, right button Fetch URL. OAB address, input field https colon slash xmail.mwn.de slash OAB slash 32 sedecimal digits with 4 minus signs slash oab.xml, below empty box, Open Mailbox of other user, below empty input field, right dimmed button Search... Authentication. Check for Supported Types, checkbox NTLM. At the very bottom right, 4 buttons Cancel, dimmed Finish, Back, dimmed Next.


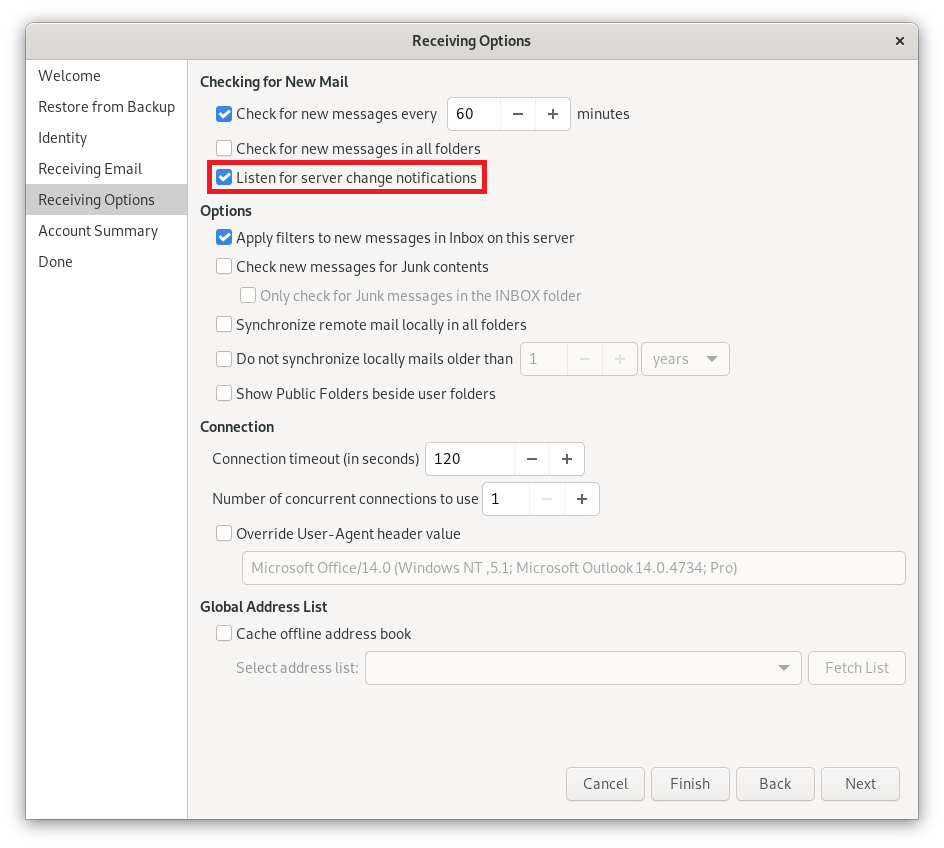
Make sure that the "Listen for server change notifications" checkbox is checked so that emails can be automatically retrieved from the server.

Window Receiving Options. Left column with 7 items, selected item 5, Receiving Options. On the right the main field. Checking for New Mails. Check box, Check for new messages every, input field 60, minus sign button, plus sign button, minutes. Empty box, Check for new messages in all folders. Checked line, box with tick, Listen for server change notifications. Options. Checked box, Apply filter to new messages in the Inbox on this server. Empty box, Check new messages for Junk content, indented and dimmed below Empty box, Only check the for Junk messages in the INBOX folder. Empty box, Synchronize remote mail locally in all folders. Empty box, Do not synchronize locally mails older than, rest dimmed, input field 1, minus sign button, plus sign button, years selection field. Empty box, Show Public Folders beside user folders. Connection. Connection timeout (in seconds), input field 120, minus sign button, plus sign button. Number of concurrent connections to use, input field 1, dimmed minus sign button, plus sign button. Empty box, overwrite User-Agent header value, indented dimmed Microsoft Office slash 14.0 input field below, more detailed information in brackets. Global address list. Empty box, Cache offline address book, indented hidden line below, Select address list, empty selection box, Fetch list button on right. At the very bottom right, 4 buttons Cancel, Finish, Back, Next.


In the next step you can change the name of the Account Information.

Then you can complete the setup.


Shared Mailbox


Shared mailboxes offer the possibility to work together on a mailbox. Application scenarios are, for example, function addresses (such as info@domain.de) or common chair calendars (e.g. for vacation planning) or even common contacts of the chair, which all may read or which several people manage together.

In Evolution, you do not include a shared mailbox as another mailbox as in Outlook, but you subscribe to the individual folders of the shared mailbox. A shared mailbox is therefore included in the same way as the shared folders of another user. The mail address of the shared mailbox is entered as an alias in your own account. Then, when sending an email, you can select the desired sender address from a drop-down menu.

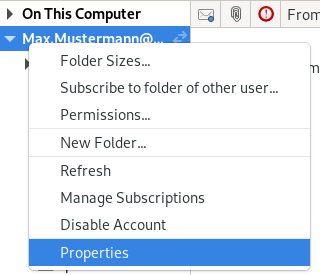
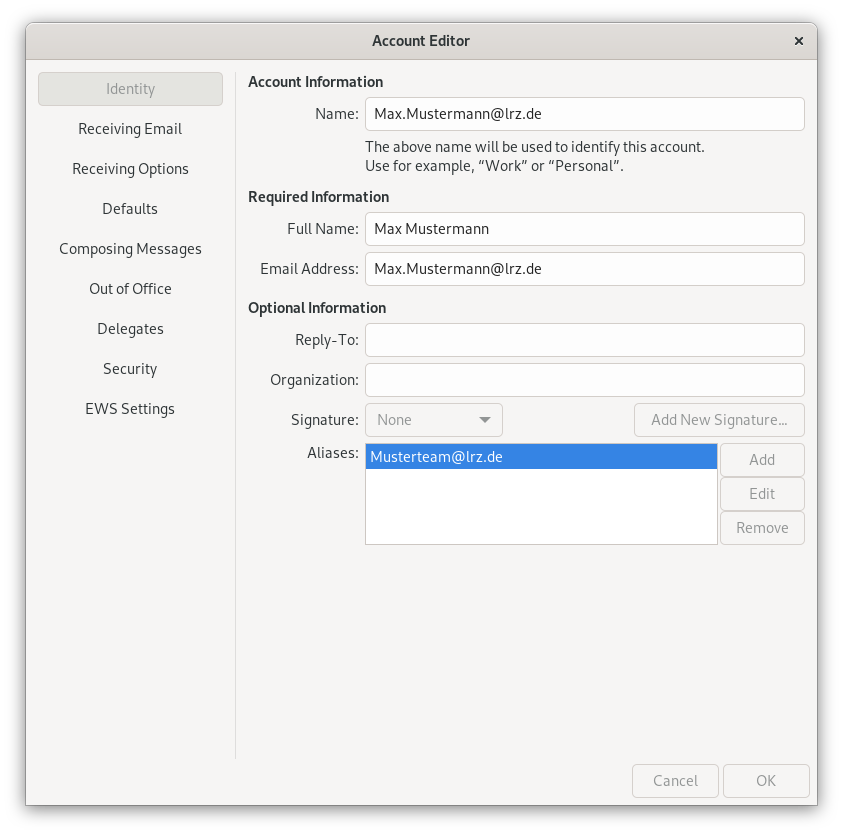
First, add the main mail address to the shared mailbox as an alias. To do this, open the properties by right-clicking on the top level of the mailbox (here: Max.Mustermann@lrz.de).

Window pane. Arrowhead to the right for not unfolded, On This Computer. Arrowhead down for unfolded, Max.Mustermann At lrz.de. Overlaid by context menu with 8 items, selected item 8 Properties.


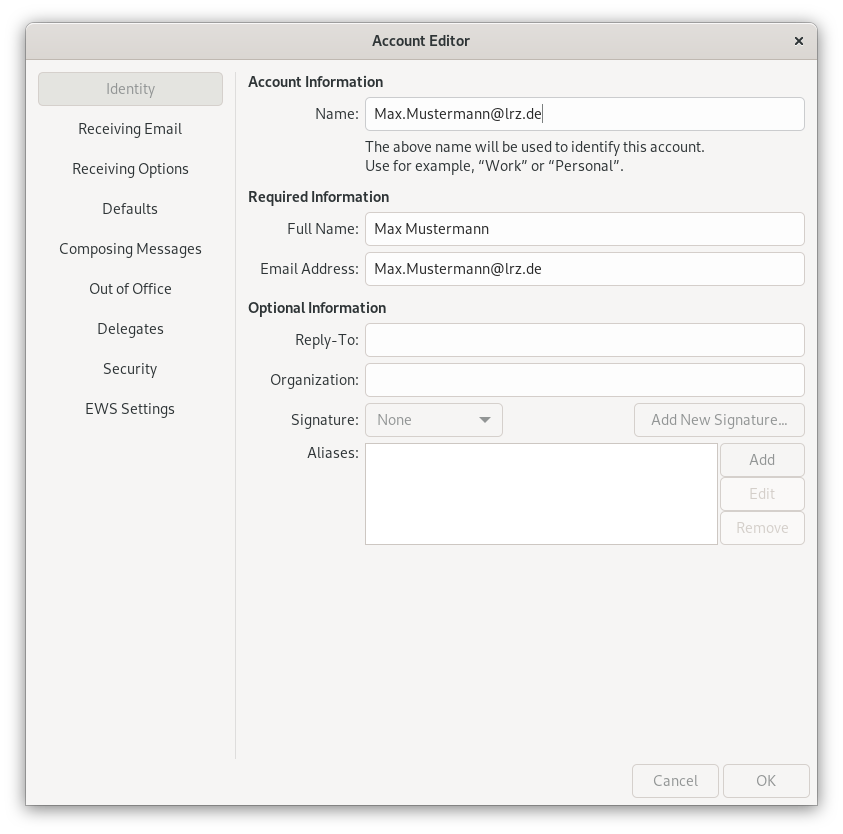
Then click "Add" at the bottom right of the window. Enter the mail address of the shared mailbox in the line that appears and click "OK".


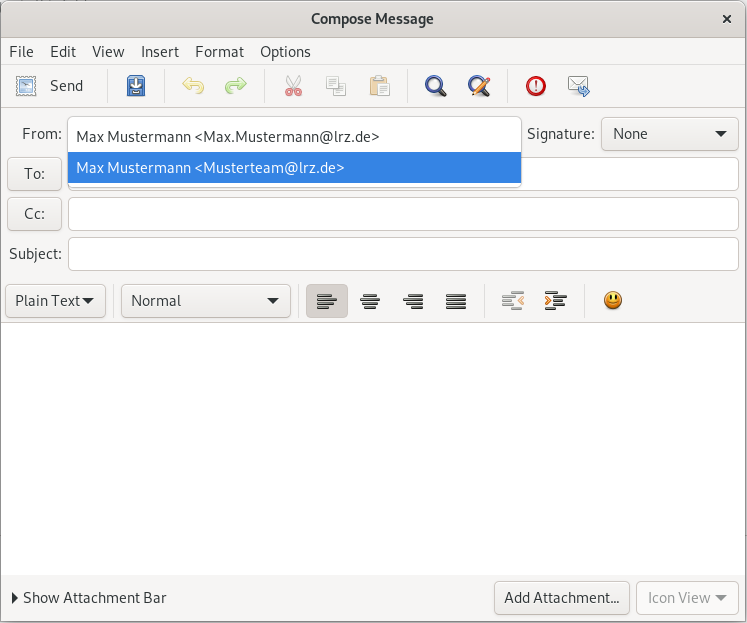
If you want to write an email from the shared mailbox now, click on "New". Click on the field where the sender address is located and then select the desired sender address.

Account editor window as before with modification Aliases, larger input field marked Musterteam At lrz.de, right of it one below the other 3 buttons, Add, Edit, Remove. At the bottom right, buttons Cancel, OK.


Window Compose Message. Menu bar. Toolbar. From, selected input field Max Mustermann Smaller character Max.Mustermann At lrz.de Larger character, Signature, selected field None. To, selected input field Max Mustermann Kleinerzeichen Musterteam At lrz.de Larger character. The rest is empty.


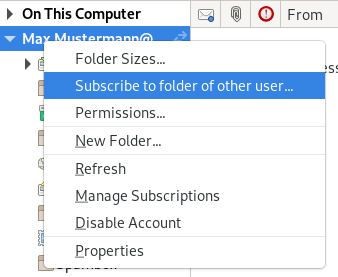
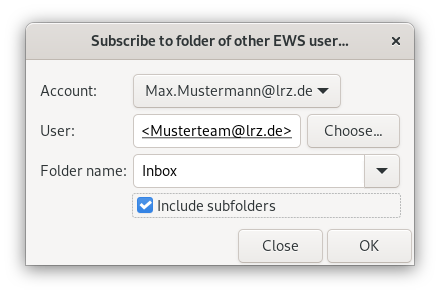
Then subscribe to the mail folders. Again, right-click on the top level of the mailbox and then select "Subscribe to folder of other user...".

Window pane. Arrowhead to the right for not unfolded, On This Computer. Arrowhead down for unfolded, Max.Mustermann At lrz.de. Overlaid by context menu with 8 items, selected second item, Subscribe to folder of other user...


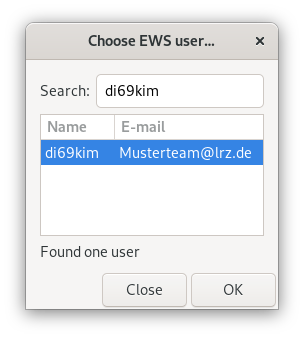
To search for the shared mailbox, click Choose and enter the identifier or email address and select the mailbox from the list.

Small window Choose EWS user... Search, input field di69kim. Table with 2 columns and a selected entry. Name column, di69kim. Column E-Mail, Musterteam At lrz.de. Below the table, Found one user. Below, buttons Close, OK.


Then select "Inbox" in the "Folder name" drop-down menu, check "Include subfolders" and click "OK". 

Small window Subscribe to folder of other EWS user... Account, selection field Max.Mustermann At lrz.de. User, input field Musterteam At lrz.de, Choose... button. Folder name, input field Inbox, attached selection field, below input field check box, Include subfolders. Bottom right, buttons Close, OK.


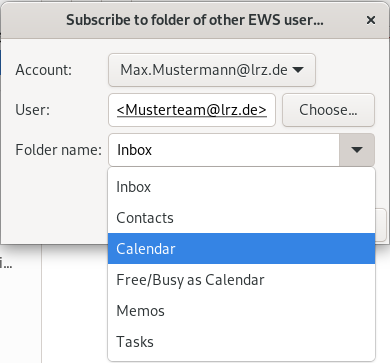
Add the calendar to the shared mailbox in the same way, but instead of Inbox select Calendar.


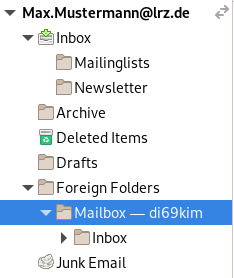
You now find the subscribed folders in your mailbox under "Foreign Folders". This is not a real folder in your mailbox. The developers of Evolution came up with this way of displaying shared folders. In other clients or in Ooutlook on the Web "Foreign Folders" does not appear, there a different display is used.

Window cutout. Arrowhead down for expanded, Max.Mustermann At lrz.de. In the folder structure unfolded Foreign Folders, below selected unfolded Mailbox - di69kim, below not unfolded Inbox.


Delegation

Set up delegate access

Open the settings and select the account for which you want to enter a delegation.

Window Evolution Preferences. Left column centered 7 items, each with icon and below naming, selected item 1 Mail Accounts. On the right the main field. Table with 3 columns and 3 entries. Entry 1st column Enabled , empty box. Wide column Account name, On this computer, icon tick on circle, default. Type column, maildir. Entry 2 is selected. Enabled column, box with check mark. Width column account name, Max.Mustermann At lrz.de. Type column, ews. Entry 3. column Enabled, empty box. Width column account name, Search Folders. Type column, vfolder. Selected below, you can drag and drop account names to reoder them, Button Reset Order. To the right of that, one below the other, 4 buttons, Add, Edit, Delete, Default. At the bottom left, Help button, right Close button.


Click on edit and then select "Delegates" in the column on the left side. Then click add.


Window Account Editor. Left column with 9 items, selected item 7, Delegates. On the right, the main field. Delegates. Delegates can send items on your behalf, includeing creating and resonding to meeting requests. If you want to grand folder permissions without giving send-on-behalf-of permissions, close this dialog box, right-click the folder, click Permissions and change the options there. Larger empty input field, right of it one below the other 3 buttons, Add, 2 times dimmed Remove, Properties. Deliver meeting requests addressed to me and responses to meeting requests where I am the organizer to, colon. Dimmed below that 3 items with radio buttons, the first of which is selected. My delegates only, but send a copy of meeting requests and responses to me (recommended), My delegates only, My delegates and me. At the very bottom right, buttons Cancel, OK.


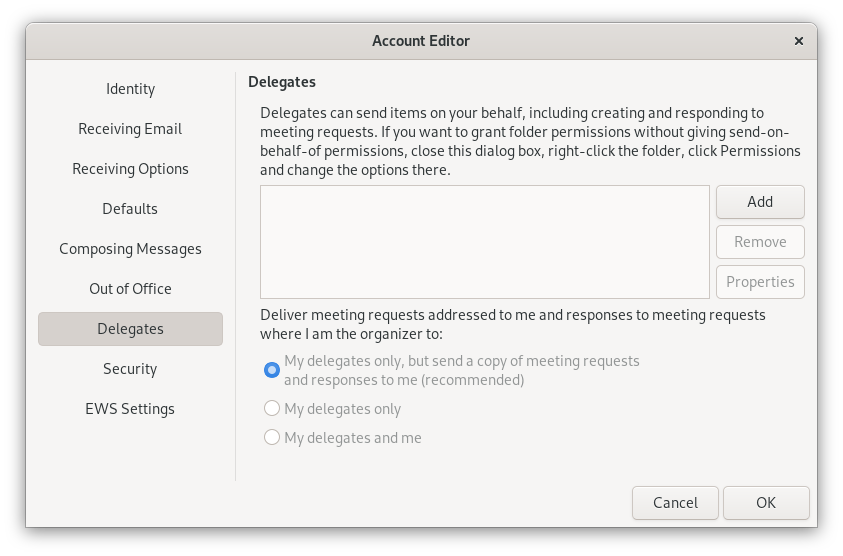
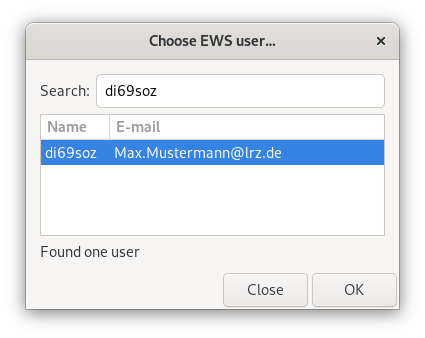
In the next window, search for the person who will represent you. To do this, search for the account, or e-mail address and then select the correct person from the list. Confirm the selection with "OK".

Small window Choose EWS user ... Search, input field di69soz. Table with 2 columns and a selected entry. Name column, di69soz. Column E-Mail, Max.Mustermann At lrz.de. Below the table, Found one user. Below, buttons Close, OK.

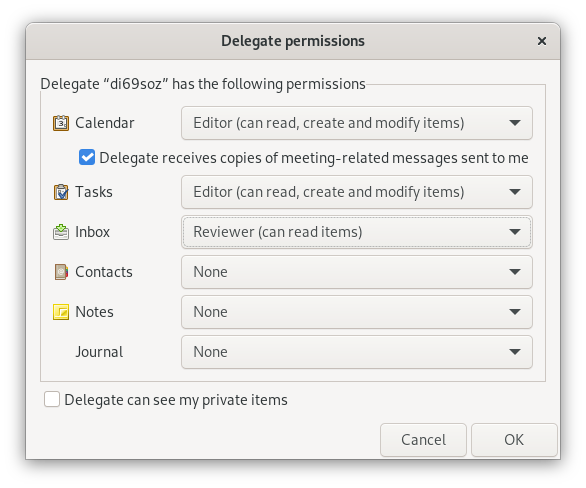
In the following window, select which parts of your mailbox your delegation may access and with which authorization. Then confirm twice with "OK".

Window Delegate permissions. Area Delegate 'di69soz' has the following permissions. Mini-icon, Calendar, selection box Editor (can read, create and modify items), indented below, box with check mark, Delegate receives copies of meeting-related messages sent to me. Mini-icon, Tasks, selection box Editor (can read, create and modify items). Mini-icon, Inbox, selection field Reviewer (can read items). Mini-icon, Contacts, selection box None. Mini-icon, Notes, selection field None. No mini symbol, Journal, selection field None. End of range. Empty box, Delegate can see my private items. At the bottom right, Cancel, OK buttons.


Use delegation

If you have been given a delegation and want to use it in Evolution, set it up like a Shared Mailbox.


Calendar

Share calendar

Switch to the calendar view by clicking "Calendar" in the column on the left side at the bottom. 

Select the calendar you want to share, right click on it and select "Permissions...". 


Click "Add" to search for the person you want to give permissions to your calendar. 

You can search for the account or the E-Mail address. Select the right person and confirm the selection with "OK". 


Dimmed window Edit EWS folder permissions... Superimposed on the small window Choose EWS user ... Search, input field di69soz. Table with 2 columns and one entry. Name column, di69soz. Column email, Max.Mustermann At lrz.de. Below the table, Found one user. Below, Close buttons, dimmed OK.


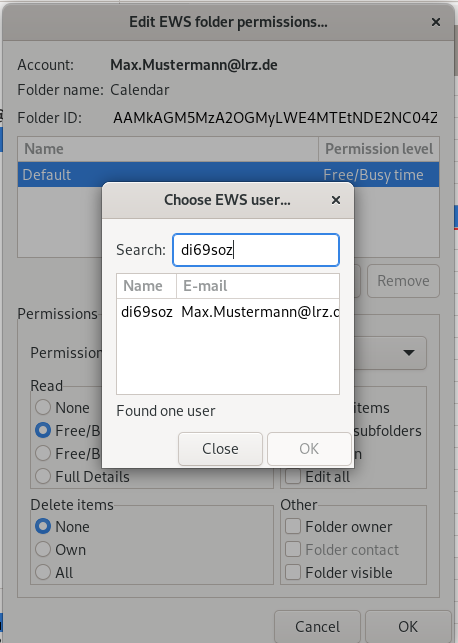
Then you can set the access rights: You can select a permission level or select the permissions individually.

To save these permissions click "OK".


Open a shared calendar


To open a shared calendar, you need to subscribe to it like a shared folder.

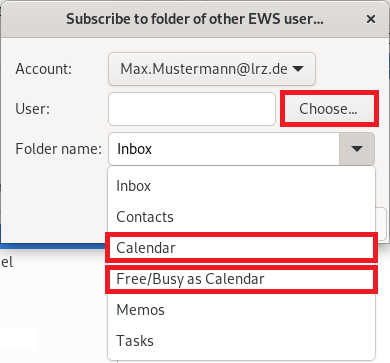
Switch to the Mail view and right-click on the top level of the mailbox (the email address written in bold) and then select "Subscribe to folder of other user...". 

Click on "Choose" and there search for the user whose calendar you want to open.

If you only want to open the free/busy times, select "Free/Busy as calendar" from the drop-down menu next to "Folder name".

If you have been given higher permissions on the calendar, then select Calendar.


Email Rules


To increase the clarity in a mailbox, it is often useful to automatically sort incoming emails into other folders based on certain criteria. Exchange offers you the possibility to create server-side filter rules.

In Evolution you will find the item "Message Filters" in the menu under "Edit". If you click on it, the adjoining window opens:


Here you can create new rules or edit existing ones.


Small Window Message Filters. Show filters for mail, colon. Selection field Incoming. Filter Rules. Larger empty field, to the right of it one below the other 7 buttons, Add, 6 times dimmed Edit, Remove, Top, Up, Down, Bottom. At the bottom left, dimmed Describe Filter... At the bottom right, Cancel, OK buttons.


Examples for filter rules

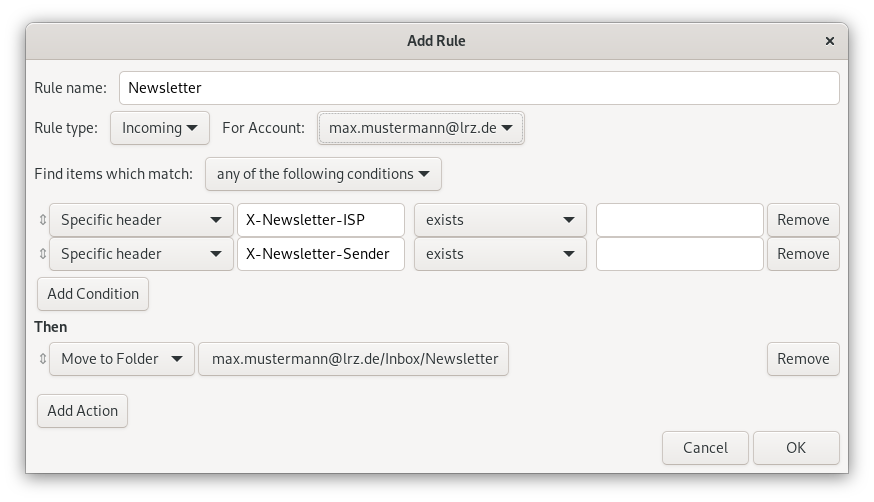
Filter newsletters...


In order for newsletters to be filtered, we have introduced tagging for some major newsletter senders, which is done through special header lines in the email. Create a rule that will be applied to messages you receive. 

Then select "Specific header" and then type in the blank field next to it:

"X-Newsletter ISP" and
"X-Newsletter Sender."

Select "exists" from the next field on the line. 

Then select the folder where the newsletters should be moved to. Finish with "OK".


Window Add rule. Rule Name, input field Newsletter. Rule type, selection box Incomming, For account, selection box Max.Mustermann At lrz.de. Find items which match, selection box any of the following conditions. Arrow with tip up and down for move, selection field Specific header, input field X-Newsletter-ISP, selection field exists, empty input field, remove button. Arrow with point up and down for Move, Selection field Specific header, Input field X-Newsletter-Sender, Selection field exists, Empty input field, Remove button. Button Add Condition. Then. Arrow with point up and down Move, Selection field Move to Folder, selection field Max.Mustermann At lrz.de slash Inbox slash Newsletter, right button Remove. Button Add Action. At the very bottom right, Cancel, OK buttons.


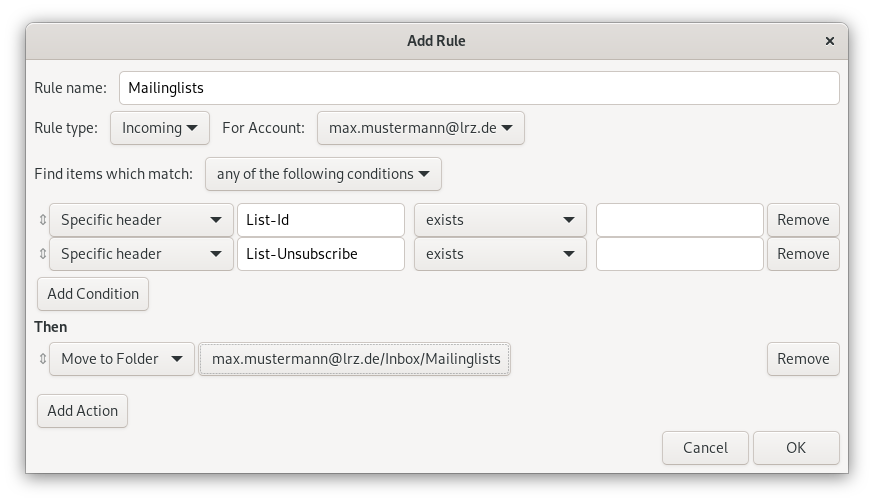
Filter mailing lists...


To filter out emails from mailing lists create a rule analogous to the newsletter rule. Check for the "List-Id" and "List-Unsubscribe" header fields and move these emails to the desired folder.

Note, if you want to filter newsletters as well, that many newsletters also use these fields. That is why the filter for newsletters should come before the filter for mailing lists in the list of filter rules.


Windwo Add Rule. Rule name, input field Mailinglists. Rule type, selection box Incomming, For Account, selection box Max.Mustermann At lrz.de. Find items which match, selection box any of the following conditions. Arrow with tip up and down for move, selection field Specific header, input field List-Id, selection field exists, empty input field, remove button. Arrow with point up and down for Move, Selection field specific header, List-Unsubscribe input field, Selection field exists, Empty input field, Remove button. Add condition button. Then. Arrow with point up and down for Move, Selectin field, Move to Folder, selection field Max.Mustermann At lrz.de slash Inbox slash Mailinglists, remove right button. Add action button. At the very bottom right, Cancel, OK buttons.


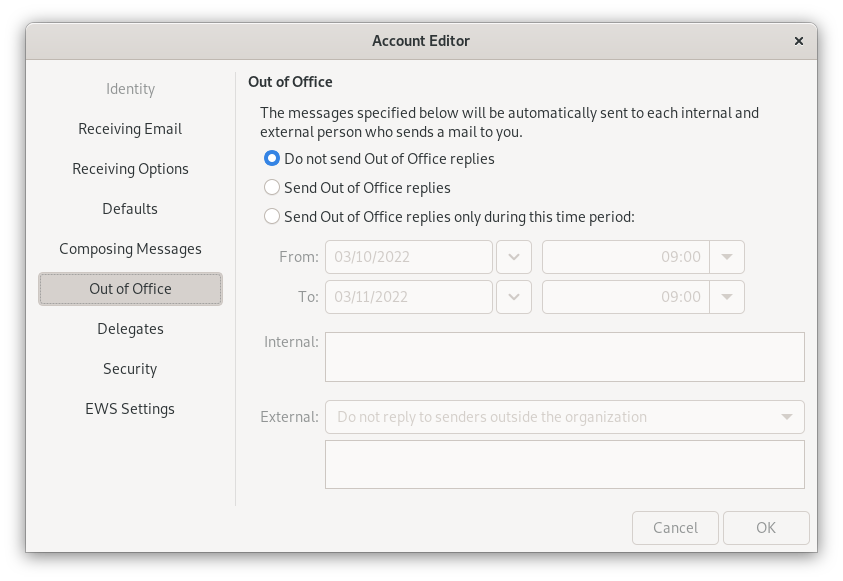
How do I set up an out of office message?

To do this, proceed as follows:

  • Preferences → Mail Accounts → Select your account → Out of Office

You can configure different out of office messages for senders inside (all users on the Exchange Server) and outside the organization.


By the way, your out-of-office message will not be triggered by mail from mailing lists or mail marked as spam.


Window Account Editor. Left column with 9 items, selected item 6, Out of Office. On the right, the main field. Out of Office. The messages specified below will be automatically sent to each internal and external person who sents a mail to you. Selected radio button, Do not send Out of Office replies. Not selected radio button, Send Out of Office replies. Not selected radio button, Send Out of Office replies only during this time period, colon. The other information is dimmed. 2 lines to select a period, From or To, input field with date, selection field for calendar, input field with time, selection field for time. Internal, larger empty field. External, selection field Do not reply to senders outside the organization, larger empty field below. End of dimming. At the very bottom right, Cancel, OK buttons.


Encrypt and sign

In order to send e-mails signed or encrypted with S/MIME using Outlook, you need a personal user certificate.

As a member of TUM, you can find information on how to apply for a certificate at https://www.it.tum.de/en/it/certificates/. If you have any difficulties in doing so, please contact the IT support of TUM (it-support@tum.de).

For the other institutions of the MWN, we are currently not aware of any way to obtain a personal user certificate.

Please pay attention to the correct format when downloading your certificate. Unfortunately, some operating systems (e.g. Windows, MacOS) only support TripleDES-SHA1.

For further information, please visit https://doku.tid.dfn.de/de:dfnpki:tcs:usercert#auswahl_des_key_protection_algorithms_in_formularen_fuer_p12-dateien.

Please note that the encryption method with S/MIME described here is not compatible with the PGP method which is especially widespread under Unix/Linux. PGP is not supported by some Exchange clients or require a plugin for PGP.

Briefly, the essential properties of signed and encrypted e-mails:

  • Signing an e-mail ensures that it cannot be manipulated unnoticed on its way from the sender to the recipient. Whether the e-mail is transmitted in encrypted form depends on whether the mail systems involved support transport encryption.
  • By encrypting an e-mail, the content is already encrypted before it is sent and is therefore transmitted in encrypted form (and also stored in the mailbox in encrypted form) regardless of the properties of the mail systems involved. When working with encryption, it is essential to keep your own certificate (especially the private key) in a loss-proof manner, as otherwise encrypted e-mails can no longer be read - neither those you have encrypted yourself nor those you have received.

General preparations

Before you can sign or encrypt e-mails, you have to import your user certificate on your computer. If you want to send digitally signed or encrypted e-mails from multiple computers, you must import the certificate on each of these computers. This also applies if you want to read encrypted emails on multiple PCs.


Before you can sign or encrypt email, you must import your user certificate into Evolution. If you want to send digitally signed or encrypted emails from multiple computers, you must import the certificate on each of those computers. This is also the case if you want to read encrypted emails on multiple PCs.

Open the preferences in Evolution and select the "Certificates" item.


Window Evolution Preferences. Left column centered 7 points, each with icon and below naming, selected point 7 Certificates. On the right the main field. 4 tabs, selected Your Certificates, Contact Certificates, Authorities, Mail. You have certificates from these organizations that identify you, colon. Table with 5 columns without entries. To the right of that, one below the other, 4 buttons, dimmed View, dimmed Backup, Import, dimmed Delete. At the bottom left, Help button, right Close button.

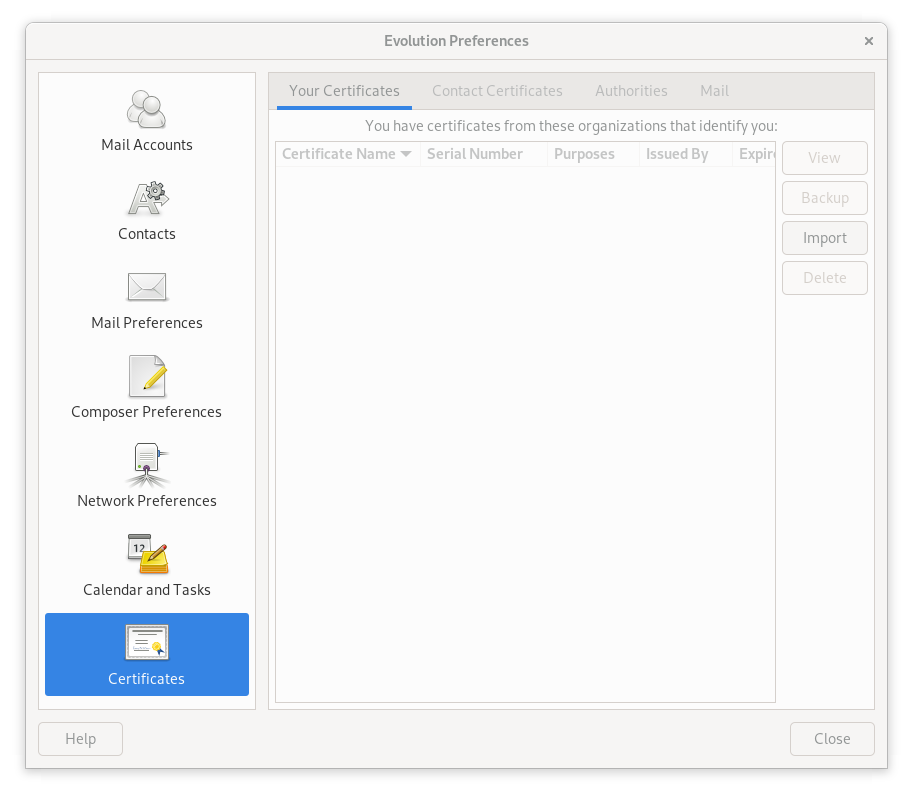
By clicking on "Import" you can search for the certificate in your files. Select the certificate and confirm with "Open".


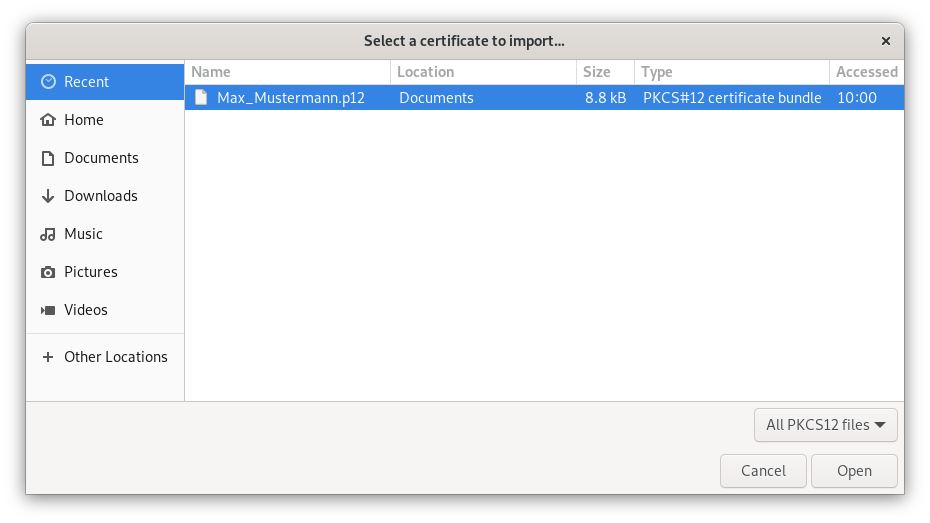
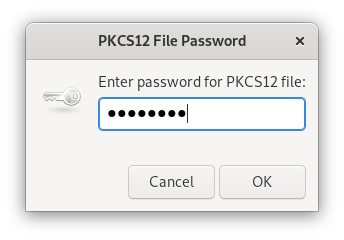
A new window opens asking you to enter a password. This password was set by you before you exported the certificate and the associated private key to the P12 file.


Small window PKCS12 File Password. Enter the password for the PKCS12 file, colon. Input field with thick dots. At the very bottom right, Cancel, OK buttons.


Now, after you have imported the certificate, switch from Certificates to Mail Accounts. Select the account for which you have requested the certificate and for which you want to add the digital signature.

Click on "Edit" and select the "Security" item.

At Secure MIME (S/MIME), click Select next to Signing certificate and Encryption certificate.  Then select the certificate you want to use.

Finally, click OK.


Window Account Editor. Left column with 9 items, selected item 8, Security. On the right the main field. General. Box with check, Do not sign meeting requests (for Outlook compatibility). Pretty Good Privacy (OpenPGP). OpenPGP key identifier, empty input field. Signature algorithm, checkbox Default. Empty box, Always sign outgoing messages when using this account. Empty box, Always encrypt outgoing messages going when using this account. Check box, Always encrypt for myself when sending encrypted messages. Empty box, Always trust keys in my keychain when encrypting. Empty box, Prefer inline sign slash encrypt for plain text messages. Secure MIME (S slash MIME). Signing certificate, input box PN - Max Mustermann issued by Ver, 2 buttons Select, Clear. Signing algorithm, selection box Default. Check box, Always sign outgoing messages when using this account. Encryption certificate, input box, PN - Max Mustermann issued by Ver, 2 buttons Select, Clear. Empty box, Always encrypt outgoing messages when using this account. Checked box, Always encrypt to myself when sending encrypted messages. At the very bottom right, Cancel, OK buttons.


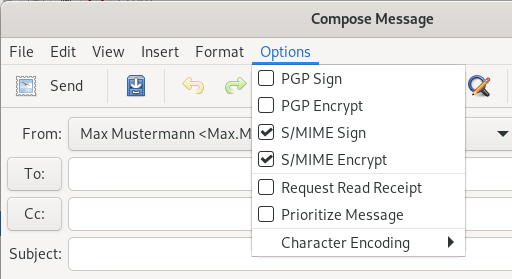
Signing emails digitally with S/MIME

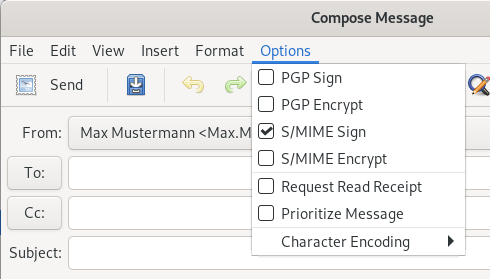
To add a digital signature to an email in Evolution, go to the "Options" tab before sending and click "S/MIME Sign". If you want to automatically sign every email, you can configure this in the Security Settings.


Window section Compose Message with expanded Options menu. Empty box, PGP Sign. Empty box, PGP Encrypt. Checked box, S slash MIME Sign. Empty box, S slash MIME Encrypt. Empty box, Request Read Receipt. Empty box, Prioritize Message. Character encoding with right arrow for submenu.


Encrypting emails with S/MIME

If you want to encrypt an email, proceed in the same way as for signing an email. Select the option "S/MIME Encrypt". In contrast to signing, you need not only your own certificate, but also the certificate (more precisely: the public key) of the mail recipient.


Window section as before, but box with check mark, S slash MIME Encrypt.


How do I get the public certificate of a recipient?

To send encrypted emails you always need the certificate of the recipient. If you do not have this, there are several ways how you can possibly find the certificate:

A digitally signed or encrypted email from the recipient.

If you have already received a digitally signed or encrypted email from the recipient, the public certificate was also sent to you in this email. As soon as you have opened this email, Outlook for Mac saves the certificate in its own keychain and you can send encrypted to this recipient.


Typical error messages

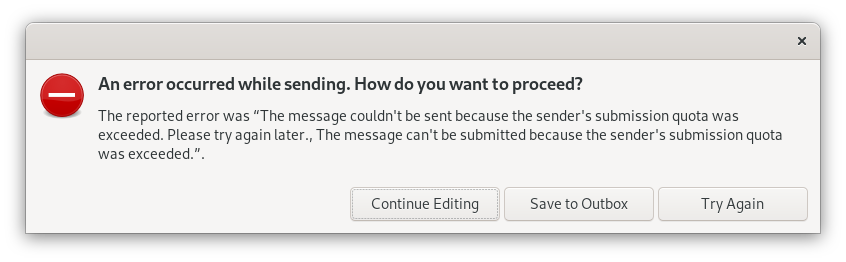
Why can't I send emails anymore?


If you have sent a lot of emails or emails with a large number of recipients in one day, it is possible that you will not be able to send any more emails and the message on the right will appear.

As explained in this message, you have exceeded the limit of 250 recipients within 24 hours. The limit resets automatically after 24 hours.

The purpose of the limit is to ensure that only a limited number of emails are sent, even via compromised accounts, and thus to minimize the risk of LRZ mail servers ending up on so-called "denylists".
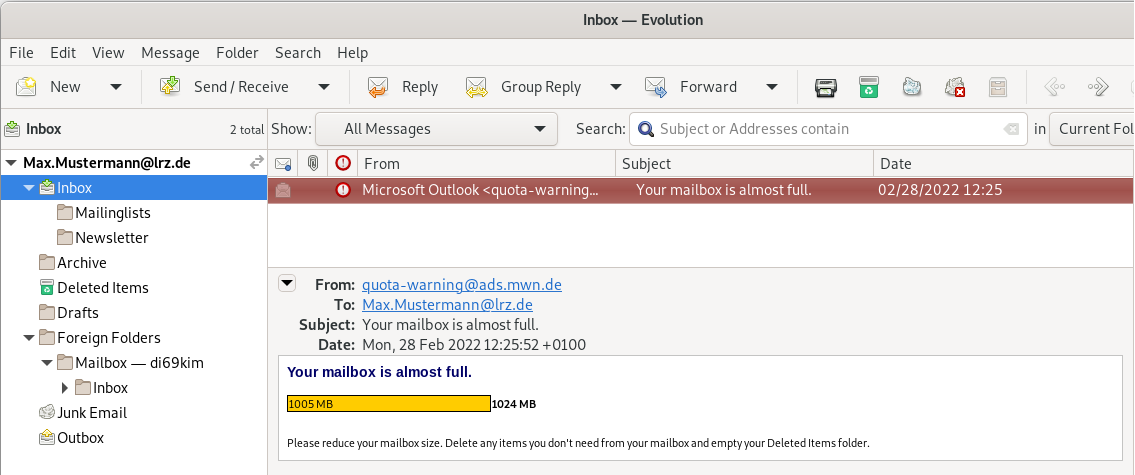

Small window without label. Symbol minus sign on red circle. An error occurred while sending. How do you want to proceed, question mark. The reported error message was, quote, The message couldn't be sent because the sender's submission quota was exceeded. Please try again later, The message couldn't be submitted because the sender's submission quota was exceeded, end of quote. Below 3 buttons Continue Editing, Save to Outbox, Try Again.


Own mailbox full

Your mailbox has a certain size (usually 3 GiB). If you exceed it, you will not be able to send or receive emails. 


When you reach the limit, you will first receive a warning mail (from quota-warning@ads.mwn.de). If the memory consumption continues to increase, you will no longer be able to send messages. If the quota is significantly exceeded, you will also no longer be able to receive messages.

Window Inbox - Evolution. Mail, the important fields are, From, Microsoft Outlook Smaller character quota-warning At ads.mwn.de Larger character. To, Max.Mustermann At lrz.de. Subject, Your mailbox is almost full. Content, Your mailbox is almost full. Mostly colored bar, 1005 MB, to the right 1024 MB. Please reduce your mailbox size. Delete any items you don't need from your mailbox and empty your Deleted Items folder.

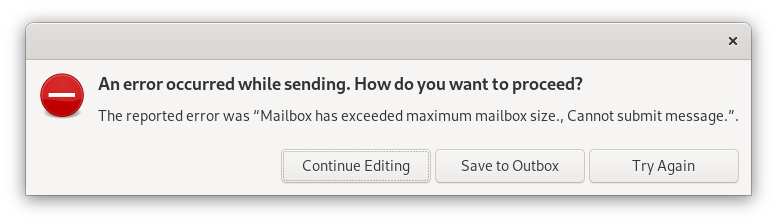
If you have reached the limit for sending, the adjacent message will appear when you try:


Small window without label. Symbol minus sign on red circle. An error occurred while sending. How do you want to proceed, question mark. The reported error was, Quote, Mailbox has exceeded maximum mailbox size., Cannot submit message. Quote end. Below 3 buttons Continue Editing, Save to Outbox, Try Again.

If you have reached the limit for receiving, the following banner will appear when you try to edit and save emails:

Small wide window with red background and black font. Symbol minus sign on red circle. An Error occurred while saving to your Drafts folder. The reported error was Quote, Mailbox has exceeded maximum mailbox size., The process failed to get the correct properties. End of quote. The message has most likely not been saved.

Your changes will not be transferred to the server.

From this point on, you will no longer be able to receive and send emails.

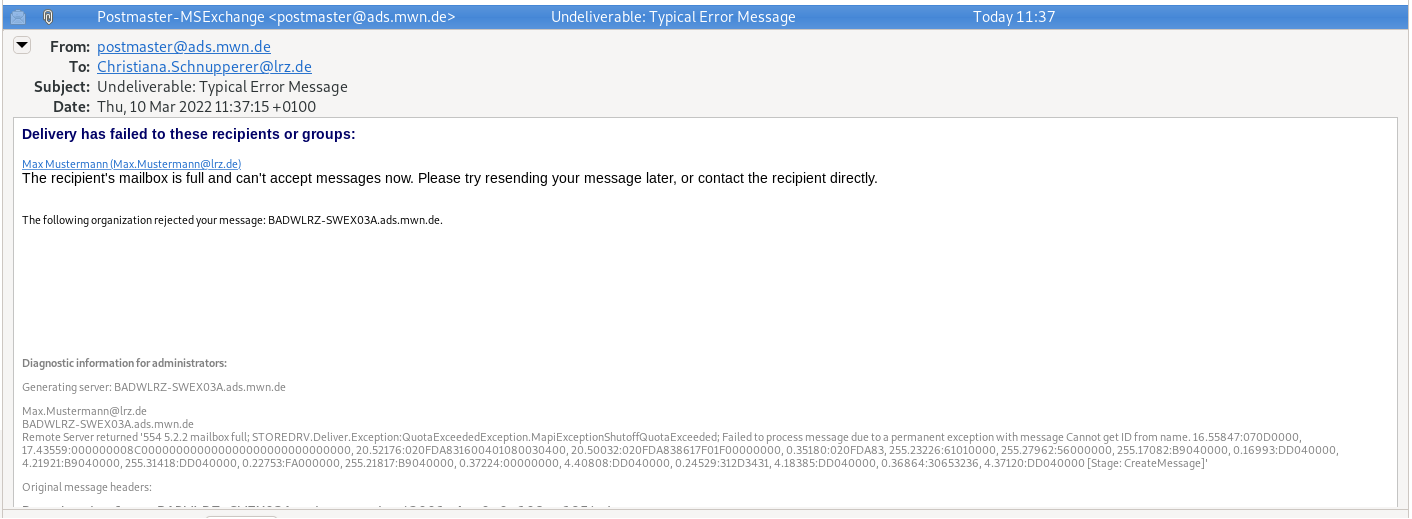
Destination mailbox full

It is also possible that the mailbox of the person you want to send an email to is full.

You will receive an undeliverable notification in a timely manner. This may look something like this.

Window section with Mail, the important fields are, From, postmaster At ads.mwn.de. To, Christiana.Schnupperer At lrz.de. Subject, Undeliverable colon, Typical Error Message. The content, Delivery has failed to these recipients or groups, Colon. Underlined and clickable, Max Mustermann (Max.Mustermann At lrz.de). The recipient's mailbox is full and can't accept messages now. Please try resending your message later, or contact the recipient directly. Free Space. The following organization rejected your message, colon, BADWLRZ-SWEX03a.ads.mwn.de. Free Space. The rest is in lighter font. Diagnostic information for administrators, colon. More information follows, some with cryptic values.