Outlook on the Web
Barrierefreiheit
Diese Seite enthält bei Bildern/Grafiken alternative Texte.
Wie melde ich mich an Outlook on the Web an?
Outlook on the Web finden sie unter xmail.mwn.de.
Zum Anmelden müssen Sie nur Ihre Kennung und Ihr Passwort angeben.
Im Gegensatz zu anderen Clients (Outlook, Apple Mail, etc.) ist es hier nicht notwendig, "ads\" vor Ihre Kennung zu setzen.
Shared Mailbox
Shared Mailboxen bieten die Möglichkeit zur gemeinsamen Bearbeitung einer Mailbox. Anwendungsszenarien sind z.B. Funktionsadressen (wie info@domain.de) oder gemeinsame Lehrstuhlkalender (z.B. zur Urlaubsplanung) oder aber gemeinsame Kontakte des Lehrstuhls, die alle lesen dürfen bzw. die mehrere Personen gemeinsam verwalten.
Wie öffne ich eine Shared Mailbox?
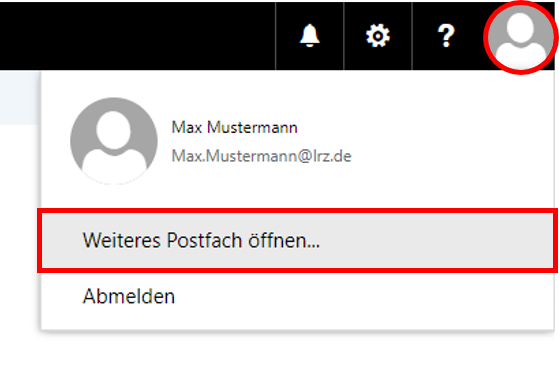
Um eine Shared Mailbox aufrufen zu können, müssen Sie sich zuerst mit ihrer eigenen Kennung an Outlook on the Web anmelden. Klicken Sie dann oben rechts auf das runde Symbol Benutzer und wählen Sie "Weiteres Postfach öffnen...".
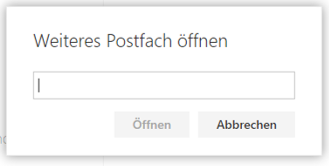
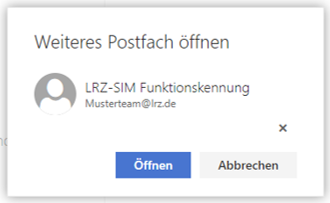
Im sich öffnenden Fenster können Sie nach der Kennung, der E-Mailadresse oder den Namen der Shared Mailbox suchen. Sie bekommen dann meist schon beim Eintippen Vorschläge mit passenden Mailboxen angezeigt. Andernfalls klicken Sie auf "Verzeichnis durchsuchen". Sie können die Mailbox nur öffnen, wenn Sie bei der Suche gefunden wurde.
Wenn Sie auf Öffnen klicken, öffnet sich ein weiterer Tab in Ihrem Browser mit der Shared Mailbox.
Alternativ ist es auch möglich eine eine Shared Mailbox so wie unter Freigegebene Mailbox (Mailordner) hinzufügen beschrieben, dauerhaft in OWA einzubinden. Bitte beachten Sie dabei aber folgendes:
Bei der Bearbeitung von Mails der Shared Mailbox werden gelöschte und versendete Mails sowie gespeicherte Entwürfe NICHT in der Shared-Mailbox abgelegt, sondern in den entsprechenden Ordnern der Mailbox, mit der Sie sich im OWA angemeldet haben. Damit können alle Kolleginnen, die auch Zugriff auf die Shared Mailbox haben, NICHT auf alle von Ihnen gesendeten, gelöschten und als Entwurf gespeicherten E-Mails zugreifen.
Dazu müssen Sie die E-Mails manuell in die entsprechenden Ordner der Shared Mailbox verschieben. Es gibt keine Möglichkeit das Verhalten über Einstellungen zu ändern.
Kalender- und Mailbox-Freigaben
Im Folgenden wird erklärt, wie Sie Personen oder Gruppen Zugriff auf Teile Ihres Exchange-Accounts gewähren und wie Sie auf Freigaben, die Ihnen erteilt wurden, zugreifen können.
Zugriff auf Teile des Exchange-Accounts kann nur für Personen und Gruppen erteilt werden, die im Adressbuch zu finden sind.
Bitte beachten Sie, dass im Adressbuch nur Personen, shared Mailboxen, Ressourcen (Räume und Geräte) und Verteilerlisten verzeichnet sind. Wenn Sie also einer Gruppe von Personen Zugriff auf Teile Ihres Accounts einräumen möchten, Sie diese Gruppe aber nicht in Ihren Adresslisten finden können, ist die Gruppe keine Verteilerliste.
Feststellen, welche Personen Zugriff auf welchen Teil meiner Daten haben
Das Feststellen der Berechtigungen geht in Outlook on the Web durch einen Rechtsklick auf die Ressource, für die Sie Freigaben erteilt haben.
Beispiele:
In der E-Mail-Ansicht Rechtsklick auf den E-Mail-Ordner:In der Kalenderansicht Rechtsklick auf den jeweiligen Kalender:
Es öffnen sich unterschiedliche Fenster.
← E-Mail-Ordner
Kalender
↓
Freigaben erteilen
Kalender und Mailordner freigeben
Es ist möglich, Personen oder Gruppen aus dem Adressbuch Lese- und/oder Schreibzugriff auf Ihren Kalender und Ihre E-Mailordner zu geben.Kalender
Machen Sie einen Rechtsklick auf den freizugebenden Kalender und wählen Sie "Freigabeberechtigung" oder wählen Sie den Kalender und klicken Sie oben in der Leiste auf "Freigeben".
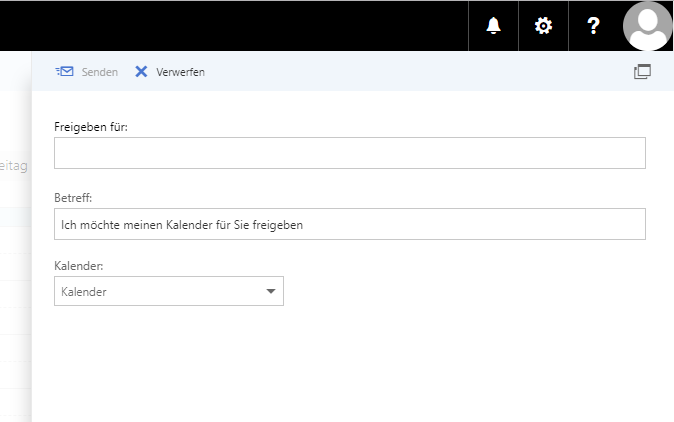
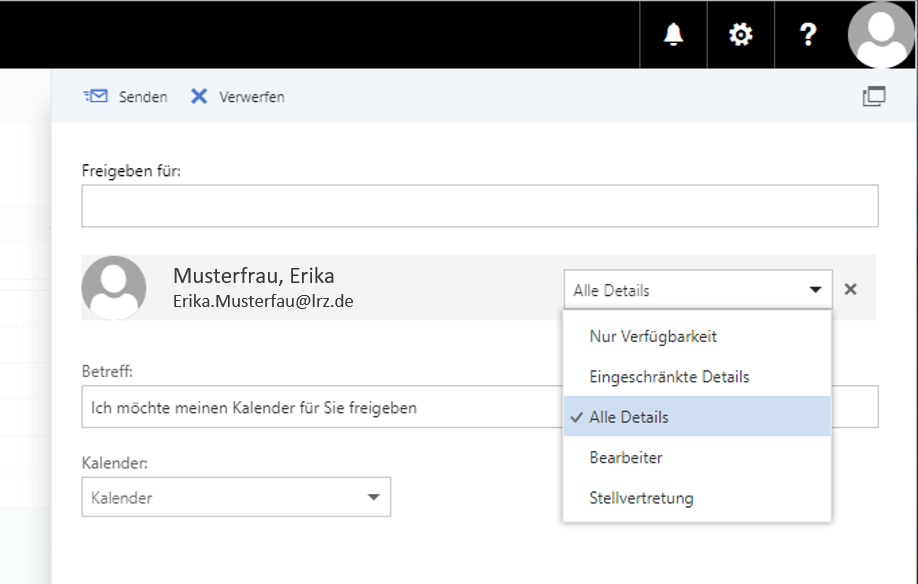
Es öffnet sich dann folgendes Fenster.
Suchen Sie im Feld "Freigeben für:" die Person, die die Freigabe erhalten soll. Wenn Sie diese ausgewählt haben, können Sie im Auswahl-Menü die Berechtigungsstufe wählen.
Wenn Sie fertig sind, klicken Sie auf "Senden". Die Person erhält dann eine E-Mail. Mit einem Klick auf "Annehmen" kann diese den Kalender öffnen und dann ist sie auch in der Kalenderansicht unter "Weitere Kalender" aufgelistet.
E-Mail-Ordner
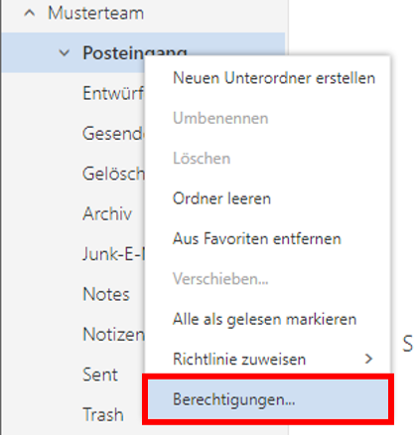
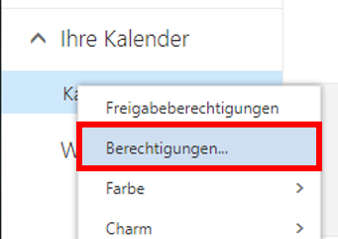
Machen Sie einen Rechtsklick auf den freizugebenden E-Mailordner und wählen Sie "Berechtigungen..." aus.
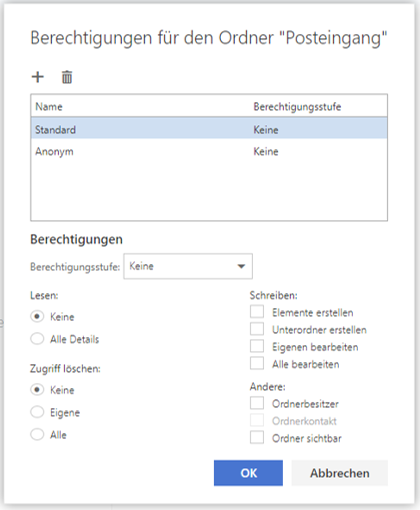
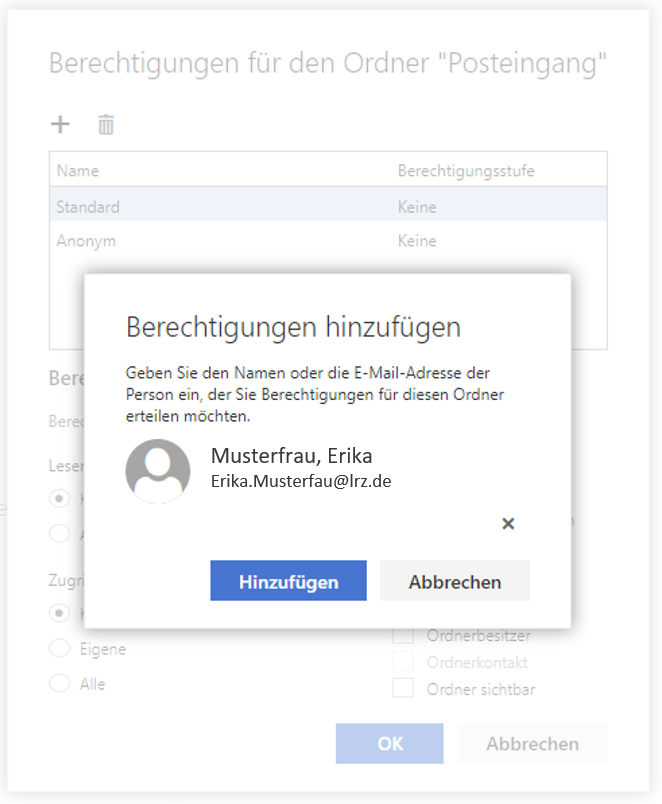
Um Berechtigungen zu vergeben, müssen Sie eine Person hinzufügen. Klicken Sie dazu auf das Plus oben links.
Suchen Sie nach de gewünschten Person und klicken Sie auf hinzufügen.
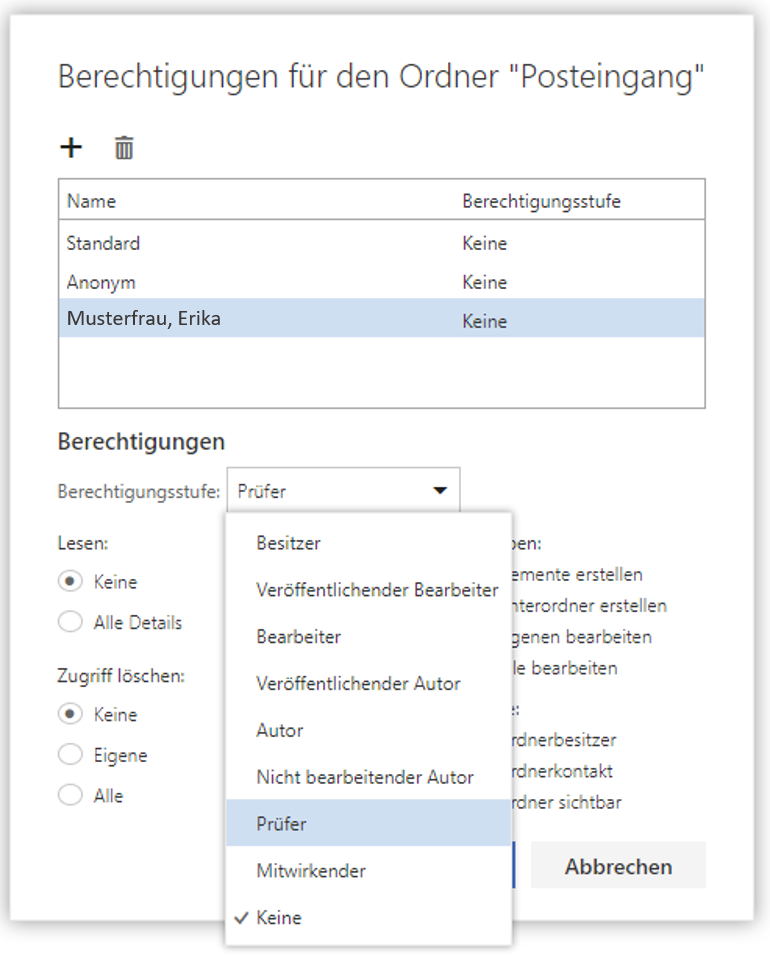
Nachdem Sie die Person hinzugfügt haben, können Sie noch die gewünschte Berechtigungsstufe auswählen. Bestätigen Sie dann mit "OK".
Damit auf den Ordner von der anderen Person zugegriffen werden kann, muss man für alle Ordner oberhalb in der Hierarchie (inklusive der Mailbox selbst) die Berechtigung "Ordner Sichtbar" vergeben. Berechtigungen werden nicht nach unten vererbt.
In Outlook on the Web können Sie nur freigegebene Kalender und E-Mailordner öffnen, keine Aufgaben etc. einer anderen Person.
Berechtigungsstufen
Berechtigungsstufe | Aktivitäten, die ein Freigabebenutzer ausführen kann |
Besitzer | Erstellen, Lesen, Ändern und Löschen aller Elemente im freigegebenen Ordner. Als Besitzer (m/w/d) kann ein Benutzer (m/w/d) die Berechtigungsstufen ändern, die andere für den Ordner haben. |
Veröffentlichender Bearbeiter | Erstellen, Lesen, Ändern und Löschen aller Elemente und Erstellen von Unterordnern. |
Bearbeiter | Erstellen, Lesen, Ändern und Löschen aller Elemente. |
Veröffentlichender Autor | Erstellen und Lesen von Elementen, Erstellen von Unterordnern sowie Ändern und Löschen von Elementen, die Sie erstellt haben. |
Autor | Erstellen und Lesen von Elementen sowie Ändern und Löschen von Elementen, die Sie erstellt haben. |
Nicht bearbeitender Autor | Erstellen und Lesen von Elementen sowie Löschen von Elementen, die Sie erstellt haben. |
Prüfer | Nur Lesen von Elementen. |
Mitwirkender | Nur Erstellen von Elementen. |
Benutzerdefiniert | Ausführen von Aktivitäten, die die Ordnerbesitzerin definiert hat. |
Frei/Gebucht-Zeit, Betreff, Ort | Nur für Kalenderfreigaben, Lesen der Frei/Gebucht-Informationen sowie von Betreff und Ort von Kalenderereignissen |
Frei/Gebucht-Zeit | Nur für Kalenderfreigaben, Lesen der Frei/Gebucht-Informationen, von Kalenderereignissen |
Keine | Ausführung keiner Aktivitäten. Die Benutzerin verbleibt in der Berechtigungsliste, hat aber keine Berechtigung und kann den Ordner nicht öffnen. |
Veröffentlichung von Kalendern im Web
Wenn Sie Ihren Kalender veröffentlichen wollen, müssen Sie folgende Schritte durchführen:
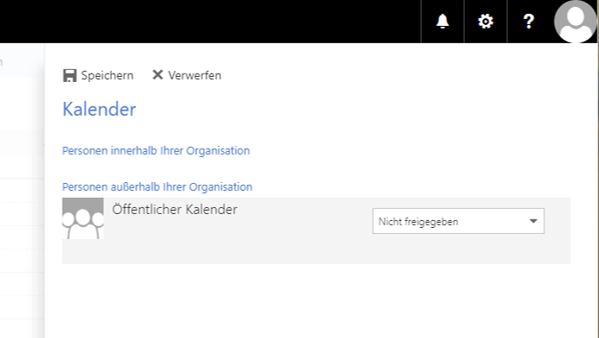
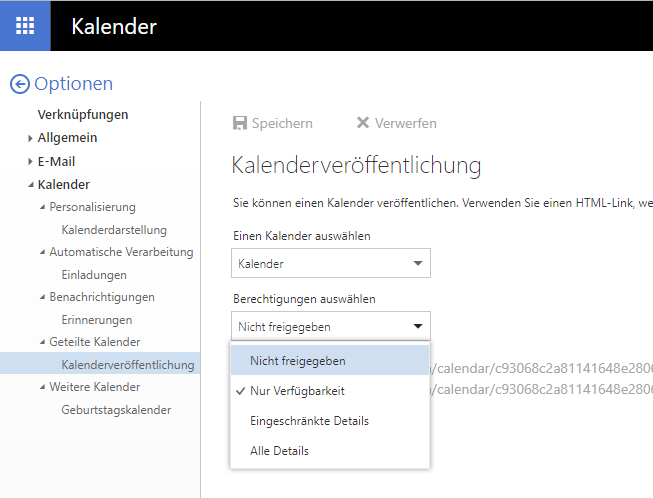
Öffnen Sie in Outlook on the Web die Optionen (oben rechts in der Leiste auf das Zahnrad klicken und dann Optionen auswählen) und wählen Sie unter "Kalender" "Geteilte Kalender" aus und Klicken Sie dann auf "Kalenderveröffentlichung".
Hier können Sie festlegen, welchen Kalender Sie freigeben bzw. veröffentlichen möchten. Außerdem können Sie festlegen ob Sie nur die Verfügbarkeit, eingeschränkte Details oder alle Details veröffentlichen möchten. Schließen Sie den Vorgang mit "Speichern" (oben links) ab. Dadurch erhalten Sie zwei Links (einen ics- und einen html-Link), welche Sie denjenigen mitteilen können, die auf Ihren Kalender Zugriff erhalten sollen. Bei den Links handelt es sich um Zufallslinks, die nicht erraten werden können. Diese werden jedes Mal neu generiert, wenn Sie den Kalender erneut veröffentlichen.
Wenn Sie einen Kalender veröffentlicht haben, können Sie jederzeit die Einstellungen ändern oder die Veröffentlichung wieder beenden. Gehen Sie dabei genauso vor wie beim Veröffentlichen. Dann können Sie die Freigabe verändern, indem Sie eine Andere Berechtigung auswählen, bzw. Sie können Sie die Freigabe beenden, wenn Sie "Nicht freigeben" auswählen.
Damit die Änderungen wirksam sind, müssen Sie noch auf "Speichern" klicken.
Einblick in freigegebene Kalender, Mailboxen etc.
Kalender
In Outlook on the Web können Sie Kalender anderer Benutzerinnen öffnen. Sie können die Kalender öffnen, indem Sie oben in der Leiste "Kalender hinzufügen" auswählen. Wählen Sie hier "Aus Verzeichnis" aus, dann können Sie im Adressbuch nach dem Kalender suchen.
Es ist zu beachten, dass Unterkalender grundsätzlich nicht angezeigt und auch nicht eingebunden werden. Ebenso besitzt man auf den Unterkalender keine automatischen Rechte (es gibt keine automatische Vererbung von Rechten).
Damit Sie solche Kalender hinzufügen können, muss der Kalender extra, wie oben beschrieben, für Sie freigegeben werden.
Diese Kalender können Sie nur mit der Einladungsmail öffnen, die Sie aufgrund der Freigabe erhalten haben.
Freigegebene Mailbox (Mailordner) hinzufügen
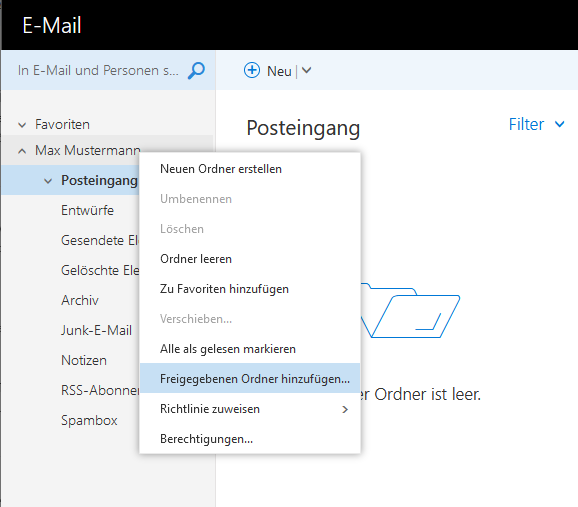
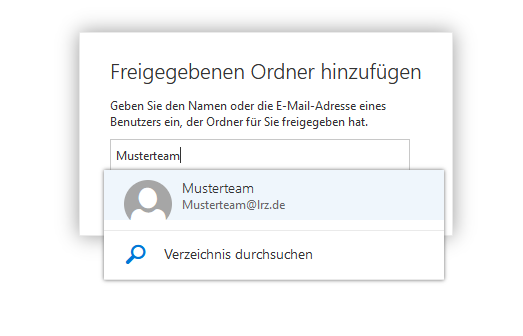
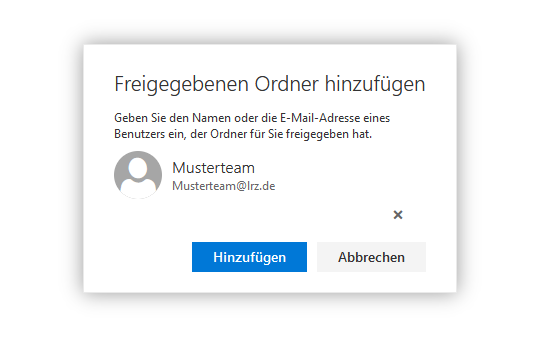
Im OWA können SIe Ordner anderer Benutzterinnen oder Shared Mailboxen dauerhalft hinzufügen. Machen Sie dazu einen Rechtsklick auf Ihren Namen und wählen Sie "Freigegebenen Ordner hinzufügen..." aus. Geben Sie nun die E-Mailadresse ein und klicken Sie dann auf Hinzufügen.
Stellvertretung
Andere Personen vertreten
Sie können, sofern Sie dazu autorisiert wurden, folgende Aufgaben ausführen:
- Mails im Namen der anderen Person schreiben:
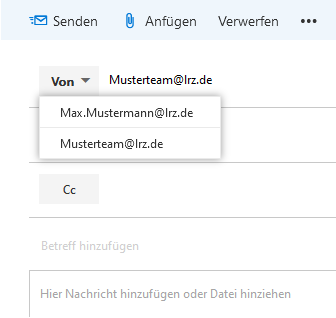
Wenn Sie wie unter Absenderadresse einblenden beschrieben, das Feld "Von" eingeblendet haben, können Sie nun den Absender (wenn Sie ihn schon einmal verwendet haben) ganz einfach wechseln, indem Sie auf Feld "Von" klicken.
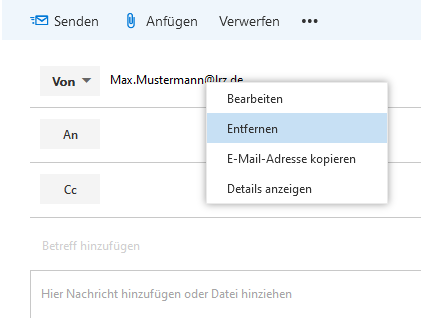
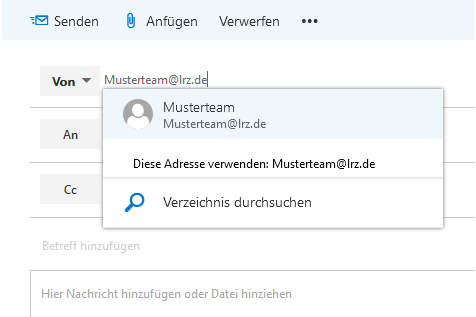
Sollten Sie eine Adresse zum ersten Mal verwenden muss man einen Rechtsklick auf die Absender Adresse machen und auf "Entfernen" klicken. Danach können Sie die neue Adresse eingeben und auswählen.
Wenn Sie eine E-Mail mit der Absendeadresse der anderen Person versenden, wird Ihre Mailadresse in einer zusätzlichen Headerzeile "Sender" festgehalten, so dass für die Empfänger ersichtlich ist, wer die E-Mail abgeschickt hat.
- Mails im Namen der anderen Person beantworten: analog.
- "Speichern gesendeter Objekte im Ordner Gesendete Objekte eines anderen Benutzers": automatisch nicht möglich. Elemente müssen manuell in den Ordner des anderen Postfachs verschoben werden.
- Erstellen von Besprechungsanfragen/Meetings im Namen einer anderen Person:
Nachdem Sie den Kalender hinzugefügt haben ("Kalender hinzufügen → Aus dem Verzeichnis"), können Sie bei entsprechender Berechtigung, Besprechungen/Termine in diesen Kalender eintragen.
Aus dem Kalender einer anderen Person heraus erstellen Sie automatisch Anfragen in deren Namen.
Vertretung und "Send on Behalf" für andere einrichten
Um eine Stellvertretung einzutragen, muss zuerst der Kalender für die Stellvertreterin freigegeben werden. Das machen Sie wie im Abschnitt "Freigaben erteilen". Vergeben Sie dann die Berechtigung "Stellvertretung".
Anschließend müssen Sie noch die gewünschten E-Mailordner ebenfalls wie oben beschrieben freigeben werden.
Absendeadresse einblenden
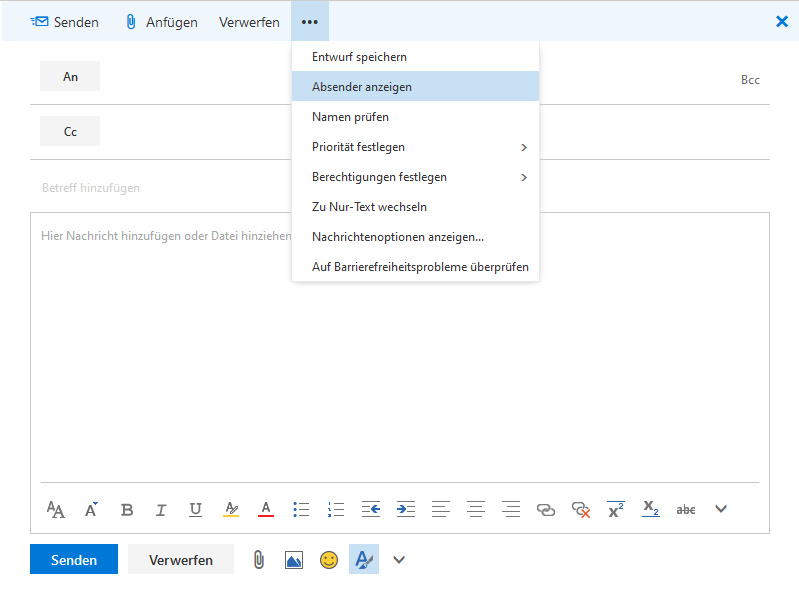
Um den Absender beim Schreiben einer E-Mail einzublenden klicken Sie einfach auf die "3 Punkte" und wählen Sie die Option "Absender anzeigen" aus.
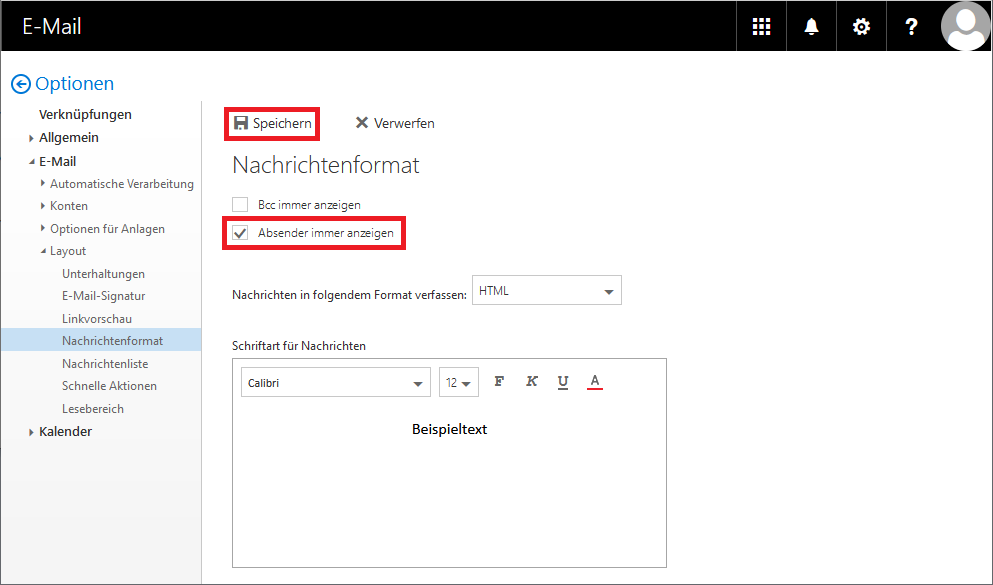
Es ist auch möglich das Feld Absender dauerhaft einzublenden. Gehen Sie dazu in den Optionen unter "E-Mail → Layout" auf "Nachrichtenformat". Wählen Sie nun die Option "Absender immer anzeigen" aus und klicken Sie auf "Speichern".
Filterregeln
Um die Übersichtlichkeit in einem Postfach zu erhöhen, ist es oft sinnvoll, eingehende E-Mails anhand von bestimmten Kriterien automatisch in andere Ordner zu sortieren. Exchange bietet Ihnen die Möglichkeit, serverseitige Filterregeln anzulegen.
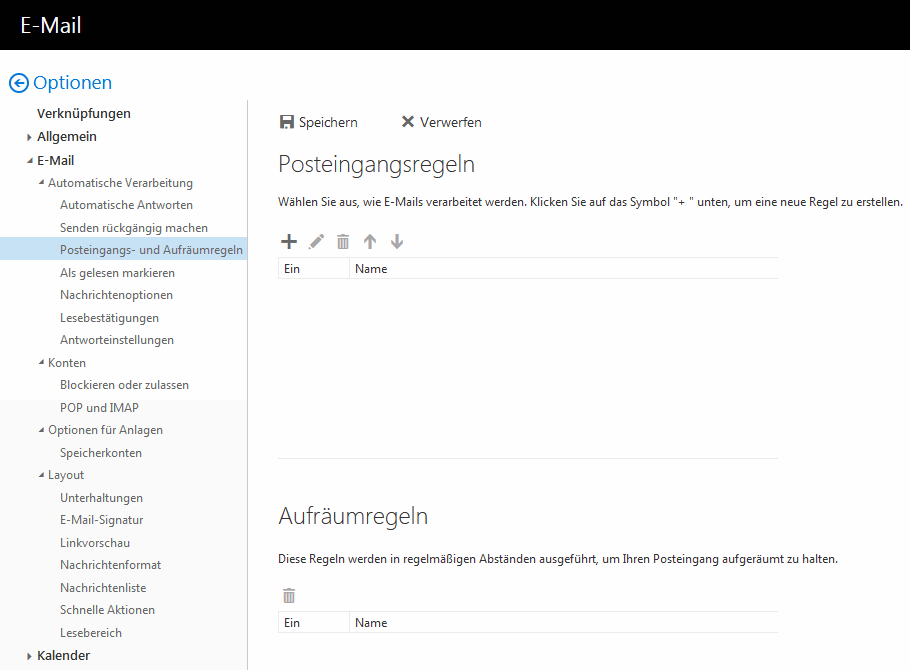
Gehen Sie in die Optionen und wählen dort bei "E-Mail" unter "Automatische Verarbeitung" den Punkt "Posteingangs- und Aufräumregeln". Über das Plus bei Posteingangsregeln können Sie neue Regeln hinzufügen.
Beispiele für Filterregeln
Damit Newsletter gefiltert werden können, haben wir für einige große Newsletter-Versender durch spezielle Header-Zeilen in der E-Mail ein Tagging eingeführt.
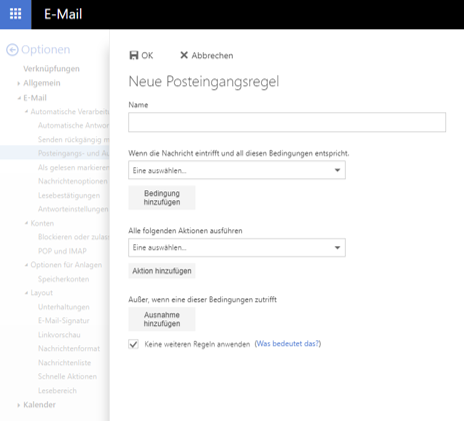
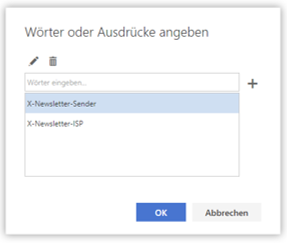
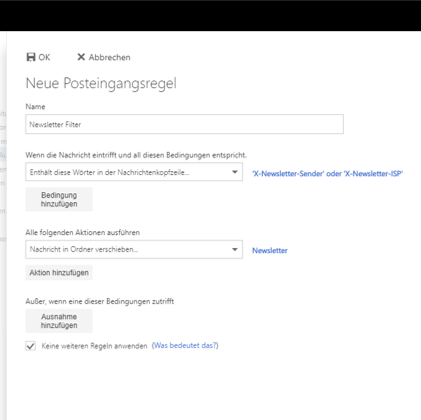
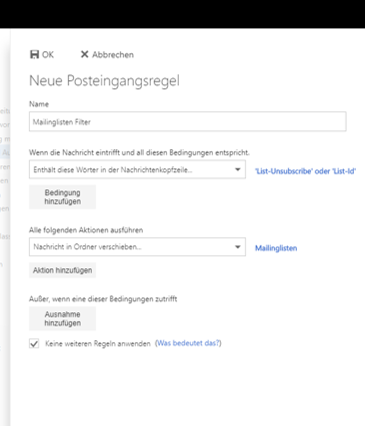
Erstellen Sie eine Regel und wählen Sie dann bei "Wenn die Nachricht eintrifft..." "Enthält diese Wörter" und "in der Nachrichtenkopfzeile" aus. Dann geben Sie "X-Newsletter-ISP" in das Feld ein und fügen es über das Plus hinzu. Genauso verfahren Sie mit "X-Newsletter-Sender".
Wählen Sie dann noch einen Ordner aus, in den die Newsletter verschoben werden sollen, und beenden Sie mit "OK".
Mailinglisten ausfiltern
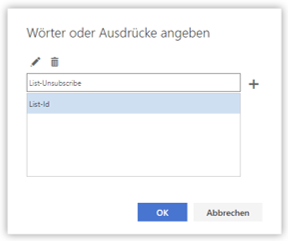
Erstellen Sie eine Regel und wählen Sie dann bei "Wenn die Nachricht eintrifft..." "Enthält diese Wörter" und "in der Nachrichtenkopfzeile" aus. Dann geben Sie "List-Id" in das Feld ein und fügen es über das Plus hinzu. Genauso verfahren Sie mit "List-Unsubscribe".
Beachten Sie, wenn Sie auch Newsletter filtern wollen, dass viele Newsletter auch diese Felder verwenden. Deswegen sollte in der Liste der Filterregeln der Filter für Newsletter vor dem Filter für Mailinglisten stehen.
Gelöschte Elemente wiederherstellen
Mails, Termine, Aufgaben und Kontakte, die Sie löschen, finden sich zunächst im speziellen Ordner "Gelöschte Elemente". Dort gibt es keine Gleitlöschung, die Elemente bleiben dort so lange liegen, bis Sie sie endgültig löschen:
Doch auch das "endgültige Löschen" ist nicht wirklich endgültig, siehe nächsten Abschnitt.
Wie stelle ich "endgültig" gelöschte Elemente wieder her?
Sogar dann, wenn Sie ein Element aus dem speziellen Ordner "Gelöschte Elemente" gelöscht haben, können Sie es innerhalb einer Frist von 14 Tagen immer noch wiederherstellen. Wählen Sie dazu den Ordner "Gelöschte Elemente" aus und klicken Sie dann auf "Gelöschte Elemente wiederherstellen". Es öffnet sich dann ein Fenster, in dem alle Elemente aufgelistet sind, die sie wiederherstellen können. Wählen Sie diese aus und stellen Sie diese über einen Klick auf "Wiederherstellen" wieder her.
Abwesenheitsmeldung
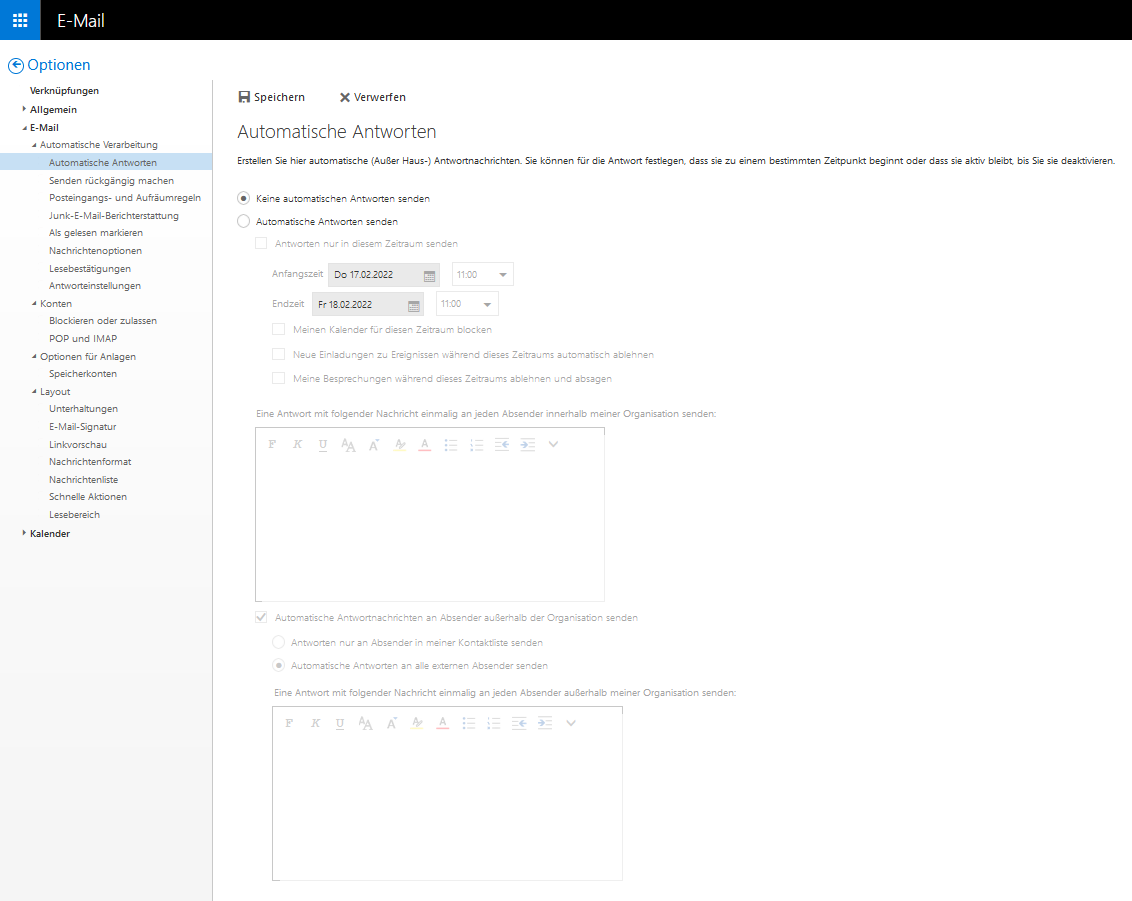
Klicken Sie oben rechts auf das Zahnrad, dann auf "Automatische Antworten" (siehe nachfolgende Abbildung)
Sie können unterschiedliche Abwesenheitsmeldungen für Absender innerhalb und außerhalb der LRZ-Exchange-Infrastruktur konfigurieren.
Ihre Abwesenheitsmeldung wird übrigens weder durch E-Mails von Mailinglisten noch durch als Spam markierte E-Mails ausgelöst.
Melden einer Spam-Mail
Standardmäßig verschiebt der Exchange-Server verdächtige E-Mails automatisch in den Ordner Junk-E-Mail. Sollten Sie dennoch eine Spam-Nachricht in Ihrem Posteingang finden, wurde sie von unserem Anti-Spam-System nicht korrekt erkannt.
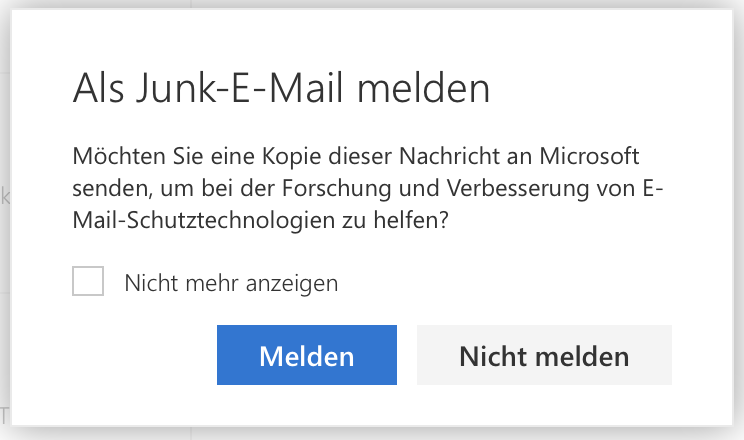
In diesem Fall können Sie die Nachricht an das LRZ melden: Öffnen Sie die betreffende E-Mail und klicken Sie in der oberen Menüleiste auf Junk-E-Mail. Bestätigen Sie die Rückfrage, ob Sie diese Nachricht melden möchten. Die Spam-Mail wird dann in den Spam-Ordner verschoben und eine Kopie der Spam-Mail wird an die Mailadresse no-ham@lrz.de verschickt.
Hinweis: In der Meldung wird angezeigt, dass die E-Mail an Microsoft gesendet wird. Das ist nicht korrekt – die gemeldeten Nachrichten werden vom LRZ an die Adresse no-ham@lrz.de umgeleitet.
Umgekehrt können Sie auch eine fälschlicherweise als Spam markierte E-Mail, die sich im Spam-Ordner befindet, per Knopfdruck an das LRZ melden. Dabei wird eine Kopie der E-Mail an no-spam@lrz.de gesendet, und die E-Mail selbst automatisch zurück in den Posteingang verschoben.
Öffnen Sie dazu den Spam-Ordner, wählen Sie die betreffende E-Mail aus und klicken Sie auf den Button „Keine Junk-Mail“.
Typische Fehlermeldungen
Warum kann ich keine E-Mails mehr versenden?
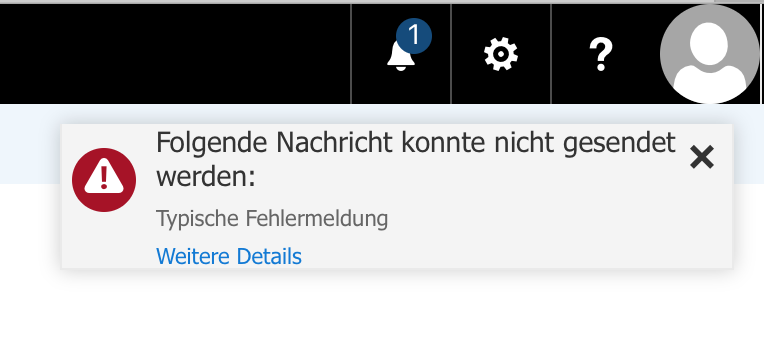
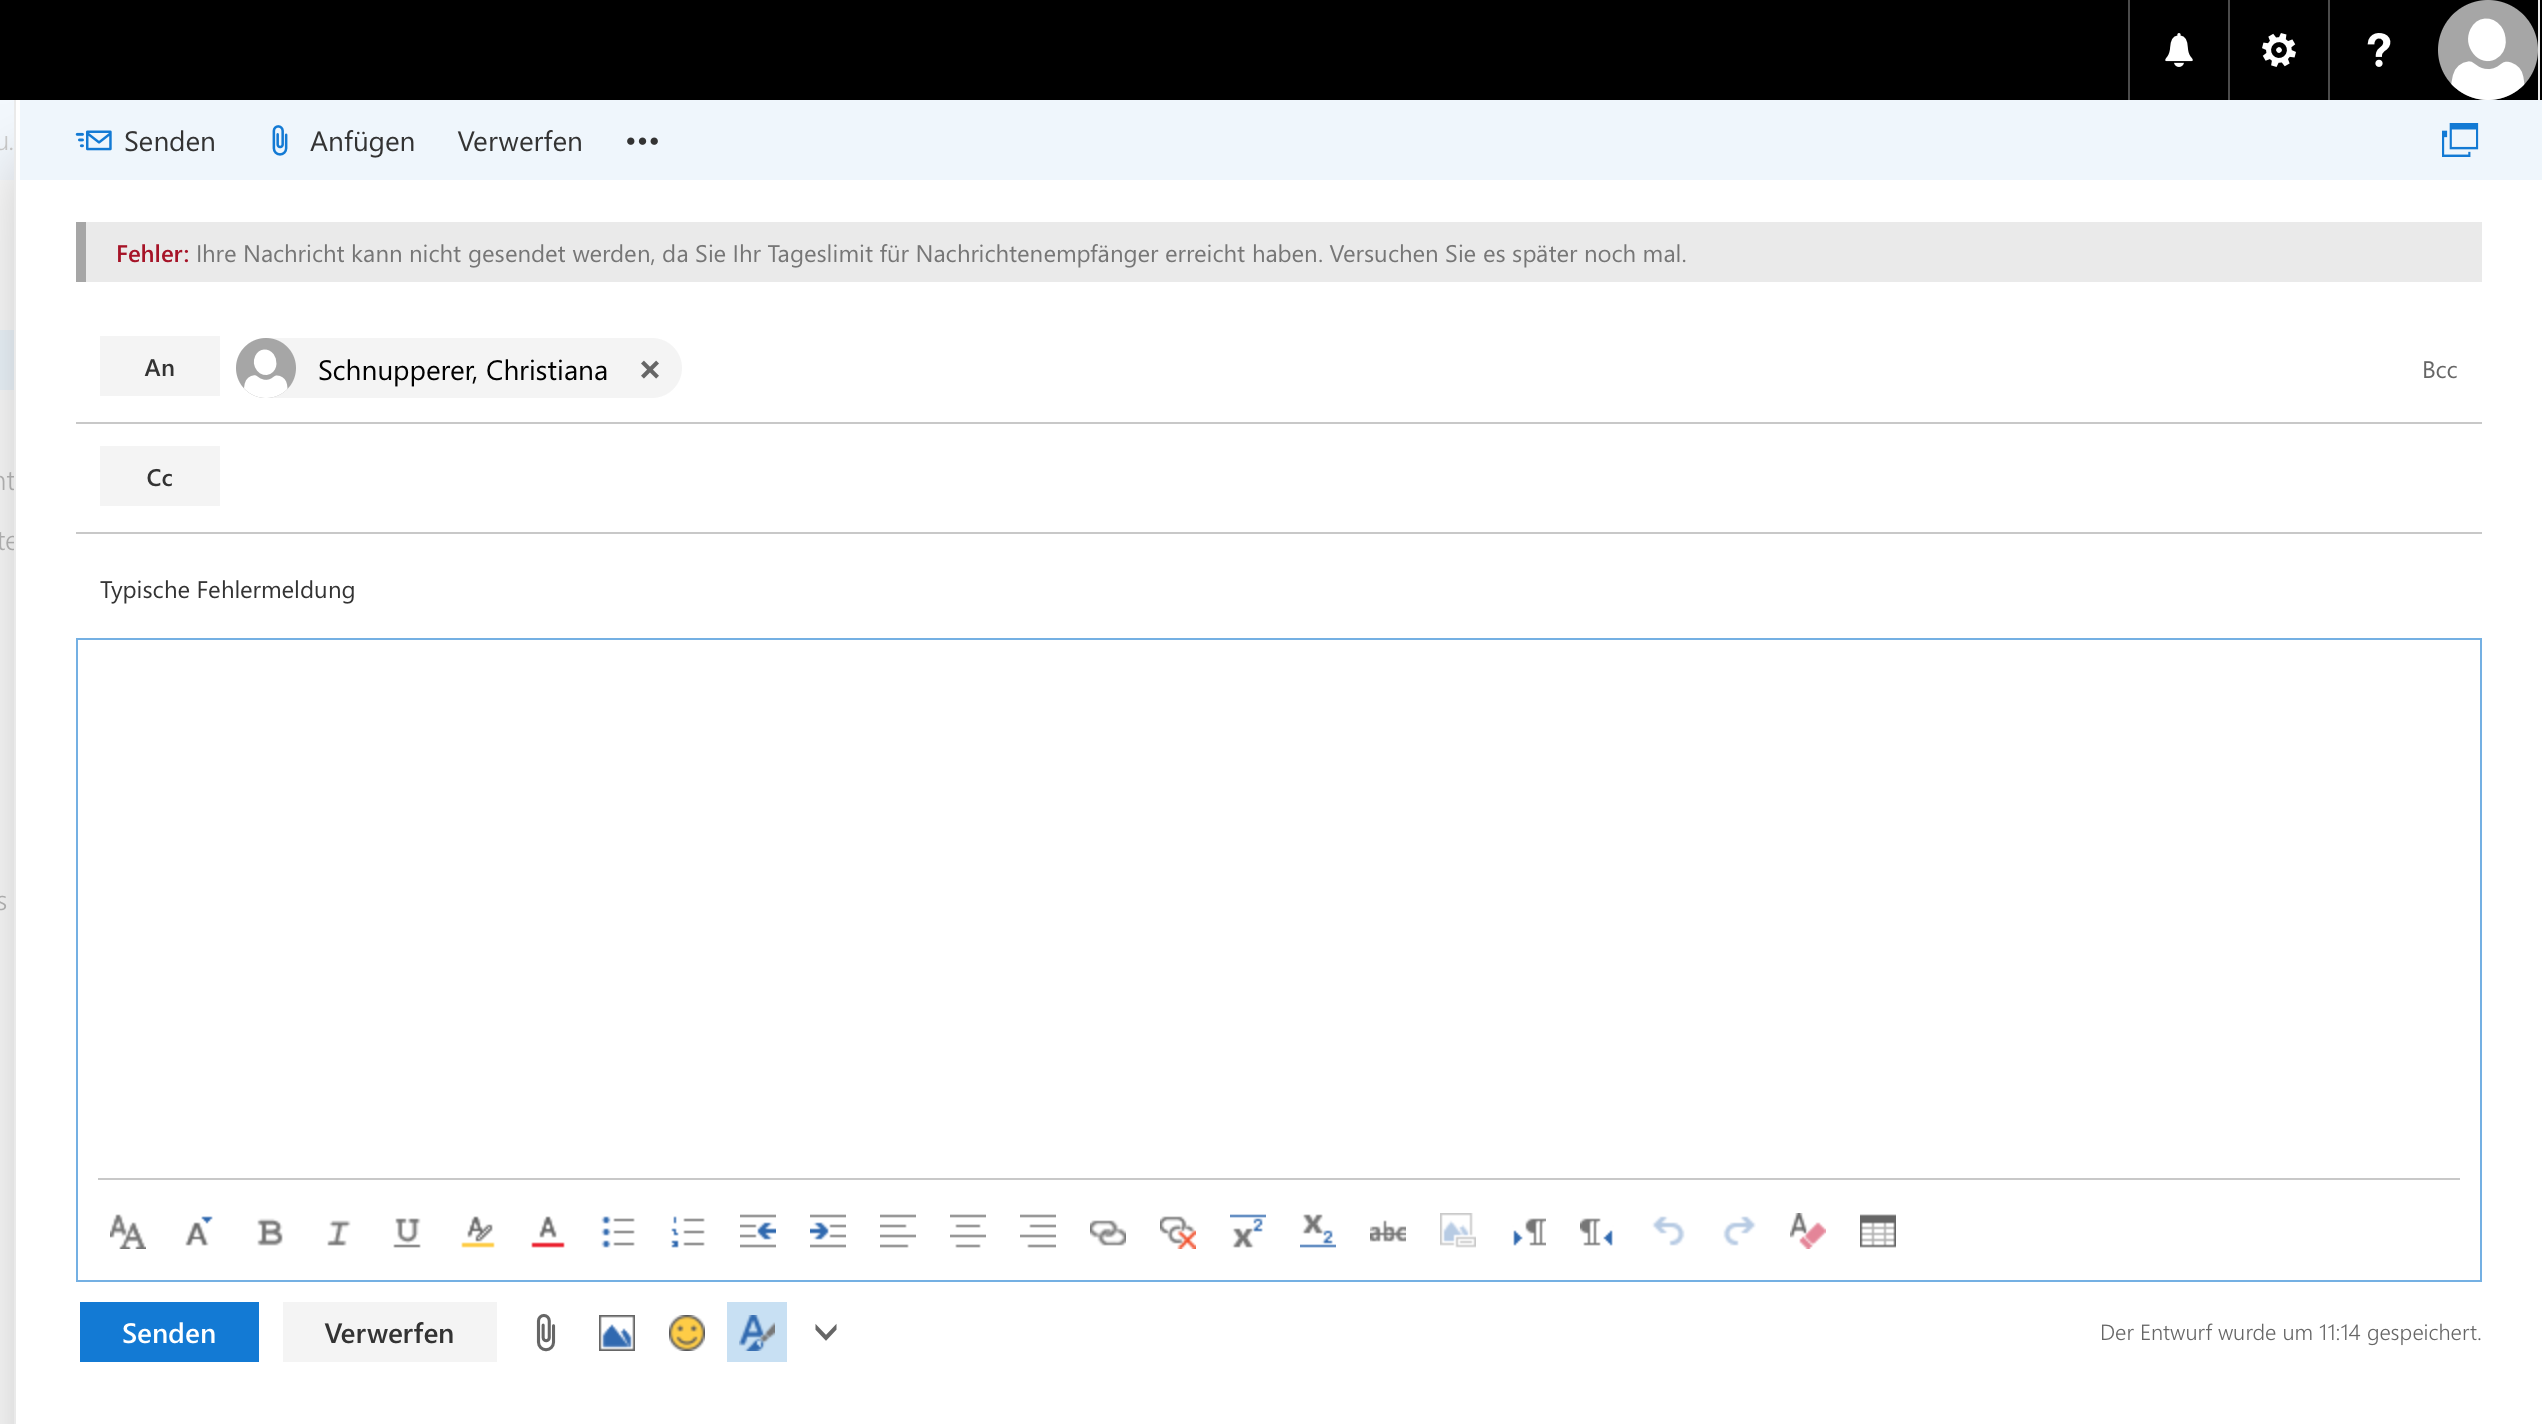
Wenn Sie an einem Tag sehr viele E-Mails oder E-Mails mit einer hohen Zahl an Empfangsadressen versendet haben, ist es möglich, dass Sie keine weiteren E-Mails mehr versenden können. Falls Sie es dennoch versuchen, öffnet sich oben rechts die nachstehende Meldung. Wenn Sie auf "Weitere Details" klicken bzw. die E-Mail bereits in einem separaten Fenster geöffnet hatten, erscheint ein Banner mit der Erklärung des Fehlers (siehe rechts).
Wie in den Details erklärt wird, haben Sie das Limit von 250 Empfängerinnen innerhalb von 24 Stunden überschritten. Das Limit setzt sich automatisch nach 24 Stunden zurück.
Die Beschränkung dient dazu, dass auch über kompromittierte Accounts nur eine begrenzte Anzahl von E-Mails verschickt wird und so das Risiko, dass die LRZ-Mailserver auf sog. "Denylists" geraten, möglichst klein gehalten werden kann.
Volles Postfach
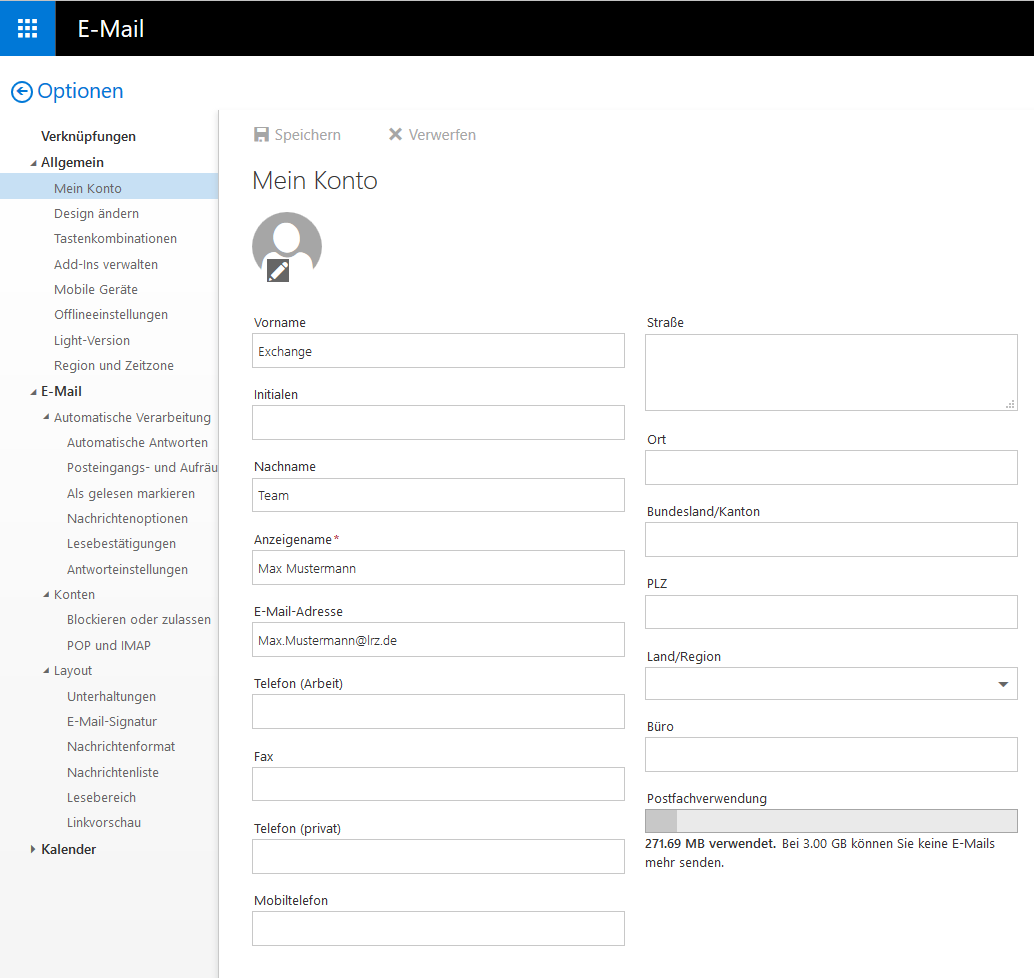
Ihre Mailbox hat eine bestimmte Größe (in der Regel 5 GiB). Wenn Sie diese überschreiten, ist es Ihnen nicht mehr möglich, E-Mails zu versenden oder zu empfangen.
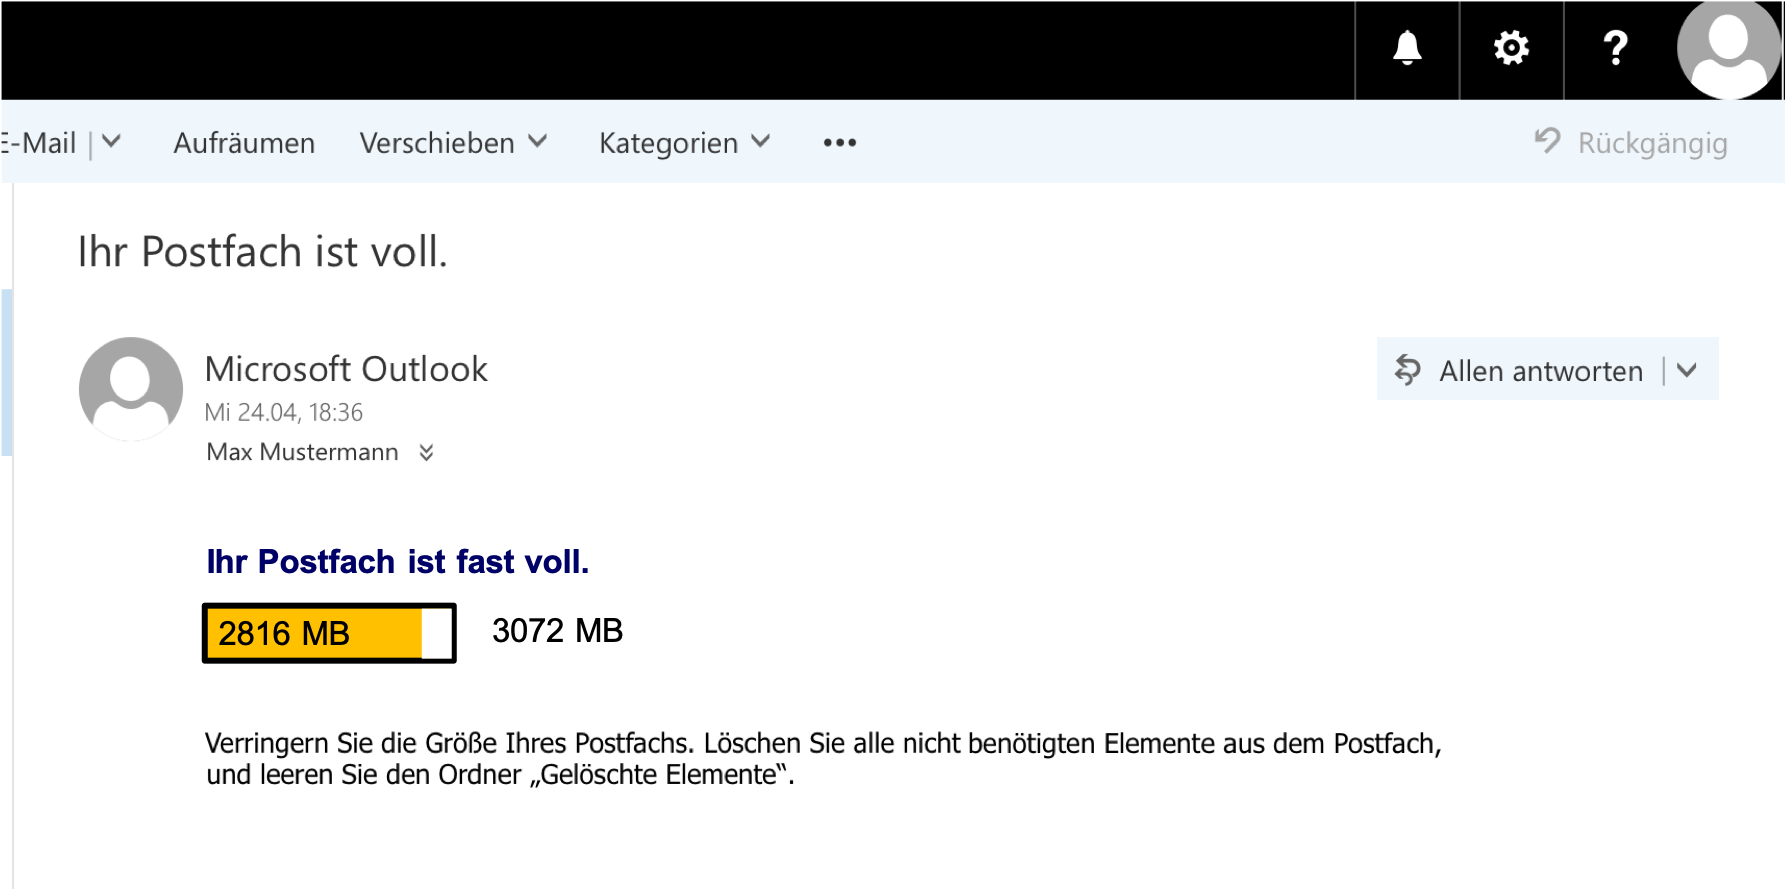
Wenn Sie an die Grenze kommen, erhalten Sie zunächst eine Warn-Mail (Von: Microsoft Outlook - quota-warning@ads.mwn.de), bei weiterem Anstieg des Speicherverbrauchs können Sie keine Nachrichten mehr senden, bei deutlichem Überschreiten des Quotas können Sie auch keine Nachrichten mehr empfangen.
Wenn Sie die Grenze erreicht haben, dass Sie keine E-Mails mehr versenden können, geht bei dem Versuch eine Mail zu versenden oben rechts eine Meldung auf.
In dieser Nachricht steht nur, dass die Nachricht nicht gesendet werden konnte. Den genauen Grund erfahren Sie, wenn Sie auf weitere Details klicken.
Nach dem Klick auf weitere Details öffnet sich das Fenster, in dem Sie die E-Mail schreiben, erneut. Diesmal ist ein Banner eingeblendet, das den genauen Grund nennt, weshalb Sie nicht versenden konnten.
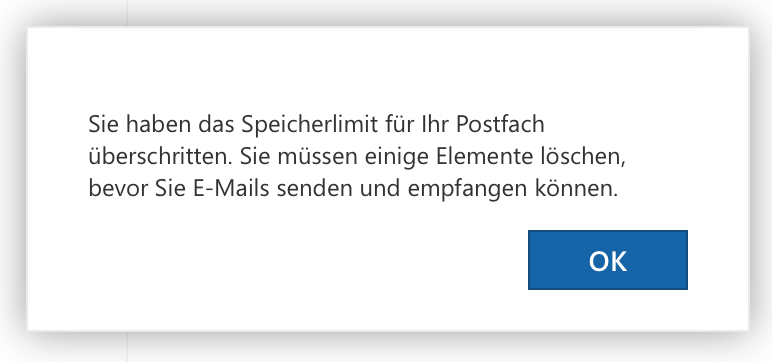
Haben Sie die Grenze deutlich überschritten, bekommen Sie bei der Anmeldung an Outlook on the Web die nebenstehende Meldung.
Den aktuellen Füllstand können Sie sehen, wenn Sie in die Optionen wechseln (Klick oben rechts auf das Zahnrad → "Optionen").
Es kann aber auch sein, dass nicht Ihre Mailbox, sondern die Mailbox der Person voll ist, an die Sie eine E-Mail versenden wollen.
Wenn diese Mailbox auch auf unseren Exchange Servern ist, wird Ihnen, bevor Sie die E-Mail versenden, mitgeteilt, dass die Mailbox voll ist.
Wenn Sie die Empfängerin auswählen erscheint folgendes Banner.
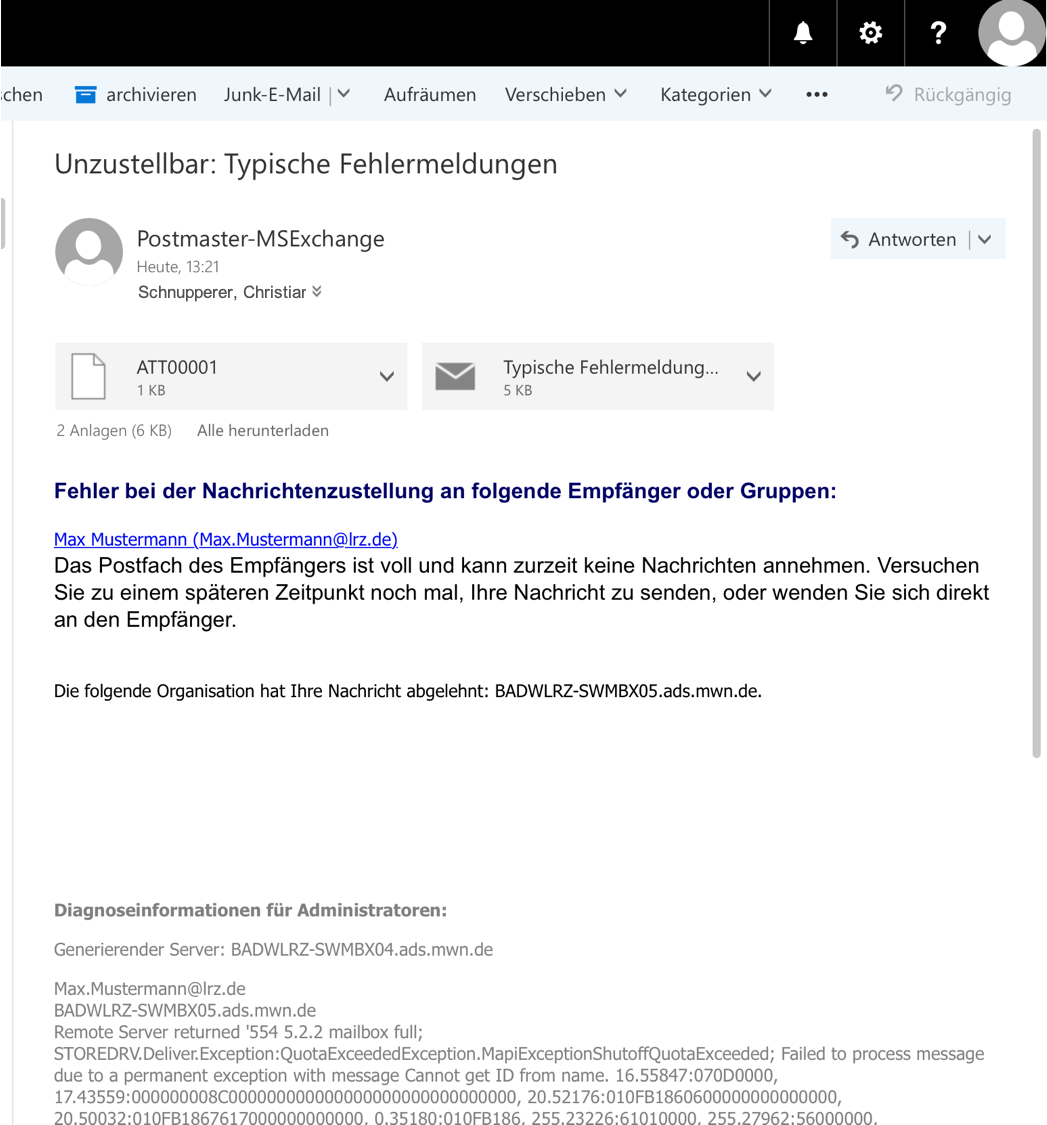
Wenn diese Mailbox auf einem anderen Server liegt, bekommen Sie eine Unzustellbarkeitsbenachrichtigung.
Diese kann ungefähr so aussehen:


