Outlook für Windows
Barrier-free
This page contains alternative texts for images/graphics.
There are two versions of Outlook: the classic version from the Microsoft Office package and the Windows app ‘New Outlook’. The new Outlook synchronises all mail accounts (incl. user name, password and all mailbox content) with Microsoft's servers and should therefore not be used.
Further information can be found here.
Setup
Outlook (classic)
![]() The tutorial was created using the on-premise version of Outlook 2019, the setup wizard may look different for the Office365 version.
The tutorial was created using the on-premise version of Outlook 2019, the setup wizard may look different for the Office365 version.
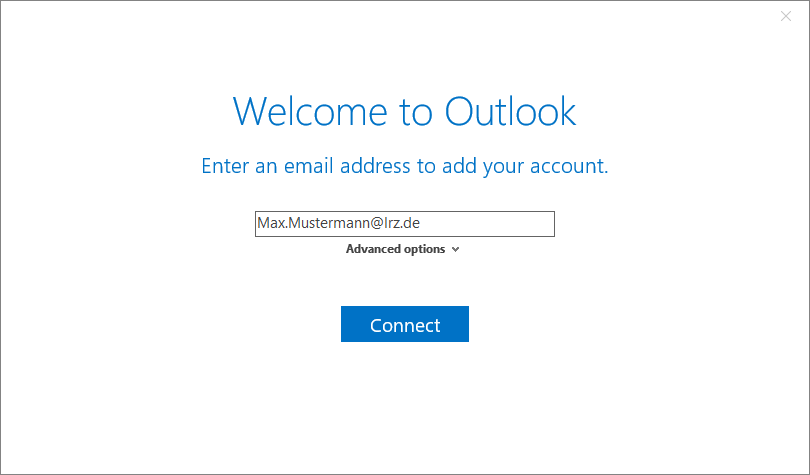
Start Outlook and enter your email address.
If Outlook does not start with a welcome window, you already have an account configured.
If you want to add another Exchange mailbox to your existing profile, please go to "File → Add account".
The welcome window will open (see above).

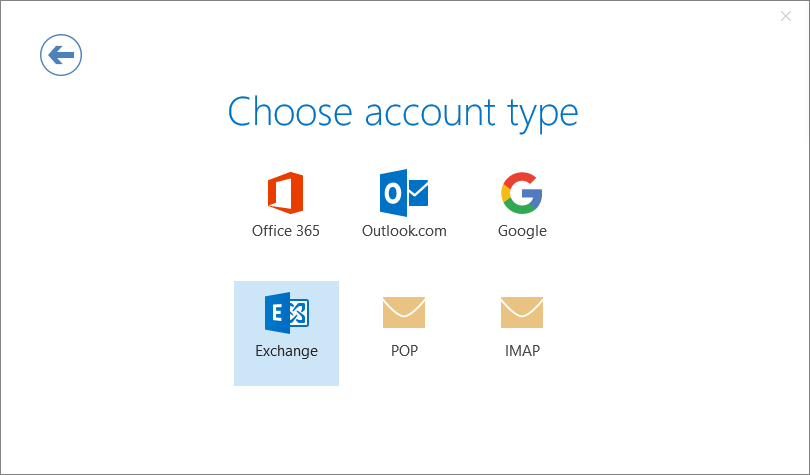
Select Exchange as the account type.
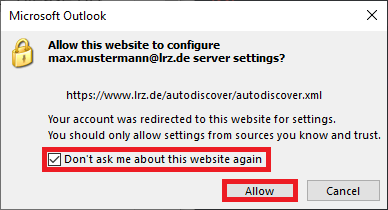
Confirm the request for autoconfiguration with "Allow". Please also check the box so that your settings can be updated automatically in the future.
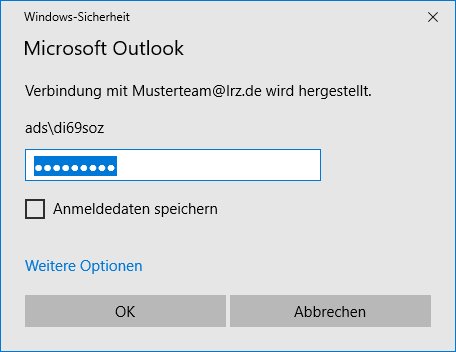
For the user name, enter your account together with the domain ads in the form ads\account, i.e. ads\di69soz in Max Mustermann's example.
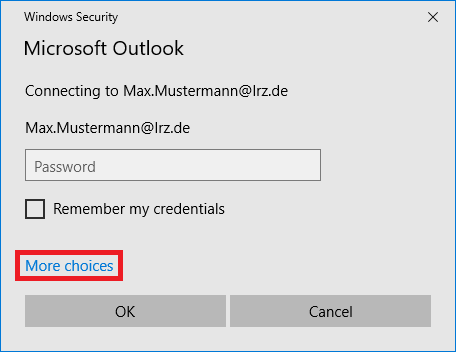
Depending on which operating system version you are using, the following password dialog will look slightly different.
If your e-mail address is already entered there, select "Use a different account" under "More choices".
»
If you want to save your credentials, simply check "Remenber my credentials.
»
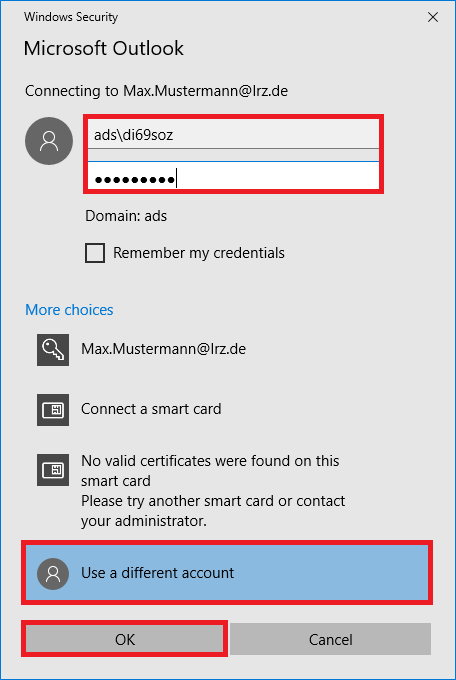
Finally, select OK twice.
Shared Mailbox
Shared mailboxes offer the possibility to jointly edit a mailbox.
Application scenarios include function addresses (such as info@domain.de), shared chair calendars (e.g. for vacation planning) and shared chair contacts that everyone is allowed to read or that several people manage together.
How do I include a shared mailbox in Outlook?
If you use Outlook, it is best to include shared mailboxes as described in this section. Then it is ensured that when processing mails from the shared mailbox, deleted mails also end up in the "Deleted items", sent mails in the "Sent items" and saved drafts in the "Drafts" folder of the shared mailbox, and not in the corresponding folders of your own mailbox. This way, all colleagues who also have access to the shared mailbox can access all emails you have sent, deleted, and saved as drafts.
For older Outlook versions or when including the shared mailbox within your own mailbox (see Adding a Shared Mailbox), the behavior described above can only be enforced by registry intervention - see:
- Deleted items: https://docs.microsoft.com/en-us/outlook/troubleshoot/email-management/deleted-items-go-to-wrong-folder
- Sent items: http://cryptojoe.blogspot.com/2011/03/outlook-2010-shared-mailbox-sent-items.html
Unfortunately, we do not know of any way to enforce the behavior for saved drafts as well.
Including a shared mailbox as a separate account
To do this, go to
"File → Add account".
Enter only the email address of the shared mailbox and click "Connect".
Select Exchange as the account type.

Following this, you will be told that you need to restart Outlook. Click "OK" and once you have done that, you will be asked for the shared mailbox credentials.
There you will need to enter ads\account as you would for your personal mailbox (not the account of the shared mailbox).
Calendar and mailbox sharing
The following explains how to grant people or groups access to parts of your Exchange account and how to access shares that have been granted to you.
Access to parts of the Exchange account can be granted only to people and groups that can be found in the address book.
Please note that the address book only lists people, shared mailboxes, resources (rooms and devices) and distribution lists. So if you want to give a group of people access to parts of your account and you can't find this group in your address lists, it means that the group is not a distribution list.
Determine which people have access to which part of my data
This can be done in Outlook by right-clicking on the resource for which you have granted shares (e.g. on the calendar icon in the left bar, as you can see in the next picture).
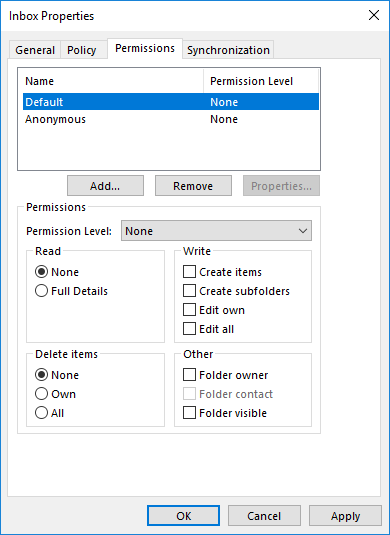
The "Properties" command will show you all the properties of the resource. Click on the tab "Permissions" to see who is allowed to access the resource and how.
You can also make changes at this point.
Give approvals
Share free/busy times of the calendar.
When you share the free/busy times, others can see when you have appointments or how you are available. (The default setting for most clients is that only availability is visible).
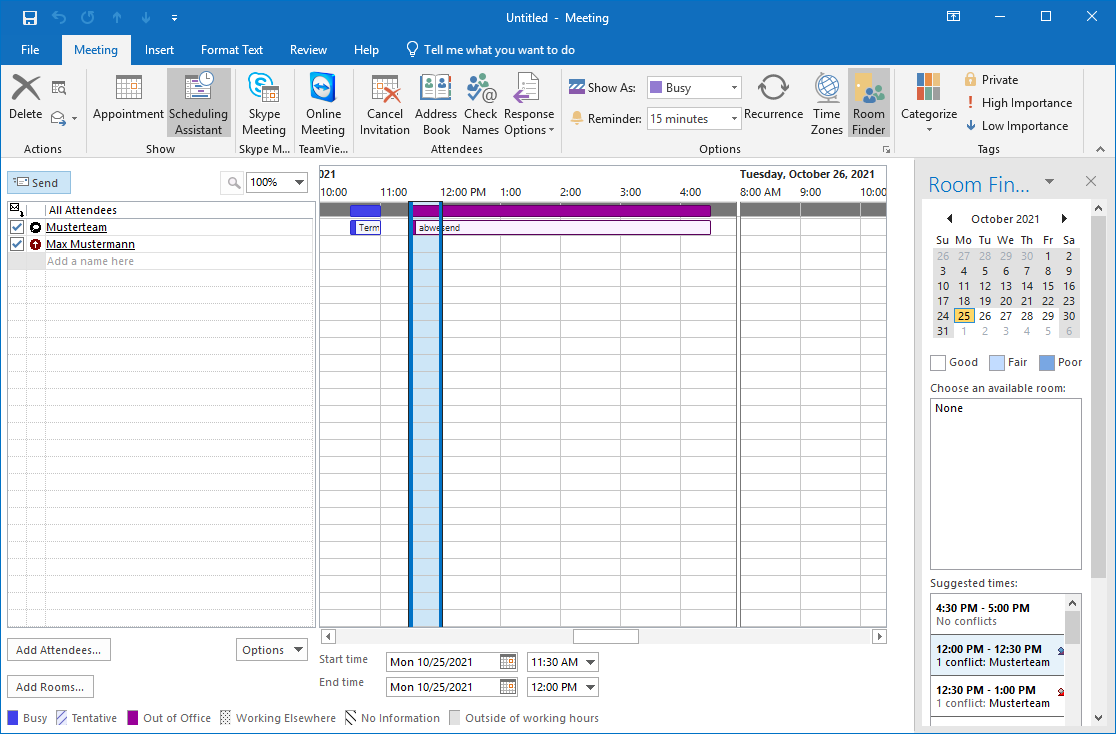
This is helpful when organizing meetings, because it allows the inviter to see at a glance in the scheduling wizard when which participant does not have time or when the best time is.
Proceed as follows:
- Right click on calendar,
- Click on "Properties" (Outlook),
- "Permissions" tab,
- "Add",
- Select person or group from address book,
- enter permissions.
To enable or restrict the free/busy times for everyone, you have to edit the "Default" entry in the "Permissions" tab. There you can e.g. define that besides the free/busy times also subject and location or also all details are visible.
If you don't want your free/busy times to be visible to everyone, you can turn it off as follows:
- Right click on Calendar,
- "Change sharing permissions",
- Permissions" tab, click on "Default" entry,
- In the "Read" section click the "None" button.
You can also add people in the way described above and specify in detail what they are allowed to do and what they are not.
Share calendar and mail folders
You can give people or groups from the address book read access to your entire mailbox by right-clicking again on the folder you want to share (Contacts, Journal, Tasks, Calendar, Notes) and then selecting "Share [Folder Name]" under "Share".
This will open a blank email that you send to the person you want to invite. You now select the person from the address book by clicking the "To:" button. Under Details you can still select the desired permission level.
If nothing else is set, the authorization level is "Reviewer".
Change permission levels
- Right click on the mail folder in question,
- "Properties",
- Permissions" tab,
- "Add",
- Select person from address book,
- Enter permissions.
In order for the folder to be accessed by the other person, you must assign the "Folder visible" permission for all folders above (including the mailbox itself) in the hierarchy. Permissions are not inherited downwards.
Permission levels
Permission Level | Activities that a share user can perform |
Owner | Create, read, modify and delete all items in the shared folder. As an owner, a user can change the permission levels that others have for the folder. |
Publilshing Editor | Create, read, modify and delete all items and create subfolders. |
Editor | Create, read, modify and delete all items. |
Publilshing Author | Create and read items, create subfolders, and modify and delete items you have created. |
Author | Create and read items, as well as modify and delete items you have created. |
Nonediting Author | Create and read items and delete items you have created. |
Reviewer | Read items only. |
Contributor | Create items only. |
Custom | Perform activities defined by the folder owner. |
Free/Busy time, subject, location | Only for calendar shares, reading the free/busy information and subject and location of calendar events. |
Free/Busy time | Only for calendar sharing, reading free/busy information, calendar events. |
None | Execution of no activities. The user remains in the permission list, but has no permission and cannot open the folder. |
Publishing calendars on the web
If you don't want to share your calendar only with certain people or groups within Exchange, but for example synchronize it with a personal calendar you have with another provider on the web (e.g. Google) or publish it on the web, there are a number of possibilities.
There are a number of tools (some third-party) for Outlook that you can use. Below are some hints and links on how to proceed - depending on what exactly you want to do.
Please note that we cannot provide support for specific issues with other platforms or third-party tools.
Publish calendar
If you want to publish your calendar with Outlook, you need to do the following steps:
In your Outlook, go to the Calendar module and select the calendar you want to publish on the left side. Then click on "Publish online" in the ribbon and there on "Publish this calendar...".
In your default browser, the Outlook on the Web login page will then open, where you will need to log in. You will then be taken to the "Publish calendar" page. There you can specify which calendar you want to share or publish. You can also specify whether you want to publish availability only, limited details or all details. Complete the process by clicking "Save" (top left). This will give you two links (an ics link and an html link) that you can share with those you want to have access to your calendar. The links are random links that cannot be guessed. They will be regenerated each time you republish the calendar.
Once you have published a calendar, you can change the settings or stop publishing at any time. To do this, follow the same procedure as for publishing, and then select the option "Configure this published calendar..." under "Publish online". This will take you back to the sharing page in your browser and you can change or stop publishing.
You can also set publishing directly in Outlook on the Web. To do this, go to the options and select Calendar → Shared Calendars → Calendar Publishing.
Opening shared calendars, mailboxes etc.
In Outlook you can open folders of other users via "File → Open and export → Other Users's Folder". There you can select both the user and the folder type (Inbox, Calendar, Tasks...).
Outlook is often very bad at "noticing" that you have been given a share. So if you can't access a share, quit Outlook and restart it.
After a folder has been shared with you, you can mount the folder with you. If it is a standard folder (Inbox, Notes, Contacts, Calendar, Journal and Tasks), there are no differences between Outlook versions. In Outlook, go to "File → Open → Other Users's Folder" and select in the menu there which folder you want to include from which person. If you have the rights, this folder will be displayed and you can work with it, depending on which permission level you have.
Please note that subfolders are not displayed and will not be included. Likewise, you do not have automatic rights to the subfolders (there is no automatic inheritance of rights to subfolders).
Delegates
Representing other persons
You can perform the following tasks, provided you have been authorized to do so:
- Write mails on behalf of the other person:
If you are in the other person's mailbox, you will get a "From:" button when writing a new mail and you can choose whether the mail should be sent with your sender address or the other person's sender address. In the latter case, your mail address will be recorded in an additional header line "Sender", so that the recipients can see who sent the e-mail.
If the button is not displayed, you have to activate the display of the button in the options ("From" button). Where exactly to click here depends on the Outlook version - it is best to consult the online help (via the F1 key or the blue round button with the question mark) by specifying the search text "Create an e-mail message for another person".
- Replying to mails on behalf of the other person: analogously.
- "Saving sent items in the Sent Items folder of another user": see the section of the same name in the Outlook Online Help.
- Creating meeting requests/meetings on behalf of another person:
From another person's calendar, automatically create requests on their behalf.
Add a shared mailbox
To do this, go to "File → Account Settings → Account Settings..." in Outlook.
In the window that opens, you need to double-click to select your Exchange account:
In the "Change account" window, click on "More Settings ...":
»
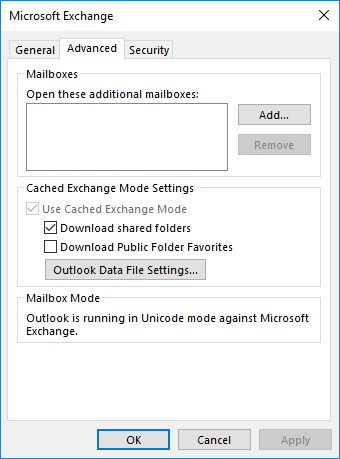
Now select the "Advanced" tab
and click there on "Add...":
Now you only have to
the name of the person
whose mailbox you want
to open you would like to
open and confirm with "OK".
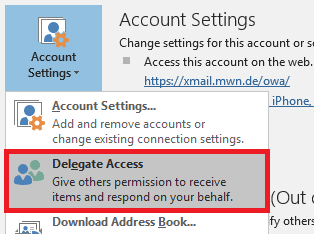
Set up delegate access and "Send on Behalf" for others
In Outlook, you can specify delegates via "File → Account settings → Delegate Access".
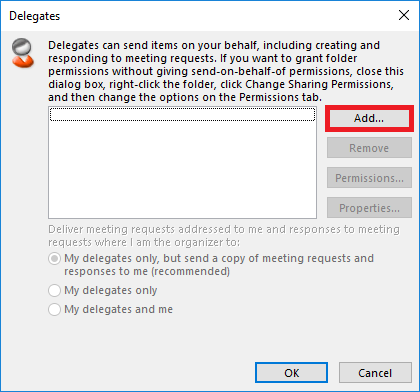
Via "Add" you can select persons from the address book. Another dialog will then appear in which you can determine which rights your delegates should receive:
Please note that the "Send on Behalf" right can only be assigned to objects that are in your organization's address book.
It cannot be assigned to any mail addresses, not even to distribution lists/mailing lists or to ActiveDirectory groups.
Also note that this way the delegates automatically gets the right "Send on Behalf" (editor). If you do not want to give them this right at all, but e.g. only read rights, then you should only set up a share.
Make sure that your delegates also have permissions to the top folder (folder above Inbox), otherwise they cannot open any mail folders.

Email Rules
To increase the clarity in a mailbox, it is often useful to automatically sort incoming e-mails into other folders based on certain criteria. Exchange offers you the possibility to create server-side filter rules.
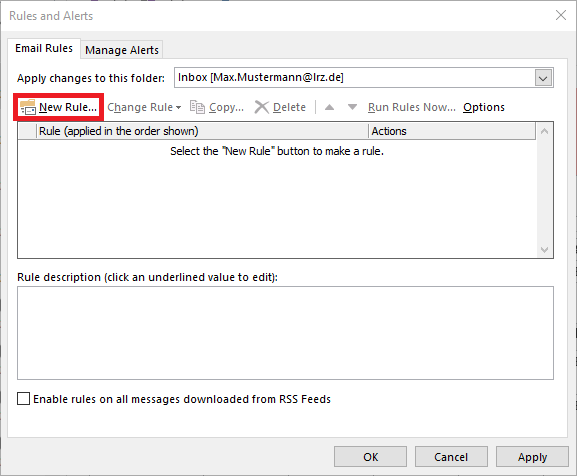
In Outlook, under the "Home" tab, you will find the "Manage Rules & Alerts" button. If you click on it, the adjoining window will open.
There you can create new rules or edit already existing ones.
Examples for filter rules
Filter newsletters
In order for newsletters to be filtered, we have introduced tagging for some major newsletter senders, which is done through special header lines in the email. Create a rule without a template that will be applied to messages you receive.
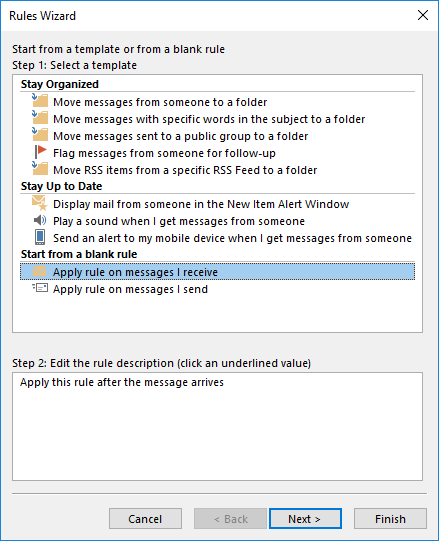
Then select "with specific words in the message header" and enter "X-Newsletter ISP" and "X-Newsletter Sender" for "specific words".
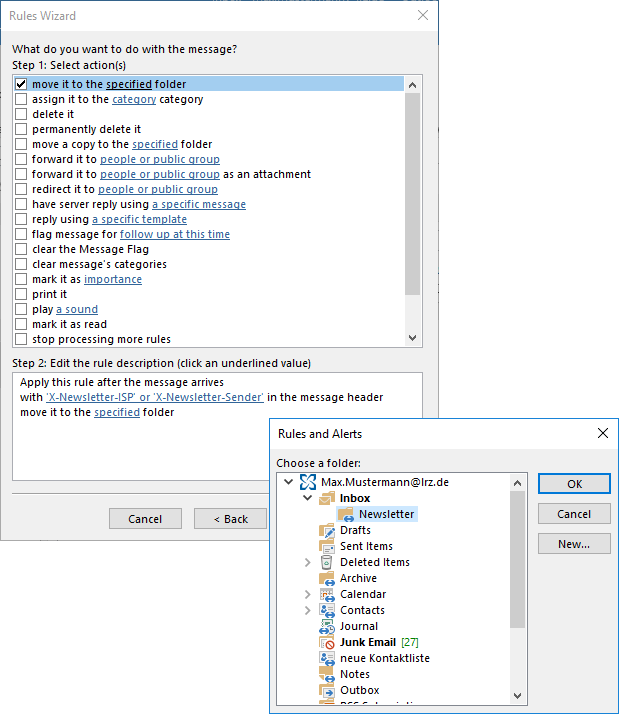
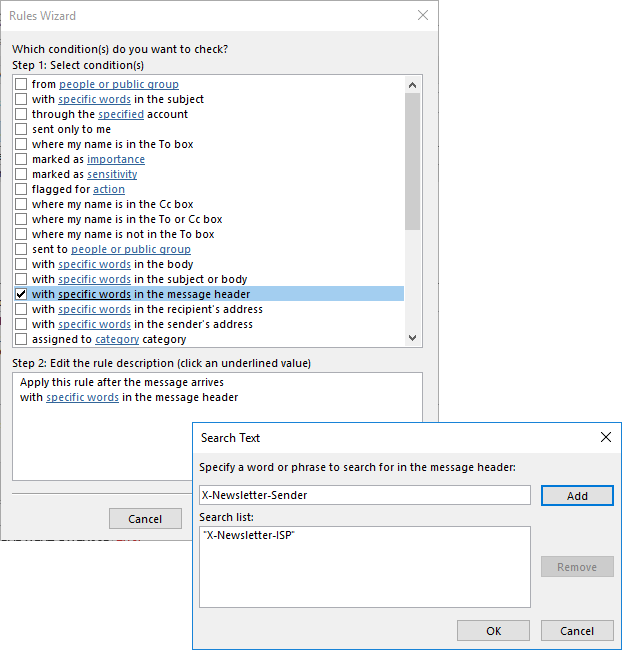 Then select a folder to which the newsletters should be moved and finish the wizard.
Filter mailing lists
To filter out emails from mailing lists, create a rule analogous to the newsletter rule. Check for the header fields "List-Id" and "List-Unsubscribe" and move these emails to any folder.
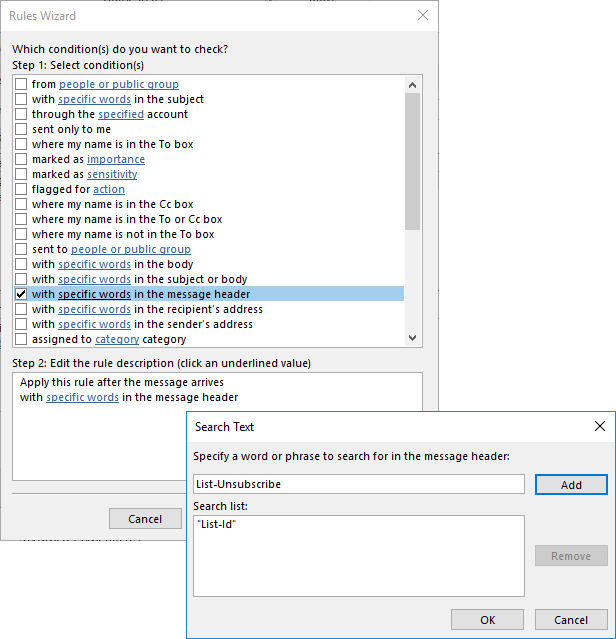
Note, if you want to filter newsletters as well, that many newsletters also use these fields. That is why the filter for newsletters should come before the filter for mailing lists in the list of filter rules.
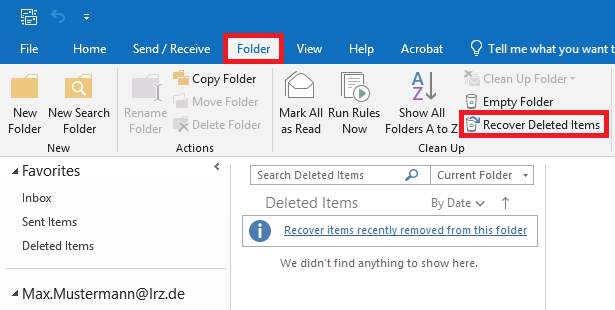
Recover deleted items
Mails, appointments, tasks and contacts that you delete are first found in Outlook in the special folder "Deleted Items".
There is no sliding deletion there, the items remain there until you delete them permanently:
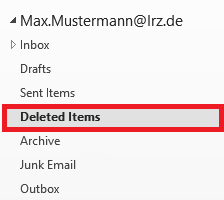
But even the "final deletion" is not really final, see next section.
Restoring deleted items: you can drag them with the mouse to where you want them, i.e. appointments drag to the "Calendar" button at the bottom left or to the "Tasks" button (to make it a task), also at the bottom left, mails to your inbox or to the mail folder you want as destination, etc.
How do I recover permanently deleted items?
Even then, if you have deleted an item from the special "Deleted Items" folder, you can still recover it within a period of 14 days, via "Folder → Recover Deleted Items" (see the figure). However, this only works for your Exchange mailbox, not for IMAP mailboxes. If you have selected an IMAP mailbox or a folder in it, you will therefore not see the "Recover deleted items" menu item.
How do I restore items that I deleted with "Shift + Del"?
Note that you must restore items you deleted with the "Shift + Del" keyboard shortcut from the folder where you deleted them, i.e. the folder must have been clicked on in Outlook beforehand. Again, use "Folder → Recover Deleted Items". Note that this does not work with Outlook on the Web: there you can only restore items that have been permanently deleted from the Recycle Bin, i.e. from the Deleted Items folder.
Address book
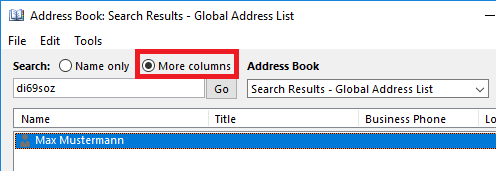
In Outlook you will find the button for the address book in the form of a small open book at the top, relatively far to the right.
By default, you can search in the address book only by name (meaning the display name).
If you click on the "More columns" button, you can also search for the mail address or the identifier. Function addresses, rooms and resources are also entered in the address book.
If you write a new mail in Outlook and are entering the addresses, you can use Ctrl-K to search for the previously typed text in the global address list. This search is a real substring search, i.e. all entries are found in which the search string appears somehow - not only at the beginning, as with the search in the address book.
Download offline address book
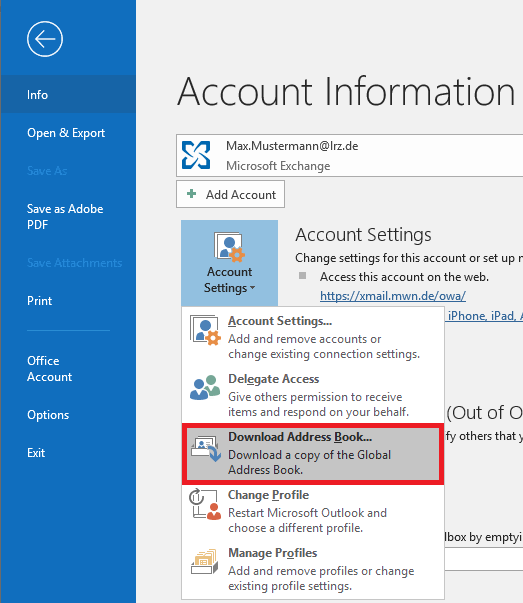
If you don't find some users in your offline address book, this can have two reasons. First, it may be that the user was newly created and the address book has not yet been updated on the server side (this is done automatically twice a day) or your offline address book is not up to date. You can update it as follows:
Click File in the Office ribbon.
Click Account Settings.
Then click Download Address Book....
Encrypt and sign
In order to send e-mails signed or encrypted with S/MIME using Outlook, you need a personal user certificate.
As a member of TUM, you can find information on how to apply for a certificate at https://www.it.tum.de/en/it/certificates/. If you have any difficulties in doing so, please contact the IT support of TUM (it-support@tum.de).
For the other institutions of the MWN, we are currently not aware of any way to obtain a personal user certificate.
Please pay attention to the correct format when downloading your certificate. Unfortunately, some operating systems (e.g. Windows, MacOS) only support TripleDES-SHA1.
For further information, please visit https://doku.tid.dfn.de/de:dfnpki:tcs:usercert#auswahl_des_key_protection_algorithms_in_formularen_fuer_p12-dateien.
Please note that the encryption method with S/MIME described here is not compatible with the PGP method which is especially widespread under Unix/Linux. PGP is not supported by Outlook and Outlook on the Web.
Briefly, the essential properties of signed and encrypted e-mails:
- Signing an e-mail ensures that it cannot be manipulated unnoticed on its way from the sender to the recipient. Whether the e-mail is transmitted in encrypted form depends on whether the mail systems involved support transport encryption.
- By encrypting an e-mail, the content is already encrypted before it is sent and is therefore transmitted in encrypted form (and also stored in the mailbox in encrypted form) regardless of the properties of the mail systems involved. When working with encryption, it is essential to keep your own certificate (especially the private key) in a loss-proof manner, as otherwise encrypted e-mails can no longer be read - neither those you have encrypted yourself nor those you have received.
General preparations
Before you can sign or encrypt e-mails, you have to import your user certificate on your computer. If you want to send digitally signed or encrypted e-mails from multiple computers, you must import the certificate on each of these computers. This also applies if you want to read encrypted emails on multiple PCs.
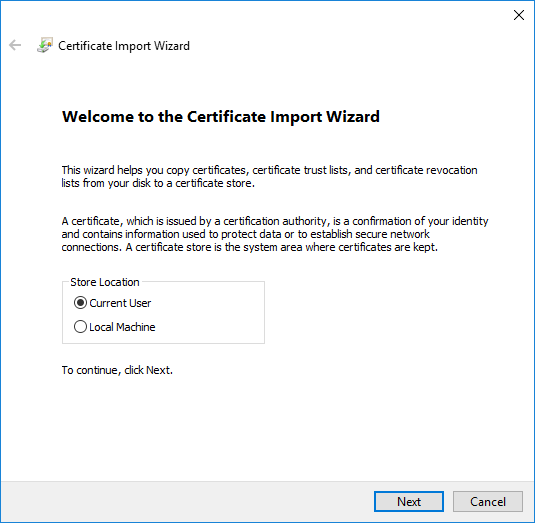
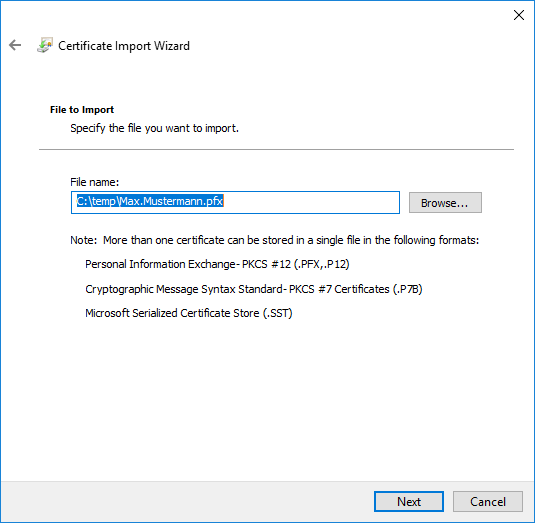
Double-click on your certificate file (file with extension ".p12" or ".pfx") in Windows Explorer to open a certificate import wizard. Select "Current User" as the location and click "Next" to make your desired settings:
Confirm the file to be imported by clicking on "Next".
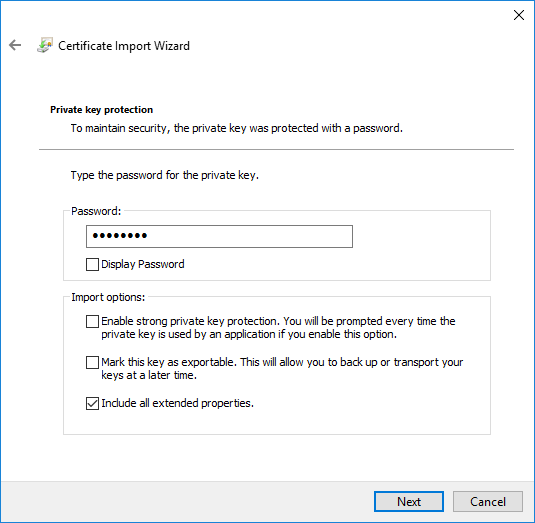
Now enter the password for the private key. You can also now decide whether you want your private key to be exported subsequently from this computer. If you want this, please set the second check mark in this window. Only if you have selected this setting, you (or potential attackers!) can, after entering the password, export the private key at a later time.
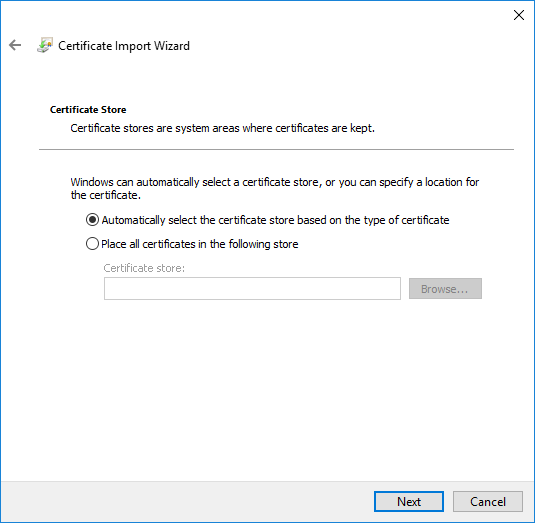
Windows now automatically selects the correct store for your certificate. Confirm this setting as well by clicking on "Next".
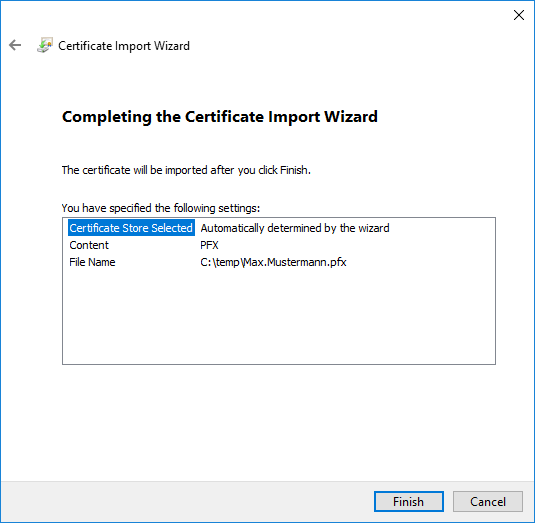
Please check your settings once more and confirm.
Configuration for the use of S/MIME
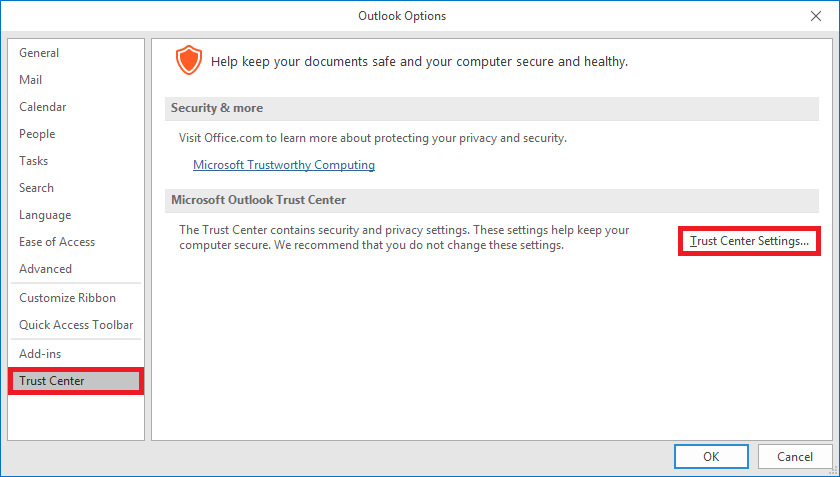
If the certificate is available in the certificate store of your computer, you can proceed with the configuration of Outlook. Call up the Outlook options (File → Options).
Then select in the in the "Trust Center" and click there on "Trust Center Settings...".
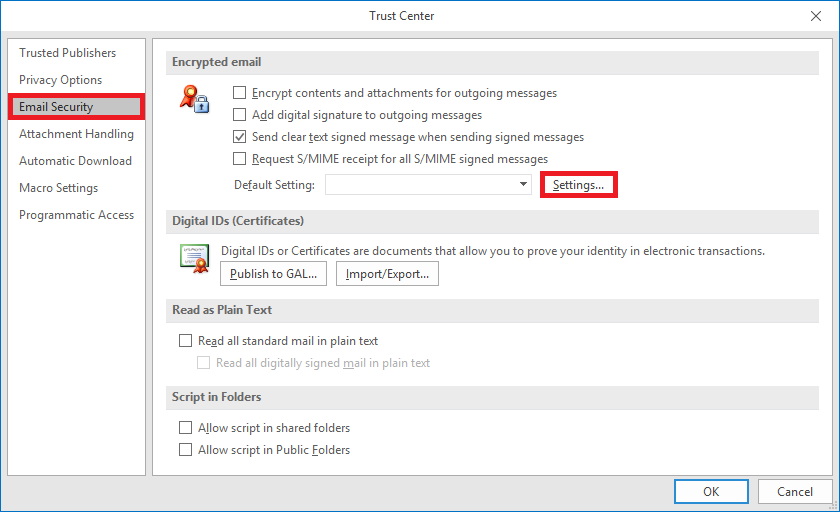
Now switch to the "Email Security" area. There you can make several settings regarding digitally signed and encrypted e-mails. If you want to automatically digitally sign every outgoing e-mail from now on, you can make the corresponding setting here. You can also publish your certificate to the GAL (Global Address List) to make it available to other users.
Now click on "Settings".
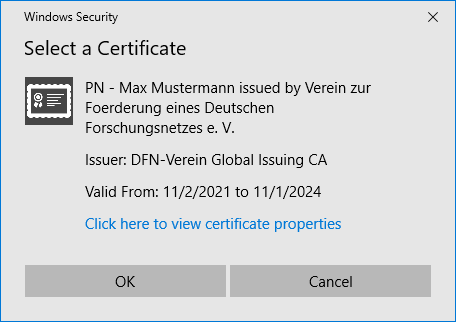
Check the security settings and make sure the correct certificate is selected for both signature and encryption.
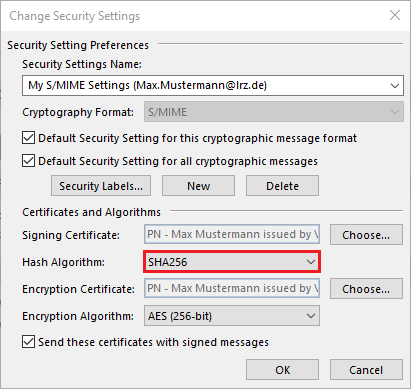
Now you can select your just configured security setting at the default setting and make some more settings. Select "SHA256" for hash algorithm.
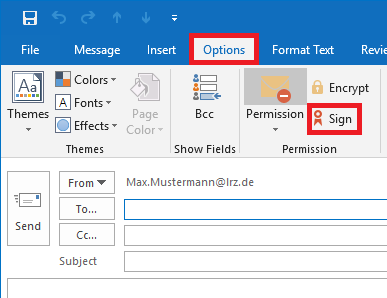
Sign emails digitally with S/MIME
To add a digital signature to an e-mail under Outlook, switch to the "Options" tab before sending and click on "Sign" there. If you want to automatically sign every e-mail, you can configure this in the security settings.
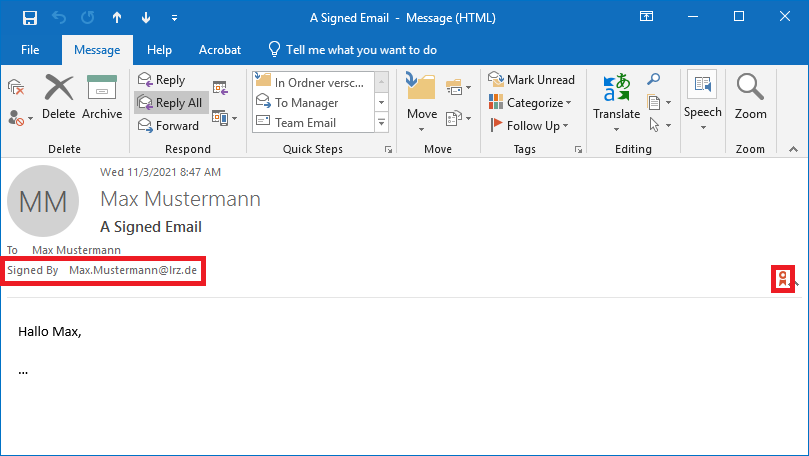
The recipient can already see in the preview that the e-mail has been digitally signed.

In the email, you can now see who signed it. If you click on the certificate icon, you can view the sender's certificate.
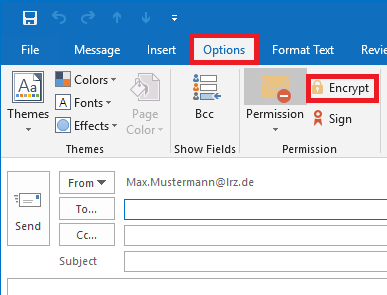
Encrypt emails with S/MIME
If you want to encrypt an e-mail, proceed in the same way as for signing an e-mail. Just select the "Encrypt" option instead of the "Sign" option. In contrast to signing, you need not only your own certificate, but also the certificate (more precisely: the public key) of the mail recipient.
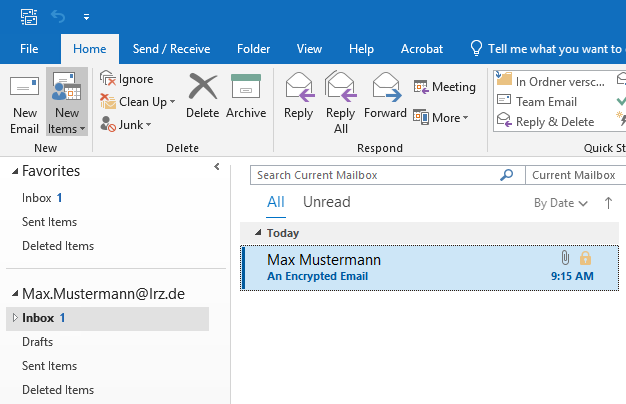
When receiving an encrypted e-mail, it is not uncommon for it to have the note "[UNSCANNED]" in the subject line. This note is added by a virus scanner because this email could not be scanned for viruses due to the encryption.
How do I get the public certificate of a recipient?
To send encrypted emails you always need the certificate of the recipient. If you do not have this, there are several ways how you can possibly find the certificate:
A digitally signed or encrypted e-mail from the recipient.
If you have already received a digitally signed or encrypted e-mail from the recipient, the public certificate was also sent to you in this e-mail. If you reply to such an e-mail, you can also encrypt it because the certificate is known.
However, if you compose a new e-mail and type the e-mail address "by hand" into the To field (even with Outlook autocomplete), the recipient's certificate is not available. You have to either create a new contact with a certificate (right-click on the sender → "Add to Outlook Contacts") or add the certificate to an existing contact.
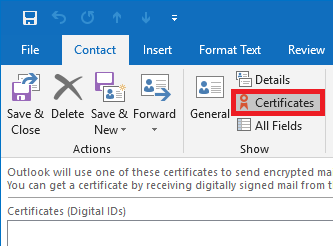
To do this, open the contact and click on "Certificates" there. There you can now import a certificate or display the properties of an existing one.
Global address list of the Exchange Server
If the recipient has published his certificate in the GAL (Global Address List), you can simply select him from the address book and encrypt the message. You can check whether the recipient has published the certificate there as follows:
Open your address book and search for the desired recipient. Now right-click on the name and select the "Add to Contacts" option. Now click on "Certificates", as already described for variant 1, to display all available certificates. When closing the window Outlook asks you if you want to save the changes. Click on "No" if you have not made any changes.
Notes
When Outlook stops working properly
Sometimes Outlook "breaks" and may show a variety of strange symptoms, e.g. it may have problems connecting to the Exchange server, you may not be able to find certain mails, folders, etc., or you may not be able to access shares given to you by other users, etc. Your data is still preserved at the Exchange server, but you may need to repair your Outlook. Please proceed in this order:
- Restart Outlook. If that did not help,
- Restart the computer. If that did not help,
- Delete your Outlook profile and create it again.
- If you still have problems, please contact your respective contact person.
How do I create a new Outlook profile?
An Outlook profile contains configuration information for e-mail accounts and data files, as well as information about where e-mail items are stored. Profiles are edited in the Control Panel in Windows and not in Outlook.
A new profile is the solution to many problems with Outlook because it tends to crash. When you create a new profile no e-mails are lost, because they are stored on the server. Also PST files (e.g. locally created archives) are not lost, because they are only mounted in your Outlook profile, you only have to mount them in the new profile again. But before you delete the broken profile, you should check if you have created client-based filter rules or set a signature. These, as well as changes to the view would then also be deleted. However, it is not necessary to delete the old profile right away. If you want to test whether your problem is solved with a new profile, you can create an additional profile. When you start Outlook, you can then select which profile you want to start.
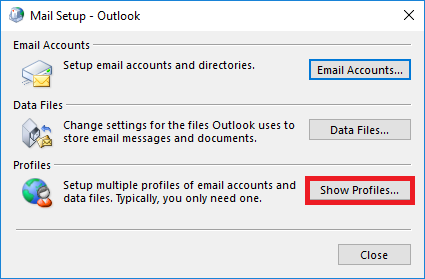
- Open the Control Panel and select Mail or E-mail. There go to "Show Profiles...":
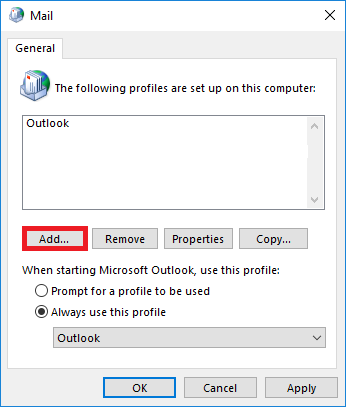
- Now click on "Add" and give your profile a new name.
- After that the setup wizard starts as described under Setup.
- After the setup is finished, you can still specify in the window above which profile should be used when Outlook is started or if you can select the profile every time you start it.
Tips for a stable and performant Outlook
The tips apply to Outlook in general, not only to the Exchange service operated by the LRZ.
- Beware of very large pst files! Regularly save attachments elsewhere. Clean up your mailbox.
- Deactivate RSS feeds.
- Third party tools (add-ins) can influence stability. Start Outlook via command line with "c:\...\outlook.exe /safe" and remove add-ins manually.
- Double entries often occur during synchronizations. Third party tools like "Outlook Duplicate Items Remover" from Vaita can help here as well.
It is not recommended to store Outlook PST files on a network drive and use them from there. The PST file can be destroyed by the slightest network interruptions.
It is better to store only one copy of the local PST file on the network drive if you want to back up your data that way.
Where can I find further information about Outlook?
Outlook itself provides the internal Outlook help. You start this by pressing the help key F1.
Microsoft offers online Outlook help and learning: https://support.microsoft.com/en-us/outlook
How do I set up a forwarding?
Forwarding to another address can only be set up via the respective portals:
→ Exchange-Dienst from Identity Management Portale
Please note that forwardings based on rules in Outlook or Outlook on the Web that point to external addresses are not executed:
→ Policies für den Exchange-Dienst under With Outlook/Outlook on the Web no forwardings to external addresses
How do I set up an out of office message?
To do this, proceed as follows:
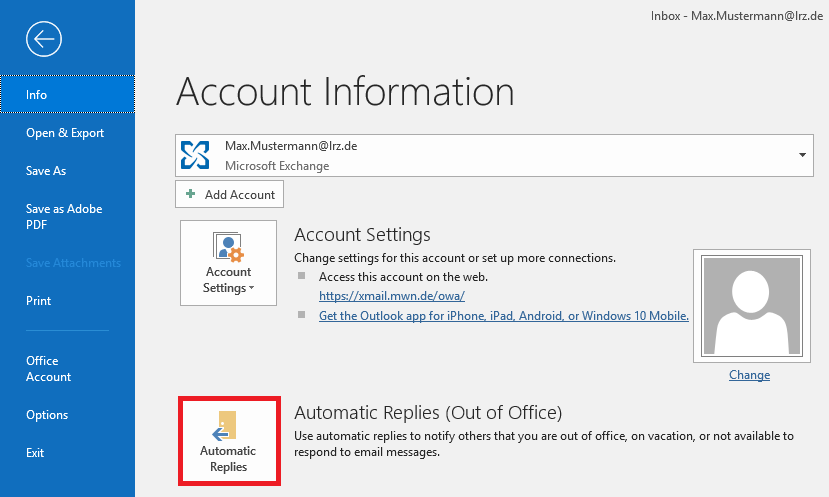
- File → Automatic replies (see following figure).
In all cases, you can configure different absence messages for senders inside and outside your institution (e.g. TUM).
By the way, your out of office message will not be triggered for mail from mailing lists and mail marked as spam.
Typical error messages
Why can't I send e-mails anymore?
What does an undeliverable message with error code 0x80004005-0x80004005-0x000501 mean?
You are receiving this e-mail because the sending of e-mails is limited to a maximum of 250 recipients per 24 hours.
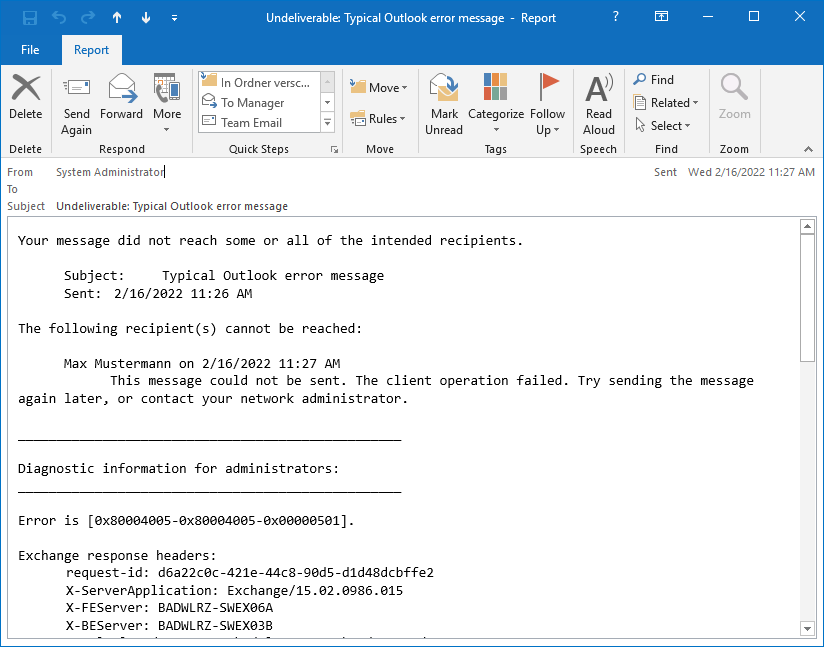
The error message is very long and not very meaningful at the beginning. Scroll down to the bottom of the email.
In the last paragraph you will find the reason why you can't send any more emails.
"The message can't be submitted because the sender's submission quota was exceeded.
"
This indicates that you have exceeded the limit of 250 recipients within 24 hours. The limit resets automatically after 24 hours.
The purpose of the limit is to ensure that only a limited number of e-mails are sent, even via compromised accounts, and thus to minimize the risk of LRZ mail servers ending up on so-called "denylists".
Response Exceptions: ROP-Index: 4 ROP zugeordnet: ropTransportSend (74) Microsoft.Exchange.Data.Storage.SubmissionQuotaExceededException:
The message can't be submitted because the sender's submission quota was exceeded.
at Microsoft.Exchange.Data.Storage.CoreItem.<OnBeforeSend>b__113_0() at Microsoft.Exchange.Data.Storage.CoreItem.TransportSend(PropertyDefinition[]& propertyDefinitions, Object[]& propertyValues) at Microsoft.Exchange.RpcClientAccess.Handler.Message.TransportSend() at Microsoft.Exchange.RpcClientAccess.Handler.RopHandler.<>c__DisplayClass153_0.<TransportSend>b__0() at Microsoft.Exchange.RpcClientAccess.Handler.ExceptionTranslator.TryExecuteCatchAndTranslateExceptions[TResult](Func`1 protectedCode, Func`2 errorCodeExtractor, Boolean noThrow, TResult& result, Exception& exception, ErrorCode& errorCode)
Full mailbox
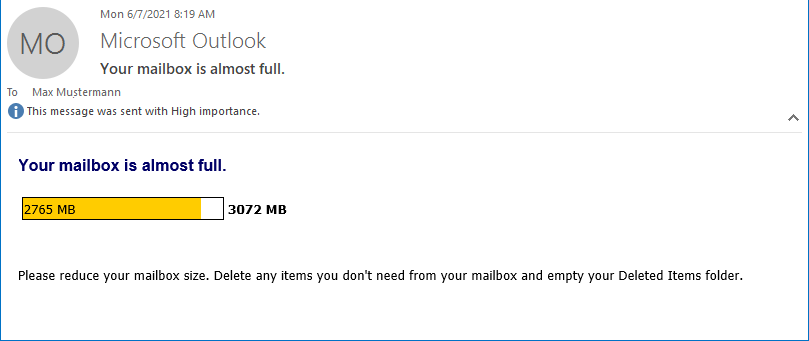
Your mailbox has a certain size (usually 3 GiB), if you exceed it you will not be able to send or receive emails.
When you reach the limit, you will first receive a warning mail (From: Microsoft Outlook - quota-warning@ads.mwn.de), if the memory consumption continues to increase, you will not be able to send any messages, if the quota is significantly exceeded, you will not be able to receive any messages either.
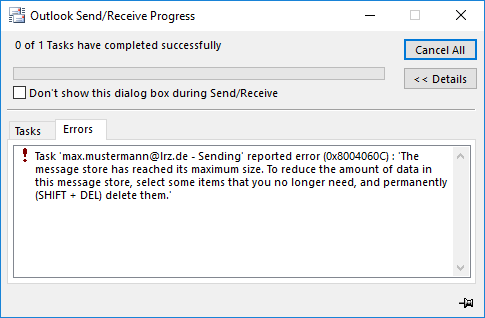
When you reach the limit that you can't send any more e-mails and you still try, a triangle will appear at the very bottom of the bar and next to it it will say "Send/Recieve error".
Click on it to find out the exact reason why the message could not be sent.
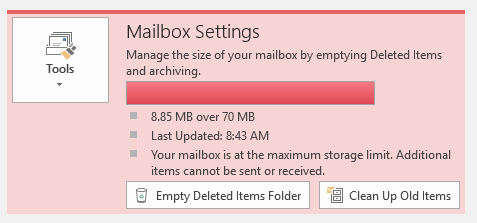
If you have significantly exceeded the limit, you will get the following message when you open Outlook.

In Outlook you can find out the current size of your mailbox by clicking on the "File" tab.
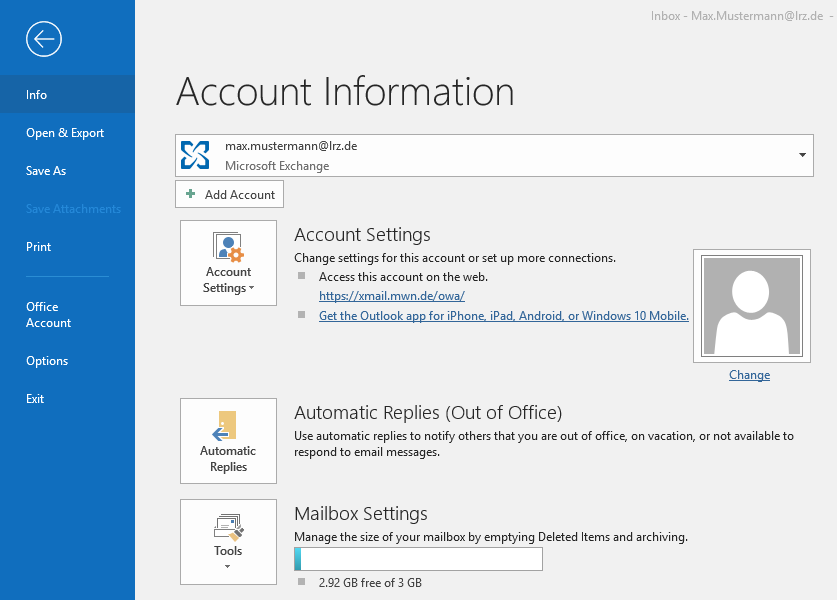
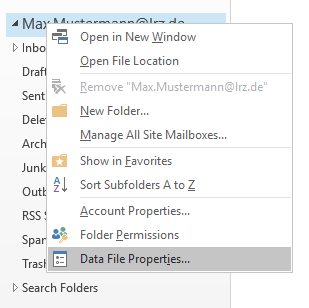
If you also want to know how the size is distributed among the individual folders, proceed as follows (see screenshots):
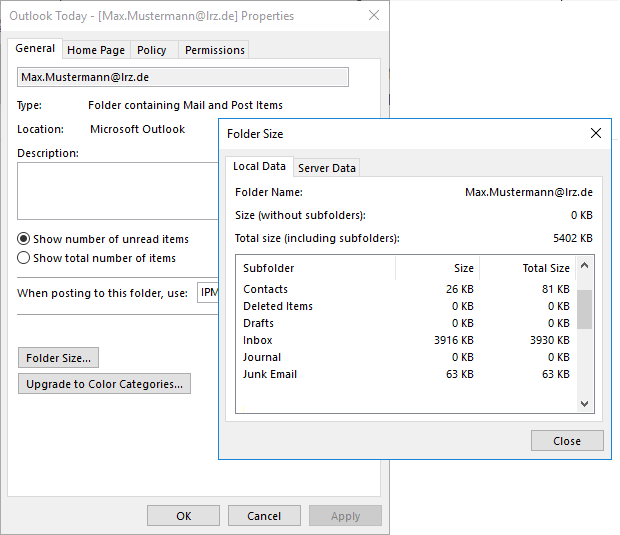
Right-click on the mailbox icon, then click on "Data File Properties" and in the mask that now opens, click on "Folder size".
This way you get another, smaller mask in which you can see your space allocation in the "Server data" tab at the "Total size" parameter.