Cloud Storage Benutzerhandbuch - 4. Zugriffsmöglichkeiten
Access to the Cloud Storage via web-browser
You have the possibility to access the central online storage worldwide via internet browser using the "Webdisk".
To log in, use your account id and password.
There are no practical file size restrictions for direct file access. However, if you access the NAS via the webdisk, the maximum upload size is 2 GBytes. The download is not limited, but should be completed in a reasonable time, e.g. to avoid problems caused by the forced disconnection every 24 hours, which is common with DSL connections.
In addition to a mobile version of the WebDisk web page, apps for mobile devices are also available for Android and iOS (keyword: HTTP Commander in Google Play or iTunes).
You can request a completely public directory within your organizational unit on the storage via the facility's service desk. This always has the name "www-public". You will receive the public link for anonymous access from the LRZ as part of the service request. Files stored in the www-public folder can be linked directly and do not require a login for download via browser.
Any write permissions to this directory must be set up by the organization's local "partial administrator". Write access is only possible for authenticated users via CIFS or via the webdisk.
Access to the Cloud Storage using Windows
Note: You must be located in the Munich Scientific Network or connected to it via VPN to access the Cloud Storage.
Since, access is only supported for the SMB3 protocol or newer. Access for SMB1 and SMB2 has been disabled for security reasons!
Supported Windows versions
The Cloud Storage supports all officially released Windows versions starting with Windows 10 Version 2004. Other Windows versions could also work, but are no longer supported by the LRZ.
The connection of the file storage under Windows depends on whether the computer used is a member of the Active Directory domain ads.mwn.de and whether the computer is located within the Munich Scientific Network (MWN).
Windows computers within the ads.mwn.de domain
To connect to a file storage, click on "Computer" in Windows Explorer with the left mouse button in Windows 10. In the context menu that appears, select "Connect network drive" (step 1).
The "Connect network drive" dialog box opens. In the dialog a list of the still free drive letters appears, from which any one can be selected, as well as an input field for the "Folder". The share must be entered in this input field, i.e. \\nas.ads.mwn.de\<account_id> for the personal online storage (step 2).
After clicking on "Finish", the file storage will mount itself under the selected drive letter in the Explorer. Since the machine is a member of the Windows domain, there is no need to specify a password - the machine will use the login name as well as the automatically provided Kerberos tickets of the logged-in user to connect and authenticate to the file storage.
Connecting to network drive with Windows - step 1:
Windows 10:
Windows 11:
Connecting to network drive with Windows - step 2:
Other Windows computers (outside the ads.mwn-domain).
If a Windows computer is not a member of the domain, a user ID as well as a password must be specified - in addition to the steps described above. The corresponding dialog appears automatically after clicking the "Finish" button. The user name is entered as "ADS\<identifier>" i.e. e.g. ADS\ne23mek.
The password corresponds to the password of the identifier. If desired, the connection can be re-established at the next login. Because the password is saved, you should use this option only on your own computers.
Windows computer outside the MWN
Your computer is located outside the Munich Scientific Network (MWN) and is accordingly not a member of the ads.mwn.de domain. To connect to the cloud storage, you have to proceed as follows:
- Establish an LRZ VPN connection (→ http://www.lrz.de/services/netz/mobil/vpn) between your computer on the Internet and the MWN.
- Performing the steps as described if you are inside the MWN.
- Additionally select "Establish connection with other credentials".
- After clicking the "Finish" button, a dialog will appear prompting you to enter a user ID as well as a password. For the user name,
ADS\<lrz-identifier>must be entered, accordingly e.g.ADS\ne23mek. The password corresponds to the password belonging to your LRZ identifier. If desired, the connection can be re-established at the next login. Because the password is saved, you should use this option only on your own computers.
Disconnecting from network drive
In order to disconnect from the network drive, one clicks with the left mouse button in Windows Explorer on "Computer" in Windows 10. In the context menu that appears, select the "Disconnect network drive" item.
Connecting the network drive via the command line
With the help of the 'net use' command (in the Windows PowerShell), the following steps can also be executed in a batch file. The exact syntax can be retrieved with the command "net help use".
Example 1:
net use x: \\nas.ads.mwn.de\<kennung>
The network share is mounted using the drive letter "X:\". You can use command 'net use' to check which drive letter is already in use. The user name is entered as "ADS\<identifier>".
Example 2:
net use * \\nas.ads.mwn.de\<kennung> * /user:ADS\<kennung>
The network share is mounted under a free drive letter. Furthermore, a prompt for the password appears. The password is not displayed.
Setting access rights using Windows
Simple Rights
On personal storage (Personal Cloud Storage), other users cannot be granted access rights; this is only possible on project storage (Institutional Cloud Storage).
If your chair administrator has set the rights on a project drive accordingly, you can further assign rights yourself: Access rights can be set as usual under Windows.
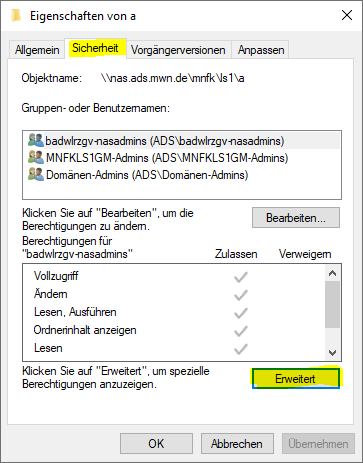
This applies to files as well as folders: Right mouse button → Properties → Security
Figure 1: Setting access rights under Windows - step 1.
Add new user → enter own ID → Apply (possibly add other IDs that are also allowed to access)
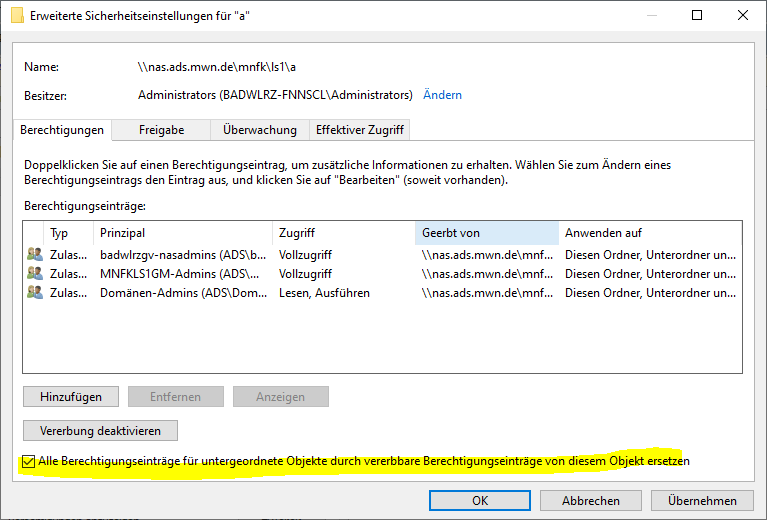
Advanced → Uncheck → Copy (inherited rights from above will be copied) → OK
Figure 2: Setting access rights under Windows - step 2.
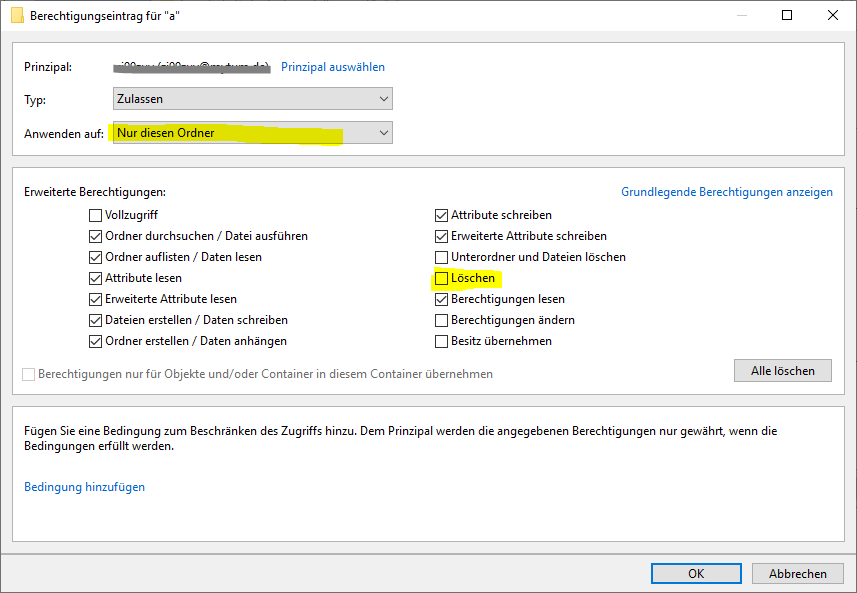
Prevent a user from moving a folder
To move a folder, a user needs the right to delete folders. Two possible approaches:
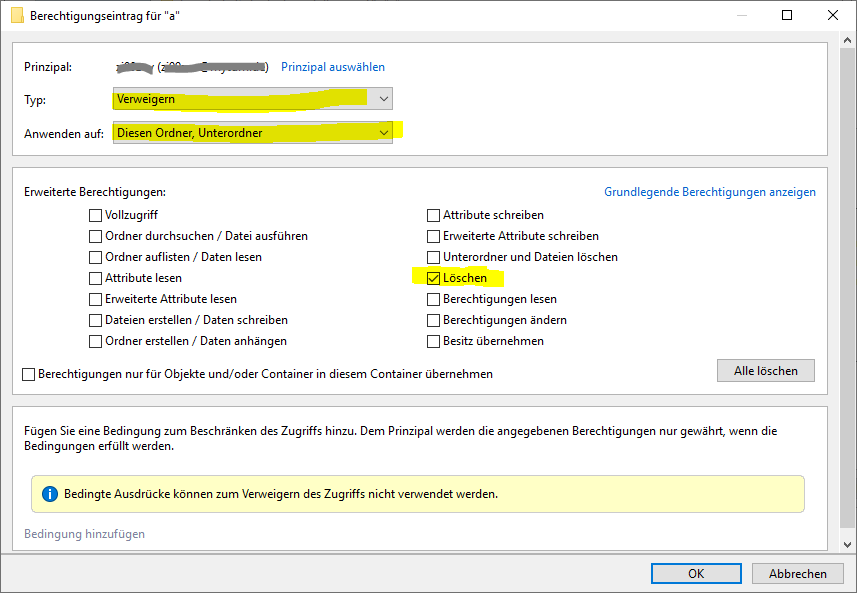
Variant 1 - Deny
You deny the user or group the right to delete folders and subfolders. However, the disadvantage of this solution is Deny removes all rights that a user would otherwise still have.
Block move on the first level
Block moving in the entire file tree
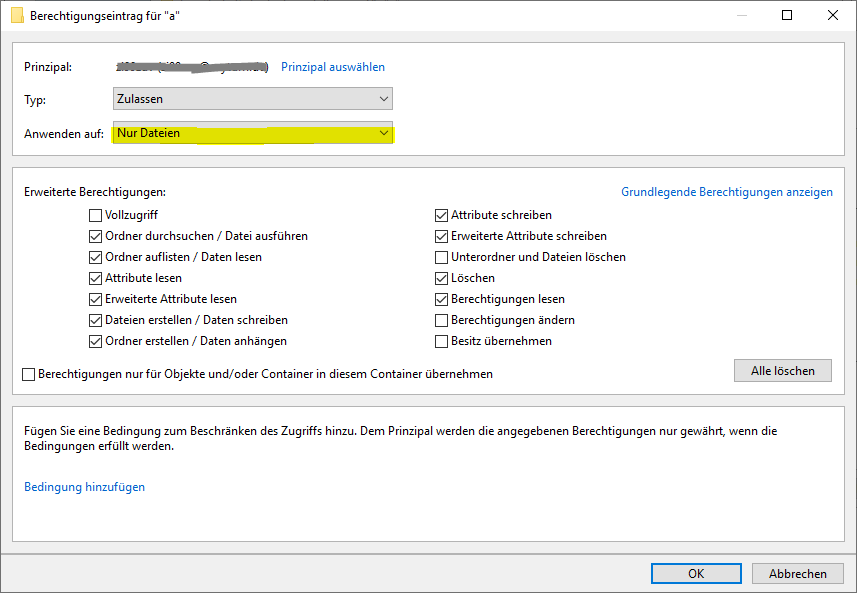
Variant 2 - restricted rights
You restrict the permissions for the user or group. This variant is somewhat more complex, as you have to set two authorisations.
Block move on the first level
Block move in the entire file tree
Access to the Cloud Storage using Linux
Note: You must be located in the Munich Scientific Network or connected to it via VPN to access the Cloud Storage.
Since, access is only supported for the SMB3 protocol or newer. Access for SMB1 and SMB2 has been disabled for security reasons!
Supported operating system versions
The cloud storage can be used with all current Linux distributions such as Ubuntu, Debian, SuSE, RedHat etc.. Unix distributions such as Solaris also work, but cannot be fully supported.
Ubuntu 22.04 (HWE) and Ubuntu 24.04 requires kernel 6.8.0-50 or higher
Mount drive under Linux
Newer Linux kernels of version 2.6+ have a CIFS file system module. Most distributions also require the "cifs-utils" package to mount SMB shares. This allows the personal storage space of the LRZ Cloud Storage to be mounted as follows:
sudo mount -t cifs //nas.ads.mwn.de/<share_name> <mountpoint> -o username=<lrz-kennung>,domain=ADS,nodfs
where <mountpoint> is the path to the directory on the local machine within which the files of the <share> named <share_name> will be mounted locally.
For example, the <mountpoint> could be specified as: /home/ne23mek/online_data. Here the files of the <share> in the home directory of the user ne23mek would be mounted with the LRZ identifier <lrz-identifier> in the folder online_data.
It may be necessary to specify a UID and a GID of the local user when mounting, e.g. if it is not possible to write to the storage after mounting:
sudo mount -t cifs //nas.ads.mwn.de/<share_name> <mountpoint> -o username=<lrz-kennung>,domain=ADS,nodfs,uid=<UID>,gid=<GID>
In oder to get the UID or GID of the local user, respectively, the id command can be used:
id -u # to get the UID
id -g # to get the GID
However, mounting only works if you have root privileges. In Linux, for example, the command entry could look like this (with some client versions the option "vers=" must also be specified! Here at least "vers=3" better still "vers=3.1.1" should be used):
sudo mount -t cifs //nas.ads.mwn.de/ne23mek /home/ne23mek/online_daten -o username=ne23mek,domain=ADS,vers=3.1.1,nodfs
Because of the preceding sudo command, you must enter your password at the command line. Alternatively, the password could just as easily be read from an environment variable, from a file, or from a pipe (see the manpage for mount.cifs).
The access rights displayed by Linux (for example with an 'ls -l' command) of a CIFS share are practically meaningless, since access control already checks the ACLs on the server. In concrete terms, this means that each user has his own connection under his own identifier to a share (and not - as with NFS, for example - a mount point is shared).
Reading and setting ACLs under Linux is possible, but quite cumbersome. For this purpose the setfacls program can be used (man setfacls). To use setfacls it is not necessary to mount a file share.
Native home directories for Linux/Unix servers are currently not possible, because no NFS is offered and the CIFS clients do not support some Unix specialities (softlinks). However, as has already been seen, it is readily possible to provide personal storage or project storage as a subdirectory in the home directory by mounting. The CIFS semantics then cause no problems in the case of sharing e.g. Office documents.
Access to the Cloud Storage using Mac OS
Note: You must be located in the Munich Scientific Network or connected to it via VPN to access the Cloud Storage.
Since, access is only supported for the SMB3 protocol or newer. Access for SMB1 and SMB2 has been disabled for security reasons!
Supported macOS versions
Official support exists for macOS X 10.8 or higher. Other versions (e.g. macOS X 10.3) also work, but may not be fully supported.
Connecting a drive under macOS X
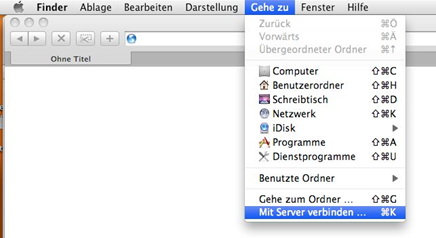
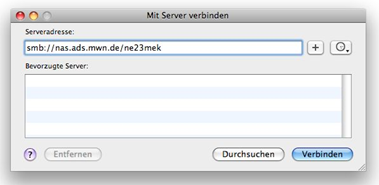
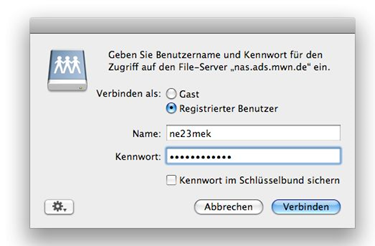
On macOS X, the function "Connect to server ..." can be called in the Finder. In the following dialog, the cloud storage address is specified with an smb:// prefix, e.g. as smb://nas.ads.mwn.de/ne23mek. Finally, user name (identifier) and password must be entered. The password can optionally be stored in the macOS X key chain.
Connecting network drive in macOS - step 1:
Connecting network drive in macOS - step 2:
Connecting network drive in macOS - step 3:
macOS X can also create links via SMB (but these are then also readable only under macOS X). Furthermore, mac file systems are normally not case-sensitive, so that access to file repositories is as transparent as possible.
Permanent mount of the drive:
The network drive must be mounted with smb://nas.ads.mwn.de/... The network icon can then be found on the desktop. Open the system settings and go under the group System to "Users & Groups" and on the left to login objects. Here you can add programs that should be opened at startup. If you now drag the previously mounted network drive from the desktop into this window, the cloud storage drive is also mounted on startup.
Scan-to-file connection problems:
If you have problems using scan-to-file devices (scanners, multifunction devices, etc.) in interaction with the LRZ Cloud Storage, please do not use the share \\nas.ads.mwn.de\tumw\les for the connection, for example, but the chair share \\nas.ads.mwn.de\tumwles$.
Access to the Cloud Storage using WebDAV
With the WebDAV protocol, another access option to the cloud storage is available. When using WebDAV, it does not matter whether you are inside or outside the Munich Scientific Network (MWN).
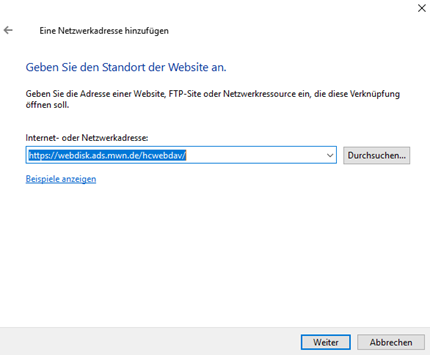
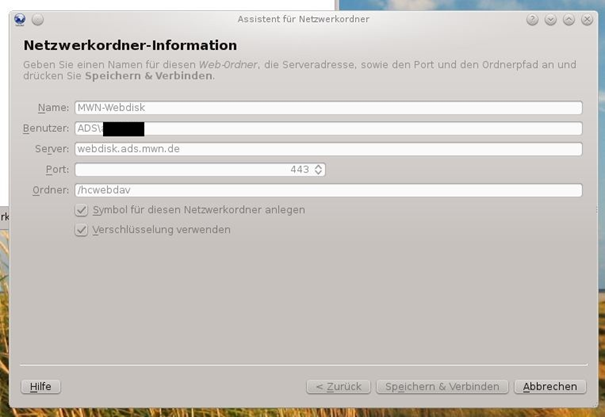
To access via WebDAV, you have to enter the URL https://webdisk.ads.mwn.de/hcwebdav. For authentication, use your identifier preceded by the domain ADS\ and the corresponding password.
WebDAV connection in Windows 10 by adding the network address in Explorer
WebDAV connection under OpenSUSE using file manager Dolphin
If the WebDAV area is to be mounted as usual under Linux, the davfs2 package is required. Once this is installed, you can mount the cloud storage in the file system tree via WebDAV as follows:
mount -t davfs https://webdisk.ads.mwn.de/hcwebdav /MountPoint
WebDAV connection under macOS X:
With macOS X, the function "Connect to Server..." can be called in the Finder. In the following dialog, the WebDAV address https://webdisk.ads.mwn.de/hcwebdav/ is specified. Finally, the username (LRZ identifier) and password must be entered. The password can optionally be stored in the macOS X keychain.
Access to the Cloud Storage via App
In addition to a mobile version of the WebDisk web page, apps for mobile devices are also available for Android and iOS (keyword: HTTP Commander in Google Play or iTunes).
A description of the WebDisk can be found here.


