


Atos QLM
This document is a guide to accessing the Atos Quantum Learning Machine. We are going to use a lot of SSH. For GNU/Linux and Mac users, the command-line client of OpenSSH is pre-installed and you only need to open a Terminal and follow our instructions. Windows users will have to install an SSH client. Windows 10 comes with a preinstalled OpenSSH client that needs to be activated in the settings. Besides that, perhaps the most popular Windows SSH client is PuTTY , another alternative is MobaXterm .
If you are an institutional user with VPN access (TUM, LMU, Hochschule München, WMI, ...) you need to be in the VPN network to be able to reach your login node. Documentation of VPN access can be found here.
We strongly recommend using SSH keys instead of pure password login. Documentation about SSH keys in general can be found here.
Step 1 - ssh via Login Nodes
Access to the QLM works via a login node. The main login node is qclogin.srv.lrz.de. Typically, qclogin can only be reached from a certain IP range, which means if you are not a TUM/LMU user and know the IP range of your institution's VPN network you should tell us.
Mac and Linux users, or if you use MobaXterm on Windows
The following command logs into QLM via a proxyjump over qclogin.srv.lrz.de.
$ ssh -J <username>@qclogin.srv.lrz.de <username>@qlm.for.lrz.de
Windows users with PuTTY
PuTTY users need to first configure a connection to the login node:
First connect to qclogin.srv.lrz.de.
Then, use an ssh command on the login node to connect to qlm.
Regardless of which login node you are connected to, continue to login to the QLM:
$ ssh qlm.for.lrz.de
Step 2 - Jupyter Notebooks
If you want to use Jupyter notebooks on the QLM, you will have to first launch the notebook within the SSH session you already opened.
Then you will need to start a second SSH session that creates the tunnel so that your web browser can reach the QLM.
The QLM will tell you which port to use (starting at 8888) after running the command qlm_notebooks/launch_qlm_notebooks.
[qlm] (di29koy) ~> qlm_notebooks/launch_qlm_notebooks

QLM JUPYTER NOTEBOOKS SERVER

IPYTHONDIR=/home/di29koy/qlm_notebooks/notebooks_1.2.1/.ipython
JUPYTER_CONFIG_DIR=/home/di29koy/qlm_notebooks/notebooks_1.2.1/.jupyter
JUPYTER_DATA_DIR=/home/di29koy/qlm_notebooks/notebooks_1.2.1/.local/share/jupyter

JUPYTER_PORT=8888
JUPYTER_OPTS=

config:
    /home/di29koy/qlm_notebooks/notebooks_1.2.1/.jupyter
    /usr/etc/jupyter
    /usr/local/etc/jupyter
    /etc/jupyter
data:
    /home/di29koy/qlm_notebooks/notebooks_1.2.1/.local/share/jupyter
    /usr/local/share/jupyter
    /usr/share/jupyter
runtime:
    /home/di29koy/qlm_notebooks/notebooks_1.2.1/.local/share/jupyter/runtime

> jupyter notebook

[I 13:36:19.233 NotebookApp] The port 8888 is already in use, trying another port.
[I 13:36:19.233 NotebookApp] The port 8889 is already in use, trying another port.
[I 13:36:19.233 NotebookApp] The port 8890 is already in use, trying another port.
[I 13:36:19.233 NotebookApp] The port 8891 is already in use, trying another port.
[I 13:36:19.233 NotebookApp] The port 8892 is already in use, trying another port.
[I 13:36:19.248 NotebookApp] [jupyter_nbextensions_configurator] enabled 0.4.1
[I 13:36:19.249 NotebookApp] Serving notebooks from local directory: /home/di29koy/qlm_notebooks/notebooks_1.2.1
[I 13:36:19.249 NotebookApp] Jupyter Notebook 6.1.5 is running at:
[I 13:36:19.249 NotebookApp] http://qlm.for.lrz.de:8793/?token=db37cc2f5ec9f084c7e1e8ad5af8ea213baaad5fdc3e3a91
[I 13:36:19.249 NotebookApp]  or http://127.0.0.1:8793/?token=db37cc2f5ec9f084c7e1e8ad5af8ea213baaad5fdc3e3a91
[I 13:36:19.249 NotebookApp] Use Control-C to stop this server and shut down all kernels (twice to skip confirmati                            on).
[C 13:36:19.252 NotebookApp]

    To access the notebook, open this file in a browser:
        file:///home/di29koy/qlm_notebooks/notebooks_1.2.1/.local/share/jupyter/runtime/nbserver-385871-open.html
    Or copy and paste one of these URLs:
        http://qlm.for.lrz.de:8793/?token=db37cc2f5ec9f084c7e1e8ad5af8ea213baaad5fdc3e3a91
     or http://127.0.0.1:8793/?token=db37cc2f5ec9f084c7e1e8ad5af8ea213baaad5fdc3e3a91
[I 13:40:32.046 NotebookApp] 302 GET /?token=db37cc2f5ec9f084c7e1e8ad5af8ea213baaad5fdc3e3a91 (127.0.0.1) 1.71ms
Note the URL to localhost at the bottom, which contains the port to use and the token you need to authenticate.
http://127.0.0.1:8793/?token=db37cc2f5ec9f084c7e1e8ad5af8ea213baaad5fdc3e3a91
Step 3 - Port Forwarding (aka tunnelling)
Now launch a second SSH session with the -L switch added to the ssh command.
Mac and Linux users, or if you use MobaXterm on Windows
Use (replace 8888 with the port you need, in both occurrences)
$ ssh -J <username>@qclogin.srv.lrz.de -L 8888:localhost:8888 <username>@qlm.for.lrz.de
So in the example above I would use:
ssh -J di29koy@qclogin.srv.lrz.de -L 8793:localhost:8793 di29koy@qlm.for.lrz.de
Unless your SSH keys are already configured, you will be asked twice for your password - once for the login node, and then for the QLM.
You can then use your browser to connect to the URL as above, e.g. http://127.0.0.1:8793/?token=db37cc2f5ec9f084c7e1e8ad5af8ea213baaad5fdc3e3a91.
Ports and Addresses, the details
Both the browser IP address and the tunnel destination IP address is 127.0.0.1 (=localhost) because the tunnelled port to the QLM has one end on your local machine and the other end is on the QLM. In both cases we're connecting to the local machine, the browser opens the local end of the tunnel, and the other end of the tunnel connects to the notebook running on that machine.
The ports - if you set the tunnel to use your own Notebook port on both ends, then it's nice and uniform all the way through the chain. (e.g. 8793 in the browser connects to the tunnel that exists on port 8793, and the other end of the tunnel connects to port 8793 where the Notebook is running.
If you are using PuTTY and doing a second hop to the QLM, it's especially important to check that your port numbers match all the way along the chain.
In some cases (e.g. in the training from Atos), it is preferred to use the default port 8888 on your local end of the tunnel. In this case you specify the local port is 8888 (e.g. 8888:localhost:8793), and in the browser URL you must also use the port 8888.
Windows users with PuTTY
Windows users with PuTTY need to create the tunnel with two hops. First configure a connection to the login node (lxlogin2 is deprecated, use qclogin.srv.lrz.de) and second, use an ssh command on the login node to connect to qlm.
In this second instance of PuTTY, use the same setup as before, and configure a port forward:
- Load the session corresponding to your login node.
- Go to Connection → SSH → Tunnels and add the ports as seen in the screenshot. Do not forget to click on "Add" in the end. Source port corresponds to the first number in the -L argument. For PuTTY, it is required you use 127.0.0.1 instead of localhost for the destination.
- Start this second SSH session.
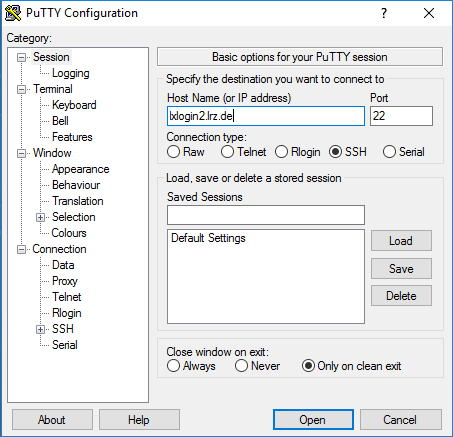

Users with LinuxCluster access use lxlogin2.lrz.de as in the screenshot.
All other users use qclogin.srv.lrz.de instead of lxlogin2.
For the second hop, once on your login node, you need to connect to QLM with another tunnel.
$ ssh -L 8888:localhost:8888 <username>@qlm.for.lrz.de
Again, replace the port number with the correct port for your Notebook session.
You can then use your browser to connect to the URL as above, e.g. http://127.0.0.1:8793/?token=db37cc2f5ec9f084c7e1e8ad5af8ea213baaad5fdc3e3a91.
FAQ
I can connect to a Notebook, but my token doesn't work and I can't access it.
You are likely connected to someone else's Notebook session. Check that the port numbers you have set all correspond to the port that was assigned to you when you started the Notebook.
I can't connect to the Notebook at all, and I've checked that the ports are all correct.
Here are some possible causes for this issue:
- Your first SSH session has been closed, so the Notebook session is no longer running.
- Your browser is configured to use a proxy, and therefore can't be routed via the tunnel on your own machine.
- In a previous session, you saved the port forwarding tunnel in your PuTTY settings. Now the first or second session is occupying ports that need to be free for your new session.
I connected just fine, but now it's suddenly stopped working.
Ensure that none of your SSH sessions have timed-out and been closed. If your login shell is bash, check that the TMOUT environment variable is set to 0.
Slurm Workload Manager
As an alternative to Jupyter notebooks, you can also use the Slurm Workload Manager to submit jobs to the QLM (on the QLM itself or on qclogin). Users with prior HPC experience might be familiar with Slurm. General documentation is available here.