


FAQ
Who should I contact in case information or additional help is needed?
Please note that cloud support can only help with problems related to LRZ Compute Cloud!
We are not the right persons to contact if you have problems with software you are running within your VM!
- Please check the LRZ CC documentation and FAQ for an answers, which you are already doing by reading this.
- Just try to google it. The internet knows much more about all the possible OpenStack issues than we do, though hard to find occasionally.
- If this does not help or in case you are 100% sure it is a problem of the LRZ CC please use the LRZ Service Desk and open a ticket.
What information should I provide when I contact support?
If you need to contact us (first make sure that you really need to ![]() ) please provide the following information:
) please provide the following information:
- your User Name (LRZ Kennung) you use to login to the cloud
- the UUID(s) of the cloud components, i.e. VM, instance, volume, network etc. which cause the problems.
How to get access to the Compute Cloud?
tl;dr
If you are a user:
- We do not offer access for students that are not associated to a chair. See below.
- You need to have an "LRZ Kennung" (user ID) in a cloud-enabled LRZ project.
If your user ID belongs to a project that is maintained by LRZ but not cloud enabled yet, you might ask the project's master user(s) to contact LRZ and ask to activate this project for the compute cloud. - This project's master user can enable your account for the LRZ Compute Cloud.
- It might take some minutes to synchronize your new permissions with the cloud system. You can not log in until your permissions have been synchronized with the cloud system. After your account's permissions have been synchronized you will receive emails providing further information on how to use the Cloud.
If you are a (future) master user:
- If you already have an existing project, you can simply contact us, provide us with some information what you want to do with the cloud and apply for access permissions.
- If you do not have a LRZ project yet, you must apply for a new project and choose "Compute Cloud" as service. You need to fill in the PDF form and submit the application as incident (service request) to the LRZ-Servicedesk: https://servicedesk.lrz.de/ql/create/9
- As a master user you can grant access rights to the project's users yourself.
- Within the given contingent we assigned to your project you can enabled/disable accounts in your project to use the cloud.
- Once the new permissions have been synchronized with the Cloud system the accounts will receive emails providing further information.
However, the following sections will give you a more detailed overview of this process:
Which accounts can be enabled for the Compute Cloud?
Accounts that are assigned to cloud-enabled LRZ projects can be used to access the cloud. Accounts that are managed by TUM or LMU can not be used to access the LRZ Compute Cloud!
More information on how to apply for a new project can be found on this page.
More information on how to get accounts can be found here.
I am a student, can I use the Compute Cloud?
We cannot offer access to the compute cloud for every individual student.
If you belong to a chair or research group that has a LRZ project that is or can be enabled to use the compute cloud please ask one of this project's master user to create a new account in this project for you and enable it for cloud usage.
I already have an account, how can I get access to the cloud?
Supposing that the account is suitable for the usage with the LRZ Compute Cloud (namely, it is part of a LRZ project), there are 2 requisites to be finally able to log in:
- a valid password
- the LRZ Compute Cloud Platform flag
Please note that both requirements have to be fulfilled in order to get access, however they're independent. In other words, it does not matter the order in which the two operations (change the password, assign the flag) are carried out, especially because two different subjects are involved).
Password management
This is the LRZ Compute Cloud account's password, it is up to the account's owner to
- change the initial password (Startpasswort) received by the master user;
- renew the password periodically, according to the LRZ policies.
In case the password has been forgotten, it can always be reset by the master user to an initial password, which has then to be updated. Please be also aware that the initial password (Startpasswort) grants no access.
The tool for password management is the LRZ ID Portal. Log in using your known password (the initial one is of course valid) and
- on the left panel click on the Self Services button, if present;
- always on the left pane, under Account (Kennung), click on modify password (Passwort aendern);
- on the right part of the screen, a list of accounts owned by the user are shown. Please check that the status of the account meant to be used on the LRZ Compute Cloud reads valid (gueltig), otherwise click on the Select (Waehlen) button. A new page will open, in order to let you change the current password. Please type the old one (once) and the new one (twice), then click on Modify password (Passwort aendern).
Information for Master Users
A user account is able to access the LRZ Compute Cloud if it has been assigned to the corresponding platform. This can be done by the master user. The master user should connect to the LRZ ID Portal and
- on the left panel click on the Master User Services (Master User Dienste) button, if present;
- always on the left pane, under Project (Projekt), click on view / modify (anzeigen/bearbeiten);
- on the right part of the screen, a list of projects managed by the master user are shown. Please click on the Select (Waehlen) button near the name of the project enabled for the cloud.
Something similar to the following picture should appear at the bottom of the page, or click on List of accounts (Kennungliste) on the top right corner of the page.
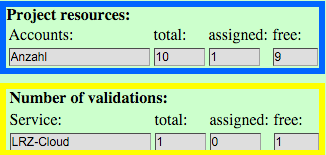
Each project is assigned an Account Quota (Kontingent), i.e., the maximum number of account of the project (blue square in the previous picture). Cloud projects are also given a Cloud Quota (Cloud Kontingent), i.e., the maximum number of accounts that can be assigned to the cloud platform (yellow square in the previous picture). The master user should verify that the cloud quota is present and there are enough free tokens. If it is not the case, please contact us.
As suggested by the description, just put a X in the LRZ Cloud column (for each account that should be given access) and save it.
Important note: the LRZ Compute Cloud front-end and the ID Portal are synchronized every 15 minutes. After the account's activation please wait about a quarter of a hour before trying to login. If there are still problems, please contact us , do not try to remove the account or the flag and create it again. Moreover, as already specified, it is not important that the initial password is changed before or after the flag is assigned. The important thing is that the account has the flag and a valid password at login time.
Costs of using the LRZ Compute Cloud
When will LRZ start to charge money?
Billing will start on 01.04.2024. For more information please refer to the budgeting page or see section below.
Who is reponsible?
From our point of view the master user of a project is responsible for assigning permissions for the LRZ compute cloud to the particular project members. Therefore the master user wil be responsible for any costs that may occur.
How to use the LRZ Compute Cloud
Funktionskennungen (functional accounts)
If you want to share access to VMs (and the management tasks) between different individual users, a project's master user can create a functional account that is allowed to be shared between different normal users. In many cases it makes sense that a research group runs their virtual resources using a functional account instead of the researchers' personal accounts.
From an OpenStack perspective there is no difference between a functional account and a normal account.
Quota
Quota limits will be assigned on a per-user basis.
A quota is a limit on resources to prevent that a single user can block too many resources at once and to have resources available for other users on the cloud. This quota can be adjusted to a user's need, e.g. if she/he needs to use more VMs or more CPUs per VM. In this case please contact us: cloud support team
Default quota
The default quota for new LRZ Compute Cloud users will be set to the values shown in the table below. In case you need more you have to contact us: cloud support team
| Quota | Limit | Comment |
|---|---|---|
| instances | 4 | Number of VMs |
| cores | 10 | Total number of CPU cores |
| ram | -1 | unlimited |
| volumes | 4 | Number of block storage volumes |
| gigabytes | 200 | Total size of all block storage volumes |
| snapshots | 10 | Total number of volume snapshots |
| floating-ips | 8 | Total number of floating IPs (MWN_pool and internet_pool) |
| networks | 4 | Total number of networks |
| subnets | 4 | Total number of subnets |
| key-pairs | 4 | Total number of public key-pairs |
| secgroups | 10 | Total number of security groups |
Shelve/Shut Off VMs you do not need at the moment
It is important to understand that our (physical) resources are limited. Please do not run idle VMs but free resources to other users. This function was called UNDEPLOY (and RESUME) in the old cloud system and it is called Shelve / Unshelve Instance in OpenStack.
Shelving a VM means that this machine is orderly shut off and the resources consumed are freed. The IP and MAC addresses of the network interfaces as well as floating IP addresses assigned to the VM will stay assigned and will become available when the VM is unshelved again in a later point in time. However, the number of CPUs, RAM and disks are counted in the quota of the particular user. If you need to free up your quota you must delete existing VMs.
The cloud also offers to Shut Off a VM. This means that the VM will be shut off but the resources stay assigned to this VM and will not become available for other users. There might be rare cases in which this behavior makes sense but I cannot remember one single case. However, if you have VMs in state shut off for at least 2 days you will receive a notification emails until you resume or shelve the VMs.
The differences between shelved and shut off VMs is as follows:
| State | Resources available for other users? | Karma |
|---|---|---|
| SHELVE | yes | +1 |
| SHUTOFF | no | -1 |
Please free resources you do not need.
Virtual Machines
Can I have a VM with x vCPUs and y GB of RAM?
Probably yes, but: There is a fixed ratio between CPUs and RAM for the compute nodes. Each VM running on a standard compute node will get at least 1.125 GB of memory per vCPU core used. This is reflected in the different Flavors.
Flavors
Flavors define the number of vCPUs and the amount of main memory for each VM.
| Name | vCPUs | RAM | maximum CPU Overcommit[1] | Remarks | Access[2] |
|---|---|---|---|---|---|
| lrz.tiny | 1 | 1.12 GB | 8 | public | |
| lrz.xsmall | 1 | 2.25 GB | 8 | public | |
| lrz.small | 1 | 4.5 GiB | 8 | public | |
| lrz.xmedium | 2 | 4.5 GB | 8 | public | |
| lrz.medium | 2 | 9 GiB | 8 | public | |
| lrz.large | 4 | 18 GiB | 8 | public | |
| lrz.xlarge | 10 | 45 GiB | 8 | public | |
| lrz.2xlarge | 20 | 90 GiB | 8 | restricted, contact us | |
| lrz.4xlarge | 40 | 180 GiB | 8 | restricted, contact us | |
| nvidia-v100.1 | 20 | 368 GiB | 1 | use 1 GPU on a GPU node | restricted, contact us |
| lrz.highmem | 10 | 540 GB | 8 | restricted, contact us | |
| lrz.xhighmem | 20 | 540 GB | 8 | restricted, contact us | |
Notes: 1. The Overcommit column refers to the CPU overcommit ratio. A value X in this column means, one physical CPU processes X vCPUs. So a value of 1 basically means "no overcommitment". 2. Don't just request "more resources", this will be denied by default! Include specific CPU and memory requirements, as well as for how long you will likely need them. Our resources increasingly more limited with the size of the flavors, so check out the cloud usage dashboard: https://cc.lrz.de/lrz/cloudusagepanel/ before asking for a specific flavor. The more you request, the better your reasoning why you need them should be. Also be prepared for compromises, we cannot accommodate any request. | |||||
Can I resize a VM (add or remove ressources like cores or main memory)?
You can do that. However, you cannot freely decide which amount of cores and main memory a VM should get but you can change the flavor assigned to a VM.
Please keep in mind that VMs will be restarted during the resize process. You cannot resize a VM on the fly.
Using the web interface (GUI)
- Change to the "Compute → Instances" overview page
- Click the down arrow in the Actions column of the VM you want to resize and click "Resize Instance"
- Select the new flavor you want to assign to this VM from the "New Flavor" drop down list and click on "Resize"
- You will be returned to the Instances overview page with the VM in state "Resize/Migrate"
- Eventually it's state wil change to "Confirm or Revert Resize/Migrate". Click on the "Confirm Resize/Migrate" button in the actions column of this VM.
- After a couple of moments it's state will change to "Active" and the newly resized VM will be booted and will allow you to log in.
Using the command line tools
openstack server resize --flavor <new flavor> <vm id>
This command will attach the new flavor (e.g. lrz.large) to the VM with the specified ID. Basically, it creates a new copy of the VM with the new flavor assigned.openstack server list
Is needed to keep an eye on the VM's status. The VM's state will be RESIZE and eventually change to VERIFY_RESIZE. After the VM has entered this final state, you need to carry out one more commandopenstack server resize --confirm <vm id>
This command confirms that the resized VM is in a working state. Thereafter the old VM will be deleted and you can use your newly resized one.
Do you use over-commitment?
Yes, when we hit the 99% mark in CPU allocation while still maintaining an average CPU usage of 13% we decided to double the RAM in our normal compute nodes and set the CPU overcommit ratio to 2 for the corresponding flavors. Please see the table above for the affected flavors.
How can I log in to my VMs?
The default way to log into your VMs is via SSH. There are 2 necessary steps you need to complete:
- You need to configure your Security Group to allow SSH connections to your VM (see section below).
- You need to specify the username you want to use to log in. The username depends on the operating system image you choosed when launching a new instance.
- The default SSH authenication method is SSH Key-based authentication. You need to provide a SSH key pair during the instantiation of a VM. The public key of this key pair will be injected into the VM when it is created. The private key of the key pair must be presented when logging in via SSH.
Important note: This step is carried out only once - at the first time when a VM is created. If you start this VM later updated SSH keys will not be injected! If you need to inject an updated key you can create a snapshot of an existing VM and instantiate a new VM from this snapshot.
What is the correct username to log into my VM?
The default username you need to provide when logging in to your VM depends on the operating system image you choose.
| Operating System | Username | Password | Remarks |
|---|---|---|---|
| CentOS | centos | SSH-key only | |
| cirros | cirros | gocubsgo | |
| Debian | debian | SSH-key only | |
| Fedora | fedora | SSH-key only | |
| FreeBSD | root | First login via Console as root with empty password (press Enter). Set password using passwd command. | |
| openSUSE | opensuse | SSH-key only | |
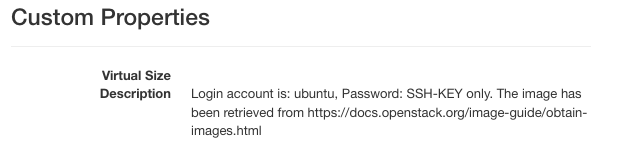
| Ubuntu | ubuntu | SSH-key only |
We provide information regarding the login information in the description field of each image. You can access this information by clicking on the image you are interested in the Images tab. The description field can be found in the Custom Properties section. As an example, the following figure shows the Description of an Ubuntu-based Operating System image:
Which keypair type should I use?
Short story: RSA with at least 3072 bits
Long story:
| Key Algorithm | Recommended Key Length | Works out of the Box | Remarks |
|---|---|---|---|
| DSA | >= 3072 bit |
| |
| ECDSA | >= 256 bit |
| |
| RSA | >= 3072 bit |
| |
| ED25519 | >= 256 bit |
|
I want to use a GPU but can not see the nvidia-v100 flavors
To use a GPU you need to launch a new VM using one of the nvidia-v100 flavors. This flavors are not accessible by default. Please contact us to ask for GPU access
The virtual GPU causes problems when using a GUI in my VM
A user ran into a problem when he wanted to access the Gnome settings menu of the virtual Cirrus Logic GD 5446 GPU (this is used as the default GPU by qemu) under Ubuntu. The solution was to change the emulation of the GPU to a different model. The current problems could be solved by using "qxl" as hw_video_model in the image metadata.
To change the hw_video_model using our Cloud web interface, go to Compute → Images and ans select "Update Metadata" from the particular image's dropdown menu. From the left list choose "libvrit Driver Options for Images" → "Video model" and click the + button right next to it to add it to the image's metadata. Now choose "hw_video_model" in the right list and select one of the options from its dropdown menu.
You can also use the command line tools to set the hw_video_model metadata option. To select qxl you can simply type:
$ openstack image set {image name or ID} --property hw_video_model=qxl
How can I import an own disk image?
When logged in, you can go to Project > Compute > Images and click on "Create Image". From there you can select the image file you want to upload to our cloud.
Please note that you are only allowed to upload images in raw format at the moment.
If you want to upload images in qcow2 you need to convert this image to raw before uploading it. This can be done with the qcow-img command that you can install on your workstation or in a virtual machine on our cloud. ![]()
$ qemu-img convert -f qcow2 -O raw image.qcow2 image.img
Can I install Microsoft Windows in a VM?
Technically it is possible to run Windows in a VM on the LRZ Compute Cloud. Before you start you must make sure that you own an appropriate license and that your Windows license allows you to run Windows virtualized on our hardware. Because of licensing issues, Windows Server operating systems must not be run in the LRZ Compute Cloud.
At the moment we cannot provide a comprehensive installation howto but we want to point you to some important aspects that users told us:
- You can upload an ISO containing the installation files
- A user ran into the problem that a VM's volume was write-protected after fresh Windows installation. He could circumvent this by preparing a Windows-VM on his workstation, installing the latest VirtIO drivers for Windows and uploading this volume to our cloud.
- Make sure that no other (conflicting) virtualization drivers (such as Hyper-V) are installed inside your VM running in the LRZ Compute Cloud.
- One user succeeded building the image outside of OpenStack: https://superuser.openstack.org/articles/how-to-deploy-windows-on-openstack/
Needless to say: if you use a commercial product, like Windows, you need to have a license for it!
Volumes and images
Do you create any backups?
No. If you need to backup your data you are responsible for that. You can use the LRZ backup service to do that. But you need to install and configure it manually.
Resize a VM's volume
Once in a while you may have the need for more storage space in an existing VM. How to accomplish this depends on the type of volume you need to enlarge.
Additional Volumes
If you are dealing with a volume that you attached additionally to you VM, then enlarging is rather straightforward.
- Connect to your virtual machine via SSH, and unmount the volume.
- Now login to the web interface, navigate to the volume page and detach the volume via 'Manage Attachments' in the drop down menu on the right. (Or use the CLI Client)
- Then click on 'Extend Volume' in the same drop down, and choose a new bigger size for it.
- After that you can attach the volume again via 'Manage Attachments'
- Adjust the partition layout of the volume if necessary from the virtual machine and mount the volume again.
- Finally enlarge the filesystem of the volume. For example in case of an xfs or ext4 filesystem use the xfs_growfs /mount/point or resize2fs /mount/point commands.
Root Volumes
Root volumes need special treatment, because you cannot detach them from an instance. There are two options:
Deleting the virtual machine
If you didn't choose 'Delete volume on instance' delete when creating the virtual machine, you can do the following:
- Delete the virtual machine.
- Go to the volume page, and extend the volume via the drop down 'Manage Attachments'.
- Then create a new virtual machine from this volume.
- Finally adjust the partition layout if necessary.
Using the Cinder CLI Client
First of all you have to install the OpenStack and Cinder command line tools on your local (Linux) computer, see https://doku.lrz.de/display/PUBLIC/OpenStack+Command+Line+Tools#OpenStackCommandLineTools-InstallingtheCommandLineTools . To install the Cinder CLI on Ubuntu do 'apt install python3-cinderclient'. On other Linux distributions please contact the internet.
- Shut down the instance using the OpenStack CLI command '
openstack server stop <INSTANCE-UUID>' or by using the OpenStack Web UI selecting 'Shut Off Instance' in the pull down menu. - When the instance state has changed to shutoff, call '
openstack server volume list' and get theVOLUME_IDof the/dev/vdavolume, i.e. the root volume. - Call '
cinder --os-volume-api-version 3.42 extend <VOLUME_ID> <NEW_SIZE>' . - Restart the instance using Web UI or by calling '
openstack server start <INSTANCE-UUID>' . - Finally adjust the partition layout if necessary and enlarge the filesystem, see above.
I cannot delete a volume or a volume snapshot
The volume must be in the state Available and have the attachment status Detached. Before you can delete volumes you need to delete any snapshots of these volumes or vice versa. Volumes cannot be deleted as long as any snapshots of the particular volumes exist. The Horizon Web GUI does not provide the possibility to list these dependencies between volumes and snapshots but you could use the following bash script to list the dependencies for your project: get_volume_dependencies.sh. Please follow this tutorial to install the command line tools.
Below you see an example of the output of that script. There are 2 volumes and one Snapshot listed. To be able to delete the snapshot you first have to delete the volume with UUID 1a0ed73b-d15a-4db2-8a84-c96953c183f0.
user@computer:~ > ./get_volume_dependencies.sh
VOLUME: 07e56053-082a-411e-be41-747cd7004a56 (Name: )

VOLUME: 1a0ed73b-d15a-4db2-8a84-c96953c183f0 (Name: )

SNAPSHOT: c90c09b1-01e5-4a9d-b2b6-ba9187f5af6c (Name: snapshot for snapsnap)
└── VOLUME: 1a0ed73b-d15a-4db2-8a84-c96953c183f0 (Name: )
Despite cleared dependencies the system may still refuse to delete a volume most often due to an inconsistent state and/or attachment status in the database. An example would be a volume for which openstack volume show VOLUME_UUID shows an attachment to an already deleted instance, or an instance for which openstack server show SERVER_UUID does not show said attachment. In that case the state and/or attachment status have to be reset manually which requires admin privileges, so if you have this kind of problem please open a ticket and name the volume.
I cannot delete an image
As long as there exists a volume, which has been created based on the image, you can not delete the image.
Download an image/a volume
In order to download a volume, e.g. because you want to save a backup or want to use this volume in a different environment, you will face several limitations:
- You cannot simply download a snapshot of a volume (it will always have a size of 0 (zero) bytes)
- You need to use the command line tools. Please follow this tutorial to install the command line tools.
In order to download an instance's volume please follow these steps:
- Create a snapshot of the instance
- Go to Volumes → Snapshots
- Click on "Create Volume" next to the snapshot you want to download
- Go to Volumes → Volumes
- Click on "Upload to Image" in the dropdown menu next to the volume you want to download
 This step can take a long time. Grab a coffee and do something else until the new image has been created.
 - Go to Compute → Images
- Click on the image and note its ID.
Using the command line tools you can now download the image using the openstack command:
openstack image save --file myimage.raw <Image ID>
Data Science Storage (DSS)
A Data Science Storage (DSS) container can be used to store huge datasets and to make them available for VMs you are running in the LRZ Compute Cloud without the need to copy data into your VMs and exceeding your storage quota.
If want to access a DSS container from a VM you should follow the instructions in Section "Using DSS via Compute Cloud and VMware" of the DSS documentation for users. It is noteworthy that a Floating IP will be associated to your user account until you explicitly return it to the floating IP pool. Hence you can rely on the fact that no other user can assign this particular IP to a VM unless you explicitly free this IP.
Networking
Security Groups
The concept of security groups is used to prevent unwanted and malicious network traffic from or to the machines. It can be seen as an external (outside of the VM itself) firewall that can be fully configured by the user.
It is worth noting that the default security group does not even allow incoming SSH connections! If you want to access your VMs via SSH you need to add a corresponding rule to the security group you want to use first. Please refer to our tutorial to learn how to add a rule to a security group.
If you run into problems regarding network connectivity of your VMs security groups are a good place to start debugging your problems. ![]()
Please note: you can modify the Security Groups any time. The changes take effect immediately. You do not need to restart or shelve and unshelve your VM.
I need a static IP for my VM
To reach a VM you need to assign a floating IP to it (more information on that can be found in this tutorial, step 13 ff.). Floating IPs have some remarkable characteristics:
- Once you select a floating IP from the pool this IP stays assigned to you until you return it to the pool.
This is very helpful if you want to register this IP with remote services (such as NFS exports), because until you explicitly return it to the pool you can be sure that this IP is only used by you. - Once you assign a floating IP to a particular VM this IP stays assigned to it even if you shelve your VM.
This ensures that a VM will use the same IP even if you shelve it inbetween. To free the floating IP you need to explicitly disassociate it or delete the VM. It also allows to provide a service to the MWN (or to the public) with a "static" IP.
I cannot reach my VM via SSH
First and foremost, please check if the Security Group you are using allows SSH traffic to the VM.
That said, we experienced problems with the network connectivity after we changed the network settings in our July 2019 mainenance window. The problem is that the MAC address of the virtual network card has changed but Ubuntu stores the MAC in the netplan configuration and will not update the MAC automatically. As a result, the network interface will not come up. There are 2 possible ways to recover such an VM:
- If you have set a password for your user you can use the NoVNC console from within the OpenStack dashboard to log into the VM and reconfigure netplan's configuration file located in /etc/netplan/50-cloud-init.yaml. More information on this topic can be found here.
- If you do not have a password set you need to create a new VM.
- As default value, a volume will be kept even if its VM is deleted. In this case, you can delete the VM, go to the Volumes overview page and select "Launch as instance" from the particular volume's dropdown menu.
- If you are unsure, you can create a snapshot of your (running) VM, go to Volumes → Snapshots and select "Launch as Instance" from the particular snapshot's dropdown menu.
Once the VM is ready, you should be able to log in via SSH.
How to add a second (third, ...) network interface to a VM
By default a VM has only one network interface and the DHCP assignment works out of the box. With two or more interfaces, there's a problem. Every interface tries to set the default route, but there can be only one. So, the first interface to be set up wins, and it's not given that it is the first one specified in the template. The solution consists in specifying the priority, or metric, of the interfaces. Each one sets the default gateway given by the DHCP but with a different priority.
If you plan to have more than one network interface in your VM, then give maximum priority (or lowest metric) to the public one, otherwise the VM won't be reachable. As being said, if the VM has only only one network card, then there is no need to specify a metric.
Now, some details on how to configure the network card of a VM. We consider here some well-know Linux distributions.
Debian, Ubuntu and derivatives
Debian and Ubuntu have only one file, /etc/network/interfaces. A typical example is
auto lo
iface lo inet loopback
auto eth0
iface eht0 inet dhcp
It is obvious that the loopback interface and eth0 are brought up automatically at boot (auto) and then configured.
For each additional interface, the auto statement, the iface definition, and the entry
metric 200
should be added:
auto lo
iface lo inet loopback

auto eth0
iface eht0 inet dhcp

auto eth1
iface eht1 inet dhcp
metric 200
Ubuntu 18 and later (Netplan)
network:
    version: 2
    ethernets:
        ens3:
            dhcp4: true
            match:
                macaddress: fa:16:3e:cf:ed:dd  # MAC address of first network interface
            mtu: 1500
            set-name: ens3

        ens6:
            dhcp4: true
            dhcp4-overrides:
              route-metric: 200
            match:
                macaddress: fa:16:3e:00:22:bc  # MAC address of second network interface
            mtu: 1500
            set-name: ens6
Fedora, CentOS and derivatives
The approach is very similar to SUSE. For each interface there is a script located in /etc/sysconfig/network-scripts, named ifcfg-<inteface name>, such as /etc/sysconfig/network-scripts/ifcfg-eth0 and so on.
The content should be
DEVICE=eth0
BOOTPROTO=dhcp
ONBOOT=yes
For every other interface, the DEVICE and the file name should be adapted, while the parameter METRIC=200 should be added. METRIC increases for every new interface. A higher metric means a decreasing priority of the route associated to that interface. The public interface has to be the one without the METRIC parameter, that is the one whose default route is the preferred.
SUSE
for each interface there is a script named /etc/sysconfig/network/ifcfg-<if name>, such as ifcfg-eth0, ifcfg-eth1 and so on. The content should be
DEVICE=eth0 #this is an example, change to eth1 in ifcfg-eth1 ...
STARTMODE=auto
BOOTPROTO=dhcp4
DHCLIENT_PRIMARY_DEVICE=yes
The value of the DEVICE directive should be adapted accordingly (i.e., eth1) while DHCLIENT_PRIMARY_DEVICE should be changed to no, then save the new file in a consistent way, i.e., ifcfg-eth1.
Remember: the device attached to the public network needs DHCLIENT_PRIMARY_DEVICE=yes, for all the others it should be set to no.
Adding a second floating IP to a VM
Debian Buster (ifconfig)
Some use cases require to have two floating IPs attached to a VM. The following example is based on the instructions given here: https://www.thomas-krenn.com/en/wiki/Two_Default_Gateways_on_One_System and has been tested on a VM running Debian Buster.
- Create a VM and select a network interface from the MWN network, in this example this will be eth0, IP assigned via DHCP is 192.168.1.151
- Attach a floating IP from the MWN_pool to this interface to get access to it.
- Attach a second interface from the internet network to the VM, eth1, IP: 192.168.128.32/17
- Login to the VM, in the following we will change the default network setup from DHCP to static
To disable cloud-init's network configuration capabilities we do:
root@debian-buster-two-fips:~# echo "network: {config: disabled}" > /etc/cloud/cloud.cfg.d/99-disable-network-config.cfg
root@debian-buster-two-fips:~# rm /etc/network/interfaces.d/50-cloud-init.cfg
Add a second routing table
root@debian-buster-two-fips:~# echo "1 rt2" >> /etc/iproute2/rt_tables
Get the current IP addresses of the two interfaces eth0 and eth1, here 192.168.1.151/17 and 192.168.128.32/17
root@debian-buster-two-fips:~# ip addr
1: lo: <LOOPBACK,UP,LOWER_UP> mtu 65536 qdisc noqueue state UNKNOWN group default qlen 1000
    link/loopback 00:00:00:00:00:00 brd 00:00:00:00:00:00
    inet 127.0.0.1/8 scope host lo
       valid_lft forever preferred_lft forever
    inet6 ::1/128 scope host
       valid_lft forever preferred_lft forever
2: eth0: <BROADCAST,MULTICAST,UP,LOWER_UP> mtu 1500 qdisc mq state UP group default qlen 1000
    link/ether fa:16:3e:1b:d0:fc brd ff:ff:ff:ff:ff:ff
    inet 192.168.1.151/17 brd 192.168.127.255 scope global dynamic eth0
       valid_lft 82754sec preferred_lft 82754sec
    inet6 fe80::f816:3eff:fe1b:d0fc/64 scope link
       valid_lft forever preferred_lft forever
3: eth1: <BROADCAST,MULTICAST,UP,LOWER_UP> mtu 1500 qdisc mq state UP group default qlen 1000
    link/ether fa:16:3e:dd:b4:00 brd ff:ff:ff:ff:ff:ff
    inet 192.168.128.32/17 brd 192.168.255.255 scope global dynamic eth1
       valid_lft 45040sec preferred_lft 45040sec
    inet6 fe80::f816:3eff:fedd:b400/64 scope link
       valid_lft forever preferred_lft forever
Edit the file /etc/network/interfaces
# This file describes the network interfaces available on your system # and how to activate them. For more information, see interfaces(5). # The loopback network interface auto lo iface lo inet loopback # First interface eth0, floating ip from MWN pool auto eth0 iface eth0 inet static address 192.168.1.151 netmask 17 gateway 192.168.0.1 dns-nameservers 10.156.33.53 129.187.5.1 # Second interface eth1, floating ip from internet pool auto eth1 iface eth1 inet static address 192.168.128.32 netmask 17 post-up ip route add 192.168.128.0/17 dev eth1 src 192.168.128.32 table rt2 post-up ip route add default via 192.168.128.1 dev eth1 table rt2 post-up ip rule add from 192.168.128.32/32 table rt2 post-up ip rule add to 192.168.128.32/32 table rt2- Reboot the VM
Attache a floating IP from the internet pool to the second interface
Ubuntu 18 and later (Netplan)
The following steps are based on https://serverspace.io/support/help/multiple-network-interfaces-ubuntu-20-04/ and the netplan reference https://netplan.io/reference/ .
- Add a file
/etc/cloud/cloud.cfg.d/99-disable-network-config.cfgcontaining'network: {config: disabled}' Add a line '
1 rt2' to/etc/iproute2/rt_tables- Get interface names and mac addresses by calling
ip addr Change
/etc/netplan/50-cloud-init.yamlfrom:network: version: 2 ethernets: ens3: dhcp4: true match: macaddress: fa:16:3e:cf:ed:dd mtu: 1500 set-name: ens3to:
network:
    version: 2
    ethernets:
        ens3:
            dhcp4: false
            addresses: [192.168.128.135/17]    # ip of first network interface
            match:
                macaddress: fa:16:3e:cf:ed:dd  # MAC address of first network interface
            mtu: 1500
            set-name: ens3
            gateway4: 192.168.128.1            # gateway of first network interface subnet
            nameservers:
                addresses: [10.156.33.53, 129.187.5.1]

        ens6:
            dhcp4: false
            addresses: [192.168.0.90/17]       # ip of second network interface
            match:
                macaddress: fa:16:3e:00:22:bc  # MAC address of second network interface
            mtu: 1500
            set-name: ens6
            routes:
                - to: 192.168.0.0/17           # subnet of second network interface
                  from: 192.168.0.90           # ip of second network interface
                  table: 1                     # table number from `/etc/iproute2/rt_tables`
                - to: default
                  via: 192.168.0.1             # gateway of second network interface subnet
                  table: 1                     # table number from `/etc/iproute2/rt_tables`
            routing-policy:
                - from: 192.168.0.90/32        # ip of second network interface
                  table: 1                     # table number from `/etc/iproute2/rt_tables`
                - to: 192.168.0.90/32          # ip of second network interface
                  table: 1                     # table number from `/etc/iproute2/rt_tables`
Run
'sudo netplan generate'Run '
sudo netplan'apply.
The last two commands will say somthing about "gateway4 being deprecated" - but as of right now with the latest netplan version for Ubuntu 22.04, it works fine.
Can I reach my VM via a domain name?
If you have the need to make your VM accessible via a domain (and not only its IP address) you can use the default domain assigned to each floating IP address you can assign to your VMs. This domain name will be derived from the particular floating IP:
| IP Address | Domain |
|---|---|
| aaa.bbb.ccc.ddd | vm-aaa-bbb-ccc-ddd.cloud.mwn.de |
Can I register a domain name and link it to one of my VMs?
No. LRZ is not a domain registrar or reseller. Furthermore, we do not operate any name servers for cloud VMs that we need to modify for name resolution issues.
Troubleshooting
Login to the LRZ Compute Cloud
I cannot log in to the LRZ Compute Cloud
- When a project's master user granted your account access to the compute cloud it might take up to 15 minutes until your account is created in the cloud system's backend. Please give us a couple of minutes to provide you with access to the system.
- Please login to the LRZ SIM portal and ensure that …
- … your password is not too old
(At the moment the LRZ SIM system still forces users to update their passwords every $tooshorttime months.) - … you have accepted the declaration of export control regulations ("Export-Kontrollerklärung")
You can find a button to check it in the ID Portal.
If you ask yourself "whut?" you can find more information on the website of the Federal Ministry of Education an Research (German only). - … your nationality is set correctly.
You cannot update this information yourself but you need to contact your project's master user to update your user record.
- … your password is not too old
- In case of a functional account (Funktionskennung)
the owner of the Funktionskennung (Kennungsverantwortlicher) has to accepted the declaration of export control regulations ("Export-Kontrollerklärung").
the nationality of the Kennungsverantwortlicher is set correctly.
Common error messages
No valid host was found. There are not enough hosts available
This error message appears when you try to create a new or unselve an exising VM but there are no hosts available suitable to run your VM. Users trying to create GPU-VMs are quite familiar with this message.
When you are logged in you can visit the LRZ Dashboard to see how many resources are available for your VMs at the moment.
Budgeting
- Attended Cloud Housing
Budgeting (and billing) will only affect users of the public part of the LRZ Compute Cloud (running VMs with lrz.* flavors).
Attended Cloud Housing customers are not affected as long as they do not use public resources. - SuperMUC-Nutzer
Projekte mit SuperMUC-Berechtigung haben kostenfreien Zugriff auf die Ressourcen der LRZ Compute Cloud.
Budgets
What happens if I do not set a project and the user budgets before 01.04.2024?
We initialized all budgets (project and user budgets) with 0.
This means that you will not receive an invoice for using the compute cloud and you do not have to pay anything. This will also mean that the system will automatically shelve all VMs belonging to your project/users on 01.04.2024 to prevent any costs.
You must explicitly agree to use the cloud and pay for your usage after 01.04.2024 by setting the budget(s) to a value greater 0.
You must set the project budget itself as well als the budget of each user that should be able to start VMs in the cloud. Users with a budget of 0 will not be able to run VMs.
What is a budget?
In the LRZ compute cloud exists 2 different types of budgets:
| Project budget | The project budget defined the maximum costs that this project can generate. This budget acts as an upper limit: The invoice a project's institution will receive will never exceed the budget set by the master user. |
|---|---|
| User budget | The user budget defines the maximum costs each user can generate in the billing period. The sum of all user budgets might be greater than the global project budget. But once the project budget is exceeded all VMs in this project will be automatically shelved independent of the individual user budgets. |
I need the budget to be extended!
Please contact your master user to update your or the project's budget. Only the master user is allowed to set the budget.
What happens if my budget is exceeded?
If costs will reach the budget set all VMs will be shelved in order to prevent additional costs from being created.
- If the project budget will be exceeded the VMs of all users in this project will be shelved. No user will be able to unshelve existing or create new VMs unless the master user raises the project's budget.
- If the user budget will be exceeded the VMs of this particular user will be shelved. The user will not be able to unshelve existing or create new VMs unless the master user raises the user's budget.
What happens to my virtual resources and data if my budget is exceeded?
Once your budget is exceeded your VMs will be shelved and you will not be able to access your data.
Please note that we reserve the right to delete your VMs and their volumes (containing your data) after 3 months if your budget is not extended in time. We need to prevent the system from being cluttered with old and inaccessible data.
The LRZ Compute Cloud storage system is not designed to store data. If you need long term storage please refer to our storage offerings.
Costs
There are costs displayed although I do not want to pay for the Compute Cloud! (January to March 2024)
The costs you see represent the costs that have been generated since beginning for 2024. The billing period for 2024 starts on 01.04.2024. We will reset these costs beginning of April. Usage of the LRZ Compute Cloud is free of costs in the first three months of 2024.
The costs you see have just informational purposes and should give you an idea the costs you will be facing if you (or your project's users) continue to use the cloud without altering the usage pattern.
How are the costs calculated?
The costs depend directly on the flavor used for a particular VM and its runtime.
The flavors define the physical resources a VM is allowed to use. The more physical resources can be used the more expensive a particular flavor is. Prices are given in Euros per year. If your VM only runs for a fraction of a year (e.g. a couple of days) only this period will generate costs.
Where can I see the prices of the flavors?
After logging in to the LRZ Compute Cloud web interface you can find the prices of all flavors on the page LRZ > Flavor Price.
The prices are displayed in Euros per year: This is the amount of money you need to pay when running a VM with the particular flavor for an entire year.
API Access
Is there an easier way to retrieve budgeting information, for example to automate things?
Yes, as an alternative to the webui you can also access the budgeting system via our custom CLI client: https://github.com/LRZ-BADW/lrzcc