


OpenStack Command Line Tools
Installing the Command Line Tools
OpenStack offers the possibility to manage your VMs via locally installed command line tools. This How-to explains the setup and utilization of the command line tools on your local (Linux) computer.
You need to install the command line tools on your local machine. On Debian linux, you need to install the openstack-clients package from the distribution's repository.
root@client:~# apt install python3-openstack-clients
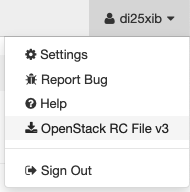
- Log in to https://cc.lrz.de with your username, click on your username on the upper right corner of the screen and download the OpenStack RC File v3 to your computer.
The RC File contains the settings you need to talk to the LRZ Compute Cloud. However, you need to provide your password to perform any actions on the cloud. Before running an openstack command, you need to source this file and enter your LRZ SIM password.
fallenbeck@client:~$ . di25xib-openrc.sh
Please enter your OpenStack Password for project di25xib as user di25xib:
That's it. Now you can use your locally installed command line tools to query information from the OpenStack cloud and manage your VMs and Images.
fallenbeck@client:~$ openstack server list
+--------------------------------------+----------------+-------------------+--------------------------------+-------+---------------+
| ID                                   | Name           | Status            | Networks                       | Image | Flavor        |
+--------------------------------------+----------------+-------------------+--------------------------------+-------+---------------+
| 5be95ee4-c3e0-4c53-b5c3-351065ec9be4 | My 3D VM       | SHELVED_OFFLOADED | MWN=192.168.0.w                |       | nvidia-v100.1 |
| 06877088-2d14-4805-814d-9a1dfe66f656 | Workstation    | SHELVED_OFFLOADED | MWN=192.168.0.z, 10.195.x.y    |       | lrz.medium    |
+--------------------------------------+----------------+-------------------+--------------------------------+-------+---------------+
A comprehensive list of possible commands as well as more detailed information of how to install and use the OpenStack command line tools can be found on the official OpenStack documentation website.
Using the command line tools
Create a VM using the command line tools
First one has to create a bootable volume from an image, in this example Ubuntu-18.04-LTS-bionic as source image , the volume will be called UbuntuVM_volume:
testuser@client:~ > openstack volume create --image Ubuntu-18.04-LTS-bionic --bootable --size 20 UbuntuVM_volume
+---------------------+------------------------------------------------------------------+
| Field               | Value                                                            |
+---------------------+------------------------------------------------------------------+
| attachments         | []                                                               |
| availability_zone   | nova                                                             |
| bootable            | false                                                            |
| consistencygroup_id | None                                                             |
| created_at          | 2019-06-13T16:06:12.000000                                       |
| description         | None                                                             |
| encrypted           | False                                                            |
| id                  | be6b28b8-c274-4e7e-8961-f067b58a9707                             |
| multiattach         | False                                                            |
| name                | UbuntuVM_volume                                                  |
| properties          |                                                                  |
| replication_status  | None                                                             |
| size                | 20                                                               |
| snapshot_id         | None                                                             |
| source_volid        | None                                                             |
| status              | creating                                                         |
| type                | ceph                                                             |
| updated_at          | None                                                             |
| user_id             | 10412e6891caa73a15a95bd02269d49f8e4bd77fec6d6ecfebc4ae8845f7bcb8 |
+---------------------+------------------------------------------------------------------+
The second step is to create the VM with name UbuntuVM and an interface attached to the MWN network:
testuser@client:~ > openstack server create --volume UbuntuVM_volume --flavor lrz.small --network MWN --key-name testuser --wait UbuntuVM
+-----------------------------+------------------------------------------------------------------+
| Field                       | Value                                                            |
+-----------------------------+------------------------------------------------------------------+
| OS-DCF:diskConfig           | MANUAL                                                           |
| OS-EXT-AZ:availability_zone | nova                                                             |
| OS-EXT-STS:power_state      | Running                                                          |
| OS-EXT-STS:task_state       | None                                                             |
| OS-EXT-STS:vm_state         | active                                                           |
| OS-SRV-USG:launched_at      | 2019-06-13T16:28:33.000000                                       |
| OS-SRV-USG:terminated_at    | None                                                             |
| accessIPv4                  |                                                                  |
| accessIPv6                  |                                                                  |
| addresses                   | MWN=192.168.0.104                                                |
| adminPass                   | AgzQ564Tcxcd                                                     |
| config_drive                |                                                                  |
| created                     | 2019-06-13T16:28:23Z                                             |
| flavor                      | lrz.small (a7f8aa12-48a9-4abe-af82-642c381e74f0)                 |
| hostId                      | 8ef51b15fdb94bdcde365c98b654e74458a3e881ca463e77af3208cf         |
| id                          | caed71dd-88a7-41dc-ace4-8d99ef773147                             |
| image                       |                                                                  |
| key_name                    | testuser                                                         |
| name                        | UbuntuVM                                                         |
| progress                    | 0                                                                |
| project_id                  | 6bc435d29df047588383bb0ddc5f87a1                                 |
| properties                  |                                                                  |
| security_groups             | name='default'                                                   |
| status                      | ACTIVE                                                           |
| updated                     | 2019-06-13T16:28:34Z                                             |
| user_id                     | 10412e6891caa73a15a95bd02269d49f8e4bd77fec6d6ecfebc4ae8845f7bcb8 |
| volumes_attached            | id='be6b28b8-c264-4e7e-8961-f067b58a9707'                        |
+-----------------------------+------------------------------------------------------------------+
Delete a VM and its volume(s) using the command line tools
Here is a one-liner. You must set SERVER to the ID of your particular server (in this example we use the server created above).
testuser@client:~ > SERVER=caed71dd-88a7-41dc-ace4-8d99ef773147; VOLUMES=$(openstack server show $SERVER -c volumes_attached -f value | cut -d "'" -f 2 | tr '\n' ' '); openstack server delete --wait $SERVER; openstack volume delete $VOLUMES